10.1. Resizing a Windows PartitionMany computers are sold with some version of Microsoft Windows preinstalled, claiming the entire disk. In order to install Fedora in a dual-boot configuration, it is necessary to reduce the size of the Windows partition to free up some space. 10.1.1. How Do I Do That?Fedora does not provide a good tool for resizing Windows partitions. Fortunately, there is a very good open source tool available, GParted.
Download the 26 MB GParted LiveCD from http://gparted.sourceforge.net/livecd.php and burn it onto a CD or DVD. Insert the disc into the system to be resized, and then start (or restart) the system; the screen shown in Figure 10-1 will appear. Figure 10-1. GParted LiveCD boot screen
Press Enter. The system will ask you to select your language, as shown in Figure 10-2, and then to select the keyboard type, as shown in Figure 10-3. Figure 10-2. Language selection screen
Figure 10-3. Keyboard selection screen
The software will then prompt you for your display resolution, as shown in Figure 10-4; select the default unless you're using an old monitor.
Figure 10-4. Display resolution selection screen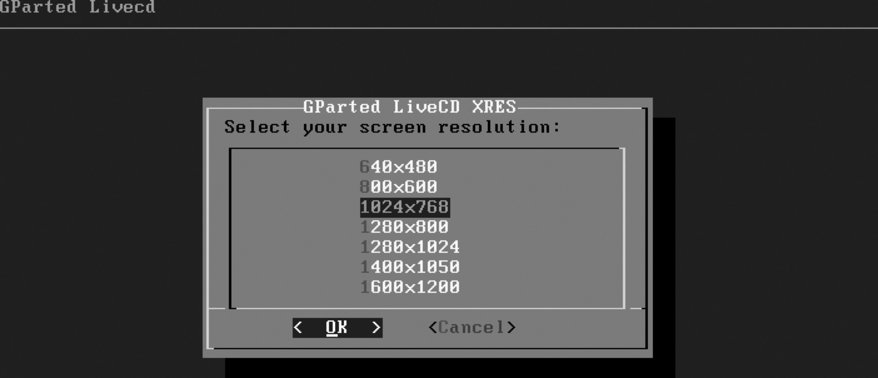
You should also select the default for the display color depth, as shown in Figure 10-5, unless you find that the default does not work with your system. Figure 10-5. Display color-depth selection screen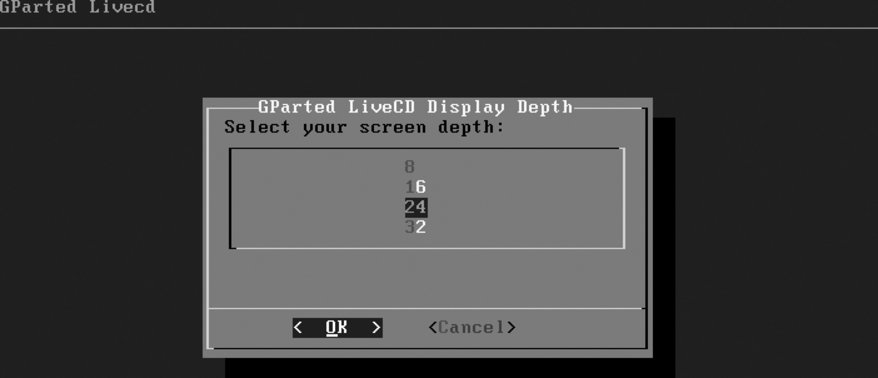
The GParted screen in Figure 10-6 will now appear, displaying a list of all of the partitions on the first hard disk drive. If you wish to edit the partitions on another drive, click on the drive menu in the upper-right corner of the screen and select that drive. Figure 10-6. GParted main window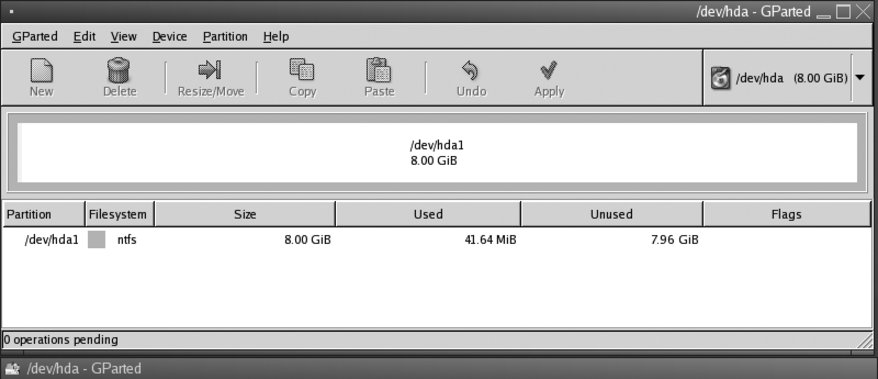
Click on the partition that you wish to resize, and then click on the Resize/Move button at the top of the window. In the resizing dialog shown in Figure 10-7, select the new size for the partition by dragging the end of the partition, by entering the new partition size, or by entering the amount of free space that you wish to have after repartitioning. Click Next. Figure 10-7. Entering a new partition size
The resize option will appear in a list of queued tasks at the bottom of the main window. Click the Apply button at the top of the window, and then click Apply on the confirmation dialog shown in Figure 10-8. Figure 10-8. Pending-operations confirmation dialog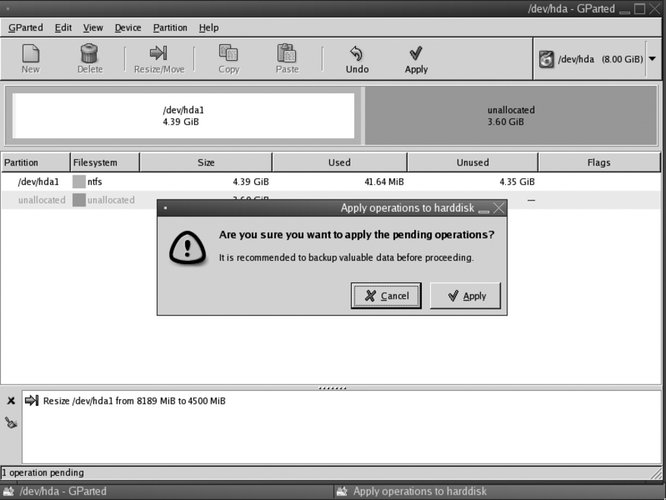
A progress display will appear while the partition is resized; click Close when the resize has finished. Close the GParted window; then right-click on the display background and select Reboot. 10.1.2. How Does It Work?The GParted LiveCD is a combination of open source software from several separate projects: the libparted partition-manipulation libraries from the GNU parted partition editor, filesystem-manipulation utilities from various filesystem projects, the GParted GNOME graphical parted interface, and a Live CD version of Slackware Linux. The GParted LiveCD boots using a process very similar to the Fedora Core installation disc. Once the kernel and initrd (ramdisk) are loaded, startup scripts request the language, keyboard, resolution, and color-depth information, and then start Xvesa, a version of the X Window server that communicates with the graphics card through lowest-common-denominator standards set by the Video Electronics Standards Association (VESA). This enables the use of almost any modern video card in a low-performance mode (perfectly acceptable for this application) without requiring card-specific drivers. The only application started is the GParted graphical interface, which communicates with other tools as necessary to perform requested tasks. Windows uses two different filesystem types: FAT32, a simple filesystem based on the original DOS 2.0 filesystem, and NTFS, an advanced filesystem with a database-like structure. Filesystem manipulation is handled by tools from the dosfstools and linux-ntfs packages. Then partition resizing is accomplished using the linux-ntfs tools or libparted libraries (depending on the partition type). 10.1.3. What About...10.1.3.1. ...one or two small partitions that appear at the end of my disk drive?Those partitions are for system diagnostic software and for returning your system to a factory-fresh state, and are especially common on notebook computers. It is best to leave those partitions alone. 10.1.4. Where Can I Learn More?
|
