10.3. Preparing Alternate Installation MediaThe Fedora Core installation process is usually booted from CD or DVD, but it may also be booted from a USB flash disk or hard disk drive, or from a PXE boot server. In addition, Fedora Core permits the use of an FTP or HTTP server as the package source during installation. These alternate installation media must be specially prepared before use. 10.3.1. How Do I Do That?Before preparing alternate boot media, check that the target system can boot from the media you wish to use. Examine the BIOS of the system on which Fedora will be installed to see if it supports booting from a USB flash drive or a PXE server; if not, select a different installation medium. 10.3.1.1. Preparing a USB driveTo configure a USB drive for booting, download the USB boot image by selecting a mirror site from the web page http://fedora.redhat.com/Download/mirrors.html and going to that mirror with a web browser. Select the directory for the desired Fedora Core version number (e.g., 6), then the directory for your machine architecture (i386, PPC, or x86_64), then select the os directory, and then select the images subdirectory. Download the file named diskboot.img (you can also find this in the /images directory of the Fedora Core DVD or the first disc of the CD set).
Once you have obtained the diskboot.img file, transfer it to your USB flash drive using a Linux system. First, insert the drive into the system; you should see an icon appear on the desktop.
Use the df command to determine the drive's device name: $ df -h
Filesystem Size Used Avail Use% Mounted on
/dev/mapper/main-root
30G 14G 15G 48% /
/dev/md0 251M 41M 197M 18% /boot
/dev/shm 506M 0 506M 0% /dev/shm
/dev/mapper/main-home
14G 6.6G 7.0G 49% /home
/dev/mapper/main-var 65G 56G 8.0G 88% /var
/dev/hdb1 99M 24M 71M 26% /mnt/oldboot
/dev/hdb3 109G 75G 29G 73% /mnt/oldroot
/dev/hda6 14G 4.1G 8.5G 33% /mnt/x-root
/dev/sdb1 8.0M 6.4M 1.7M 80% /media/usbdisk1In this case, the device name is /dev/sdb1. Unmount that device: # umount /dev/sdb1 (Notice that there is only one n in umount.) Now copy the boot image to the USB flash drive: # dd if=diskboot.img of=/dev/sdb1 16384+0 records in 16384+0 records out Flush the system disk buffers to ensure that the data is written out to the drive before you unplug it: # sync
The USB flash drive is now ready for booting. Insert the drive into the target system, turn it on, and use the BIOS options to specify that the system is to be booted from the USB drive; the rest of the process will be identical to booting from a CD or DVD. When you're done using the drive to install Fedora Core, you'll find that it looks like an 8 MB drive, regardless of its actual drive capacity. To restore its full capacity, format it with a FAT32 filesystem: # mkdosfs /dev/sdb1 mkdosfs 2.10 (22 Sep 2003) 10.3.1.2. Preparing a network installation serverYou can use any FTP, HTTP, or NIS server for network installation, but of these three, HTTP is the easiest to set up and has the least overhead. You'll need the full set of installation files. You can copy the entire contents of the DVD (or each of the five CDs) to a directory shared by your web server: # mkdir /var/www/fedora
# cp -R /media/discname /var/www/fedora
Replace /media/diskname with the disc mount point (see the output of df). Instead of copying the files, you could leave the DVD in your drive (this won't work with CDs, since you need several of them) and create a symbolic link from your web server's document root to the DVD mount point: # ln -s /media/disk /var/www/html/fedora
Alternatively, you can download the files directory to your web server directory. Go to the web page http://fedora.redhat.com/Download/mirrors.html, select an rsync, HTTP, or FTP mirror site for download, and download the entire distribution (all of the files and subdirectories in the os directory for your platform).
On an existing Fedora Core system, you can do this by first creating a directory that is web-accessible: # mkdir /var/www/fedora Then fetch all of the files into that directory: # cd /var/www/fedora # wget -nH --cut-dirs=4 -r http://less.cogeco.net/pub/fedora/linux/core/6/ Note that the URL here is taken from the mirror list, but has the Fedora Core release number (6) added to the end (replace this URL with that of a mirror close to you). The --cut-dirs= 4 option removes four leading directory names (pub/fedora/linux/core) from the retrieved files before saving them. The downloaded tree will include the ISO files. If you'd rather not download them, use the -X option when you run wget: # cd /var/www/fedora
# wget -nH -X '/*/*/*/*/*/*/iso' --cut-dirs=4 -r \ http://less.cogeco.net/pub/fedora/linux/core/6/
(The \ indicates that the command continues on the next line; you can leave it out and type everything on one line.) The downloaded directory indexes will be saved as files starting with index.html; these can be deleted using the find command: # find /var/www/fedora -name 'index.html*' -print -exec rm {} \;
The wget command can also be used with FTP sites: # cd /var/www/fedora # wget -X '/*/*/*/*/*/*/iso' -nH -X index.html --cut-dirs=4 -r \ ftp://ftp.muug.mb.ca/pub/fedora/linux/core/5/ To fetch files from an rsync mirror, use the rsync command: # cd /var/www/fedora
# rsync -v --recursive rsync://fedora.cat.pdx.edu/fedora-linux-core/4 .
Ensure that the httpd service is started (see Lab 7.5, "Using the Apache Web Server"), and then start the installation on the target system using your choice of boot media (disc, PXE boot, or USB drive). 10.3.1.3. Preparing a PXE Boot ServerTo configure a PXE boot server, you will need the tftp-server, xinetd, system-config-netboot, and dhcp packages. You will also need a working network installation server, as described in the previous section.
To configure the PXE server, select the menu option System Figure 10-17. Network boot-type selection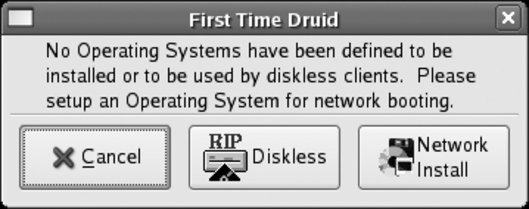
Click on the Network Install button, and the Network Installation Dialog in Figure 10-18 will appear. Figure 10-18. Network Installation Dialog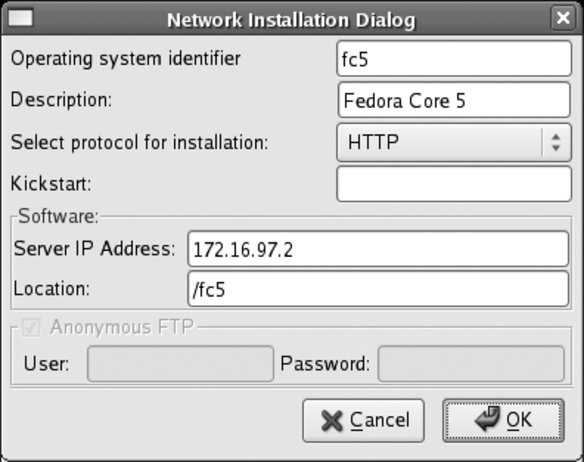
Enter fc6 as the operating system identifier, type an easily readable description of the OS to be installed, select the protocol for installation, and then enter the IP address and the server directory in which the software is installed. Leave the Kickstart field blank (even if you're using a Kickstart file). Click OK to proceed. You will now see the main window of the netboot configuration tool, shown in Figure 10-19. This window is used to associate the operating system identifier of the configuration you just created (fc6) with a particular range of IP addresses. Figure 10-19. Main netboot configuration window
Click New to add a new IP entry in the dialog shown in Figure 10-20. To configure one specific computer, enter that computer's hostname or IP address; to configure an entire subnet, enter the subnet. Figure 10-20. Entering the netboot configuration for a new IP address or subnet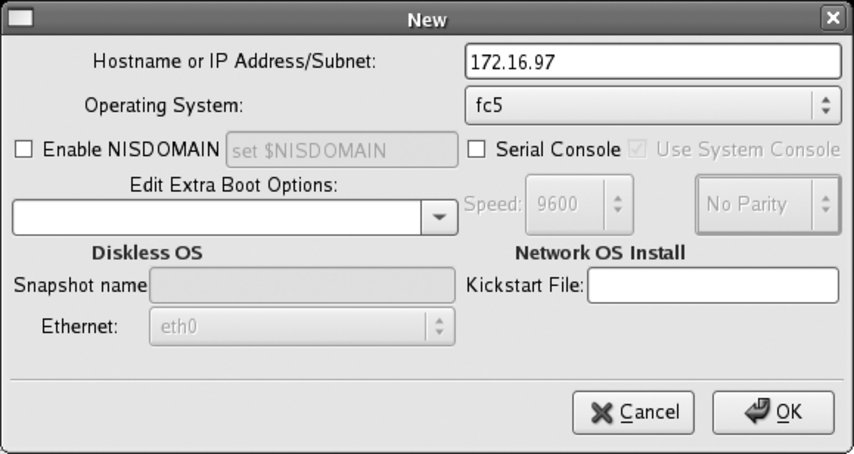
The format for entering the subnet is a bit unusual; you must enter just the network part of the address. For example, the IP address 172.16.97.32 with a netmask of 255.255.255.0 yields a network number of 172.16.97 and a host number of 32, so you would enter 172.16.97 into the IP Address Subnet field. If you have created more than one network installation profile, select the correct value for the Operating System field. Enter the Kickstart URL, if any, into the Kickstart File field, and then click OK. The main system-config-netboot window will show the new entry; you can now close the window. The next step is to configure a DHCP server using the file /etc/dhcpd.conf. In addition to the regular configuration options, you will need to add one additional statement. If you don't otherwise need DHCP, use this minimal configuration file: # /etc/dhcpd.conf file for PXE booting
ddns-update-style none;
subnet 192.168.1.0 netmask 255.255.255.0 {
range 192.168.1.16 192.168.1.250;
filename "linux-install/pxelinux.0";
}The additional statement (highlighted in bold) identifies the name of the file to be loaded via TFTP. linux-install/pxelinux.0 is the Linux bootloader; the path is relative to /tftpboot on the server.
Finally, configure the tftp Xinetd service and start the xinetd and dhcpd services (see Lab 7.2, "Configuring a DHCP Server"). To use the PXE boot server, start the target system and select Network Boot using the BIOS options. A boot display similar to that shown in Figure 10-21 should appear. Figure 10-21. PXE boot process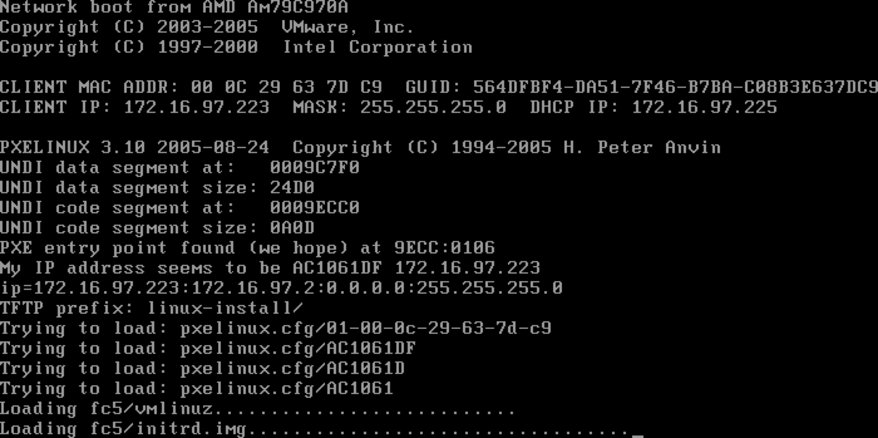
The system will then proceed with the normal Fedora Core installation process. 10.3.2. How Does It Work?All Fedora Core boot media use one of the bootloaders from the isolinux/syslinux/pxelinux family. These programs have been specifically tailored for booting from optical disk, removable disk drives, and PXE boot servers. Each of them uses text files to configure the available boot options. The USB boot image diskboot.img is a complete image of a bootable 8 MB VFAT (MS-DOS FAT with long filenames) filesystem. This filesystem contains the isolinux bootloader, the kernel, the initrd ramdisk image, and configuration files. The Intel Preboot Execution Environment (PXE) specification is used for network booting of Fedora systems. The PXE boot process uses the pxelinux bootloader, which is retrieved from /tftpboot/linux-install/pxelinux.0 on the TFTP server. Once it is running, pxelinux searches for an appropriate configuration file in /tftpboot/linux-install/pxelinux.cfg, first trying for a file named with the hardware MAC address of the target system's Ethernet adapter, then a series of filenames generated from the target's IP address written in hexadecimal, and then finally the file default. The
system-config-netboot tool is executed when you select the menu option System system-config-netboot obtains the pxelinux bootloader, Linux kernel, and initrd files from the specified network installation server (the pxelinux bootloader is found in the /images directory on the network installation server). A network installation server is not intended to provide boot files for the installation, so its only purpose is to provide the package files and other information needed to install Fedora Core after the installation environment has loaded. While FTP, NFS, and HTTP are all available, NFS and FTP use multiple ports (NFS actually relies on multiple server programs), whereas HTTP uses a single server on a single port. 10.3.3. What About...10.3.3.1. ...installing from a public HTTP or FTP server?It is possible to install directly from a public Fedora Core HTTP or FTP mirror; simply enter the mirror URL as the server for the HTTP or FTP installation methods. However, doing so generates a lot of Internet traffic, resulting in a long installation time, and the likelihood of a network error aborting the entire installation partway through is higher than it would be on a local LAN. If you are going to install more than once, it's a better idea to download the files onto a local machine for speed. 10.3.3.2. ...booting the installer from a mini-CD?The normal Fedora Core CD 1 is too large to fit on a mini-CD, but the boot image in /images/boot.iso on that CD (or the Fedora Core mirror servers) is under 8 MB in size and will easily fit on an 8 cm mini-CD or a "business card" CD. 10.3.3.3. ...booting the installer from floppy disk?Unfortunately, the Fedora Core installation boot files are now too large to fit on a 1.44 MB floppy disk. However, you may be able to use the 8 MB USB disk image file (diskboot.img) with a larger removable disk, such as a Zip or LS-120 disk. 10.3.3.4. ...configuring a PXE installation from the command line?Although system-config-netboot is recommended for PXE configuration, you can also use the pxeos and pxeboot commands to configure PXE from the command line. To configure a version of Fedora Core for PXE booting: # pxeos -a -i "Fedora Core 6" -p HTTP -D 0 -s 192.168.1.2 -L /fedora fc6 These are the arguments used:
To configure specific hosts to use the fc6 boot image: # pxeboot -a -O fc6 192.168.1 This will configure all hosts that have an IP address beginning with 192.168.1 to use the fc6 configuration. To configure the use of a Kickstart file (see the next lab), add the option -K followed by the Kickstart URL. 10.3.4. Where Can I Learn More?
|

 Administration