3.1. Power ManagementWhen you're on the go, you have to carry your power with you. Notebook power management therefore receives a lot more attention than desktop power management, even though attention to these issues on the desktop can result in significant savings in electrical costs, system wear, and heat production. For many years, power-management interfaces have been proprietary and required custom software supplied by the hardware vendor in order to function well (even when they purportedly adhered to industry standards). The situation is slowly improving, and Fedora contains good tools for power management on well-behaved systems. 3.1.1. How Do I Do That?Fedora uses the Advanced Configuation and Power Interface (ACPI) specification to monitor and manage the current power configuration. This approach requires support from the motherboard and CPU as well as the operating system; fortunately, most systems built in the last decade have some level of ACPI support, though many BIOS implementations are nonstandard. 3.1.1.1. Using gnome-power-manager to conserve power
Fedora's main power-management tool is gnome-power-manager. You can access the gnome-power-manager
configuration window using the menu option System
The same program controls the power-management icon in the panel bar, which may or may not appear depending on the system configuration (it will usually appear by default on a system that has a battery, including most notebooks, but will not appear by default on a system with no battery). The symbol used for the icon will change according to the power supply: it will show a battery when discharging the battery, a battery plus a power cord when charging the battery, or just a power cord on a system with no battery. You can access the gnome-power-manager configuration window by right-clicking on the icon and selecting Preferences. Regardless of how you access the configuration window, you will see the display shown in Figure 3-1. Figure 3-1. Power Manager Preferences window
This window contains three tabs: one that configures power management when the system is running on AC or charging the battery, one that configures power management when the system is running on (and discharging) the battery, and one for general power-management settings. The controls on first two tabs are almost identical:
The third tab in this window controls general power-management options, as shown in Figure 3-2. Figure 3-2. General tab on Power Management Preferences window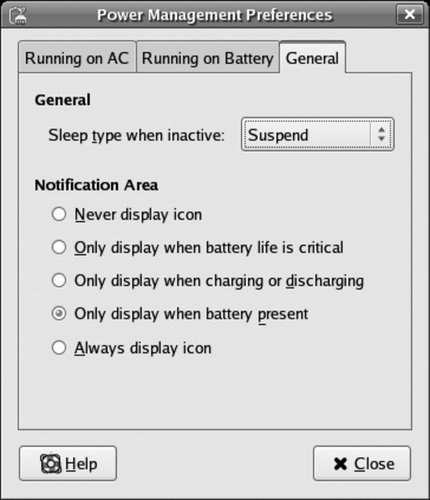
The options in this window control how the system is put to sleep when the inactivity period set in the other tabs is reached (do nothing, suspend, or hibernate). It also configures the times that the the power-management icon is displayed in the Notification Area; the default is to display it only when the battery is present, so if you want to easily access the power-management controls on an AC-only system, set this to "Always display icon." It's important to understand the difference between the suspend and hibernate options: in both cases, the system is effectively off, but in suspend mode the memory is still operating (and consuming power), while in hibernate mode the memory is transferred to swapspace. This means that suspend state will eventually run your battery down, and then the information in RAM will be lostbut until that time, the system will be able to quickly resume its operation. On the other hand, your system can be in hibernate state forever without any power and still resume successfully, but it will take a little longer to do so. In order to hibernate or suspend successfully, the drivers for all of the devices attached to the system must be able to save and restore the device state. There's no simple way to predict if this will be the case, so it's best to try suspend and resume operations when you have nothing critical happening on the system. For hibernation, it's also necessary to have a swap partition instead of (or in addition to) swapspace on a logical volume. To manually provoke a suspend or hibernate operation, right-click on the power-management icon in the status bar and use the menu options that appear. To resume from a suspend, use the wake-up key defined for your system (you may have to consult the system documentation or experiment to find this). To resume from hibernation, turn your system power on with the power button, then let it start a normal boot cycle. The kernel will recognize the hibernation state and attempt to resume; if this fails, a normal boot will take place (but you may lose changes to any files that were opened when you hibernated your computer, so it's a good idea to save changes before you hibernate).
3.1.1.2. Viewing power informationIf your system has a battery, gnome-power-manager provides a number of interesting graphs showing your power state. To view them, right-click on the power management icon on the panel, then select Information. The window shown in Figure 3-3 will be presented. Figure 3-3. Power Information window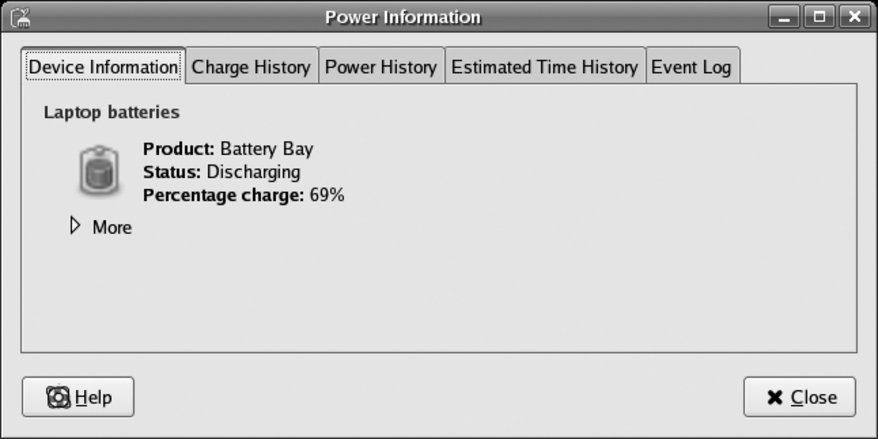
The tabs across the top provide access to the available information and graphs:
Figure 3-4. Power History graph
On an AC-only system, the graphs will all be flat lines, but power events will still be displayed. 3.1.1.3. Changing the CPU speedIf CMOS semiconductors were perfect, they would consume power only when they changed state. They're not perfect, so they leak energy and consume power when idle, but that's a tiny fraction of the power they consume when changing state. The system clock is a pulse generator that controls the speed at which the CPU changes state, and therefore controls the amount of energy used by the CPU and related system components. Therefore, there is a trade-off between performance and power consumption. Fedora can balance power usage against performance automatically according to system workload. This feature is provided by the cpuspeed service and is enabled by default. The default parameters used by this service work well in most cases, but can be adjusted by editing the file /etc/cpuspeed.conf, which looks like this: VMAJOR=1 VMINOR=1 # uncomment this and set to the name of your CPUFreq module #DRIVER="powernow-k7" # Let background (nice) processes speed up the cpu OPTS="$OPTS -n" # Add your favorite options here #OPTS="$OPTS -s 0 -i 10 -r" # uncomment and modify this to check the state of the AC adapter #OPTS="$OPTS -a /proc/acpi/ac_adapter/*/state" # uncomment and modify this to check the system temperature #OPTS="$OPTS -t /proc/acpi/thermal_zone/*/temperature 75"
Uncomment the OPTS lines that contain additional options you wish to use. The pre-configured lines have these meanings:
To see a list of all available options, run this command: $ /usr/sbin/cpuspeed --help 2>&1|less
After editing /etc/cpuspeed, restart the cpuspeed service: # service cpuspeed restart Stopping cpuspeed: [ OK ] Starting cpuspeed: [ OK ] You can monitor the CPU speed by installing a monitor on your panel. Right-click on your GNOME panel, then select "Add to Panel." Choose the CPU Frequency Scaling Monitor and click Add. The icon shown in Figure 3-5 will appear; the bar graph will rise and fall as the CPU clock speed is adjusted, and hovering your mouse cursor over the display will show the current frequency setting (the box that appears below the icon in Figure 3-5). Figure 3-5. CPU Frequency Scaling Monitor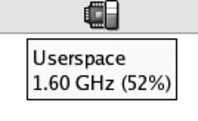
3.1.1.4. Managing power from the command lineIf you are using your system through a text-mode console, you can still access the important power-management tools. To suspend the system, execute the pm-suspend script: $ pm-suspend
To hibernate, use the pm-hibernate script: $ pm-hibernate
To view the battery status, access ACPI through the /proc filesystem: $ cat /proc/acpi/battery/*/state present: yes capacity state: ok charging state: charging present rate: 3079 mA remaining capacity: 2912 mAh present voltage: 16273 mV Battery details are also available from ACPI: $ cat /proc/acpi/battery/*/info present: yes design capacity: 6450 mAh last full capacity: 5154 mAh battery technology: rechargeable design voltage: 14800 mV design capacity warning: 515 mAh design capacity low: 156 mAh capacity granularity 1: 5 mAh capacity granularity 2: 5 mAh model number: DELL 0017F serial number: 14639 battery type: LION OEM info: Sony By dividing the last full capacity by the design capacity, you can determine the condition of the battery. In this case, the battery can presently store 5154/6450 mAh, or about 80 percent of its design capacity, indicating that it's in reasonably good condition. 3.1.1.5. Other ways to extend battery lifeTo further reduce power consumption:
3.1.2. How Does It Work?The ACPI specification enables a system's BIOS to supply data and program code to the operating system. The code is written in a unique, processor-independent pseudo-machine language called ACPI Machine Langauge (AML). The Linux kernel interpretively executes the AML code to access certain features of the host hardware system. You can think of the AML code as a type of device driver that is downloaded from the BIOS to the operating system. The Linux kernel uses the ACPI data and code to collect data that is then exposed through the /proc/acpi directory. Information received through the /proc/acpi directorysuch as instructions to change the CPU frequencyis passed to the ACPI code. Applications such as cpuspeed and gnome-power-manager monitor the ACPI information and combine it with other information (such as current process load) and then make power management decisions. These decisions cause actions to be taken by various subsystems such as the ACPI, the X Window server, storage, and loadable modules.
3.1.3. What About...3.1.3.1. ...stopping the hard drive motors when the drives are not in use?The hdparm program can be used to stop a drive immediately or to configure it to stop if it is idle for a certain length of time; this is called a spin-down (and restarting the drive is called a spin-up). This does save some power; however, the drive is rarely idle for very long and the length of time (and amount of energy) required to spin-up the drive is significant (and hard on some hardware), so opinion is divided on whether it makes sense to use this feature. In the case of a two-drive system where the second drive is rarely used, an idle spin-down timeout is a good idea. Configure it with the hdparm command: # hdparm -S 6 /dev/[hs]d[a-z]
The -S option configures the amount of time that the drive must be idle before spin-down is triggered. The scheme used to encode the timeout period is a bit convoluted (it is described in detail on the manpage for hdparm), but 0 means that spin-down is disabled, and a value from 1 to 240 sets the idle timeout in multiples of 5 seconds (5 seconds to 20 minutes). The value of 6 used here indicates a 30-second idle timeout. 3.1.3.2. ...turning the computer on and off (or hibernating and resuming) at certain times automatically?Some important operations are best performed when a system is not in normal use, such as backup, software updating, and data indexing. It's not necessary to keep a system running 24x7 in order to schedule nighttime tasks. Most modern system BIOSes contain an alarm wake feature, which causes the system to turn on at a preset time. This feature can be used with the hibernate state or a full system shutdown to automate nocturnal activities.
Some BIOS versions permit the wake time to be set through ACPI. To see if this is possible on your system, enable the alarm wake feature using your BIOS configuration utility, then boot Fedora and examine the /proc/acpi/alarm file: $ cat /proc/acpi/alarm 2007-03-17 00:00:00 Attempt to set this to a time in the future (the date portion of the time may be ignored by your system). If your system clock is maintained in UTC, be sure to also specify this time in UTC: # echo "2007-03-17 16:45:00" >/proc/acpi/alarm $ cat /proc/acpi/alarm 2007-03-17 16:45:00 Shut down your system and see if it turns on at the specified time. Regardless of whether you can set the alarm time using Linux, you can use the wake-up feature in conjunction with cron to configure automatic boot and shutdown. Configure your system to turn on at a specified time using either the BIOS or Linux ACPI methods. Create a nocturnal script that performs the work you wish to do at boot time: #!/bin/bash
#
# /usr/local/bin/nocturnal :: script for nighttime processing
# Place whatever commands you wish to execute at night here
/usr/local/bin/backup-scp
yum -y update
# Shut the system back off - you can use pm-hibernate here
# if it works on your system
shutdown -h nowReplace the last line with pm-hibernate if hibernation works on your system and you wish to reduce the startup time in the morning. Edit your crontab: # crontab -e
Add a line to execute the nocturnal script a few minutes after your preset wake-up time: # Perform nighttime processing after the 4:30 wake-up
35 4 * * * /usr/local/bin/nocturnal
If you shut down the system at the end of your working day, it will wake up at night, perform the processing you have configured, and then shut down. If your system supports changing the alarm time through ACPI, you can schedule multiple wake-up times: have your system start up in the middle of the night and perform the operations described above, and then have it schedule the next wake-up time before shutting down: #!/bin/bash
#
# /usr/local/bin/nocturnal :: script for nighttime processing
# Please whatever commands you wish to execute at night here
/usr/local/bin/backup-scp
yum -y update
# Schedule another wake-up
date "+%Y-%m-%d
07:50:00 " >/proc/acpi/alarm
# Shut the system back off; you can use pm-hibernate here
# if it works on your system
shutdown -h nowThis sets the next wake-up for 7:50 a.m. the same day, just in time to start work at 8 a.m. If your nocturnal processing takes place before midnight, schedule the wake-up for the following day: # Schedule another wake-up date +"%Y-%m-%d 07:50:00" -d tomorrow >/proc/acpi/alarm 3.1.4. Where Can I Learn More?
|
 Preferences