4.3 Adding an Email Link
Whenever you want to invite your visitors to email you, an email link is the perfect
solution. When someone clicks an email link, her email program launches automatically,
and a new message opens with your email address already in the To field. She
can then just type her message and send it off.
An email link looks like this: mailto:nessie@nationalexasperater.com. The first part, mailto:, indicates the type of link, while the second part (nessie@nationalexasperater.com) specifies the email address.
NOTE
Email links work only if the person who clicks the link has an email account and an email program that
understands the mailto: link. If someone visits your site from a computer at the public library, for example,
he might not be able to send email. If this drawback troubles you, remember that you can also collect
information using a form (as discussed in Chapter 11), a feedback method that has neither the limitations nor the easy setup of an email link.
You can create an email link much the way you'd create any other Dreamweaver link:
by selecting some text or an image and typing the mailto address, as shown above,
into the Link field in the Property inspector. To simplify this process, Dreamweaver
has a quick method of inserting an email link:
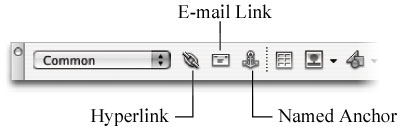
On the Common tab of the Insert bar, click the Email Link icon, which looks like
an envelope (see Figure 4-6).
Alternatively, choose Insert Email link. In either case, if you've already typed
the text (Email me!) on your Web page, select it first. The Email Link dialog box
opens (see Figure 4-7). Email link. In either case, if you've already typed
the text (Email me!) on your Web page, select it first. The Email Link dialog box
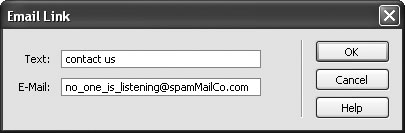
opens (see Figure 4-7). In the Text field, type the text that you'll want to appear on the Web page.
You've just indicated the link's purpose, like Email the Webmaster. (If you selected
text in the document first, it automatically appears in the Text field.)
|
Why do my links start with file:///?
Links that begin with file:/// (for example: file:///D:/missing
manual/book_site/national_ex/subscribe.html) aren't valid
links on the Web. Rather, they are temporary addresses that
Dreamweaver creates as placeholders for links to be rewritten
later. (A file:/// path tells Dreamweaver where to look
on your computer for the file.) You'll spot these addresses
when you add document-relative links to a page that hasn't
been saved, or when working with files that are outside of
your site's local root folder.
Suppose you're working on a Web page that will contain
your company's legal mumbo-jumbo, but you haven't yet
saved it. After adding a document-relative link that links to
your home page, you notice that the path displayed in the
Property inspector's Link field begins with file:///. Since your
legal page hasn't yet been saved and therefore doesn't yet
have a folder location, Dreamweaver can't create a link telling
a browser how to get from it to the home page.
So Dreamweaver creates a temporary link, which helps it keep track of what page to link to. Once you save the
page somewhere in the site, Dreamweaver rewrites the
link into a proper document-relative format and the file:///
disappears.
Likewise, when you work with files that are outside of the
local root folder, Dreamweaver can't write a proper link.
(Any folder outside of the local root folder isn't part of the
Web site; and there's no way to write a correct link from
nowhere to somewhere.) So, if you save a page outside
of the local root folder, Dreamweaver writes all document-
relative links on that page as file paths beginning with file:///.
To avoid this invalid-link problem, always save your Web
pages inside of the local root folder or a folder inside of the
local root folder. To learn more about root folders and Web
sites, see Chapter 14.
When you link to a page梠r add an image (Chapter 5)梩hat's
stored outside of the local root folder, Dreamweaver has the
same problem. However, in this instance, Dreamweaver
gives you the option of copying the out-of-bounds file to a
location of your choosing within the root folder.
|
Type an email address into the E-Mail field.
This is the address that appears in your visitors' email program when they click the
link. (You don't have to type mailto:桪reamweaver adds it automatically.) Click OK.
Dreamweaver adds the text to the page, complete with a mailto link.
|
The Favorites tab on the Insert bar is a marvelous new
addition to Dreamweaver MX 2004. It lets you collect all
of your most-used objects into a single place, without any
interference from HTML tags and objects you never use.
Maybe you use the Email Link object on the Insert bar all of
the time, but never touch the Named Anchor object.
To add objects to
the Favorites tab,
right-click (Control-
Click) anywhere
on the Insert bar.
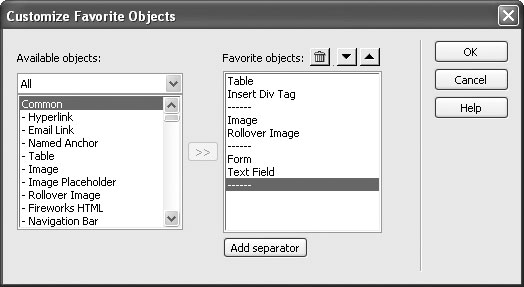
From the shortcut
menu, choose Customize
Favorites to
open the Customize
Favorite Objects
window. All of the
objects available in
all of the Insert bar
categories appear in the left-hand list. Select an object and
click the >> button to add it to your Favorites. (You can
view the objects for just one category by selecting it from
the Available Objects menu.) Repeat with other objects, if
you like.
To rearrange toolbar buttons, click one and then click the up or down arrow to move it left or right on the toolbar. (Buttons
at the top of the list appear on the left side of the Insert bar.)
You can even use the Add Separator button to insert a thin
gray line between buttons on the Insert bar梩o separate one
group of similar objects (graphic-related objects, say) from
another (such as form objects), for example. Unfortunately,
you can't group favorite
objects into
submenus. Each
item you add is a
single button on the
Insert bar.
To delete a button or separator from the list, select it and click the little Trash icon. Click OK to close the window and create your new list of Favorite objects, which are now available under the Favorites tab of the Insert bar.
After you've created your Favorites tab, you can always add more objects (or delete ones you no longer need) by right-clicking (Control-clicking) the Insert bar and choosing Customize Favorites from the shortcut menu.
|
|