5.4 Image Maps
As Chapter 4 makes clear, it's easy to turn a graphic into a clickable link. It's also possible
to add multiple links to a single image.
Suppose your company has offices all over the country, for instance, and you want to
provide an easy way for your visitors to locate the nearest state office. One approach
would be simply to list all of the state names and link them to separate pages for each state. But that's boring! Instead, you could use a map of the United States梠ne
image梐nd turn each state's outline into a hotspot that's linked to an appropriate
page, listing all of the offices in that state.
The array of invisible link buttons (called hotspots) responsible for this magic is
called an image map. An image map image map contains one or more hotspots, each leading
somewhere else.
Here's how to create an image map:
Select the graphic you wish to make into an image map.
The Property inspector displays that image's properties and, in the lower-left corner,
the image map tools, shown at bottom in Figure 5-13. (These appear in the
lower half of the Property inspector, which appears only if the Property inspector
is fully expanded [Section 1.2.3]).
In the Map field of the Property inspector, type a name for the map.
The name should only contain letters and numbers, and can't begin with a number.
If you don't give the map a name, Dreamweaver automatically assigns the map the
ingenious name Map. If you create additional image maps, Dreamweaver will call
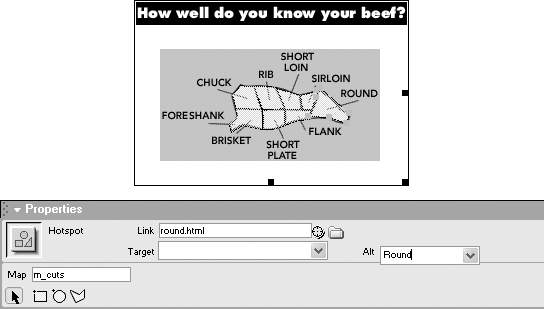
them Map2, Map3, and so on. Select one of the image map tools.
Choose the rectangle tool, the circle tool, or the polygon tool depending on the
shape you have in mind for your hotspot. For instance, in the image in Figure 5-13,
the polygon tool was used to draw each of the oddly shaped hotspots. Draw the hotspot.
To use the rectangle and circle tool, click directly on your picture; drag diagonally
to form a rectangle or circle. To make a perfect square, press Shift while dragging
with the rectangle tool. (The circle tool always creates a perfect circle.) To draw an irregularly shaped hotspot using the polygon tool, click once to define
one corner of the hotspot. Continue clicking until you've defined each corner of
the hotspot. Dreamweaver automatically joins the corners to close the shape. Dreamweaver fills in the inside of the hotspot with a light blue tint to make it easy
to see. (Your Web visitors won't see the blue highlighting.) If you need to adjust the hotspot you've just drawn, click the arrow tool on the
Property inspector. You can drag the light blue square handles of your hotspot to
reshape or resize the area, or drag inside the hotspot to move the whole thing. If
you change your mind about the hotspot, press Delete to get rid of it altogether. Add a link to the hotspot.
After you draw a hotspot, that same hotspot is selected; its properties appear in
the Property inspector (see Figure 5-13). Use any of the techniques discussed in
Section 4.2 to link this hotspot to another Web page or anchor. If necessary, set the Target property.
Most of the options in the Target pop-up menu are useful only when you're working
with frames, as discussed in Chapter 9. The _blank option, however, can be useful
any time: It forces your visitor's Web browser to load the linked page into a new
browser window. The original page remains open, underneath the new window. Set the Alt property of the hotspot.
By typing a label into the Alt box in the Property inspector, you provide a written
name for this portion of the graphic. As noted in Section 5.2.2, Alt tags are extremely
important to people who surf the Web with graphics turned off, or who use textto-
speech reading software. Repeat steps 2-7 for each hotspot you wish to add to an image.
As you work, you can see the light-blue hotspots filling in your image map.
5.4.1 Editing a hotspot's properties
As noted in step 4 above, you can change a hotspot's shape by dragging its tiny square
handles. But you can also change its other properties梬hich Web page it links to,
for example.
To do so, click to select the image map. Using the black arrow tool梩he hotspot
selection tool梠n the Property inspector (see Figure 5-13), click the hotspot you
wish to edit. Then use the Property inspector controls to edit the Link, Target, and
Alt properties.
If you're having a fit of frustration, you can also press Delete or Backspace to delete
the hotspot altogether.
|