Previous Section  < Day Day Up >  Next Section

7.4 Selecting Parts of a Table in Standard View

Tables and their cells have independent properties. For example, a table and a cell can have different background colors. But before you can change any of these properties, you must first select the tables, rows, columns, or cells you want to affect.

7.4.1 Selecting a Table

There are a number of ways to select a table in the document window:

  • Click the upper-left corner of the table, or anywhere on the bottom edge of the table. (Be careful using the latter technique, however. It's easy to accidentally drag the border, resetting the height of the table in the process.)

  • Click anywhere inside the table, and then select the <table> tag in the document window's status bar (see Section 1.2.2 to learn about the tag selector).

  • Click anywhere inside the table, and then choose ModifyTableSelect Table.

  • Right-click (Control-click) inside a table, and then choose TableSelect Table from the contextual menu.

  • If the insertion point is in any cell inside the table, pressing Ctrl+A twice selects the table.

Once selected, a table appears with a thick black border and three tiny, square resize handles梐t the right edge, bottom edge, and lower-right corner.

7.4.2 Selecting Rows or Columns

You can also select an entire row or column of cells by doing one of the following:

  • Move the cursor to the left edge of a row, or the top edge of a column. When it changes to a right- or down-pointing arrow, click (see Figure 7-13).

  • Click a cell at either end of a row, or the first or last cell of a column, and then drag across the cells in the row or column to select them.

When you're working with tables, the cursor can take on many different roles. The Table selection cursor lets you select the entire table (in Windows, this looks like a compass). When the cursor turns into an arrow (pointing either down or to the right), you can click to select a column or row of cells. The insertion-point cursor lets you click to insert content into a cell. When you pass the cursor over a resize handle, it becomes a resize icon, which you can drag to resize rows, columns, or the entire table.
figs/07_13cursors.jpg
  • Click any cell in the row you wish to select, and then click the <tr> tag in the tag selector. (The <tr> tag is how HTML indicates a table row梩his method doesn't work for columns.)

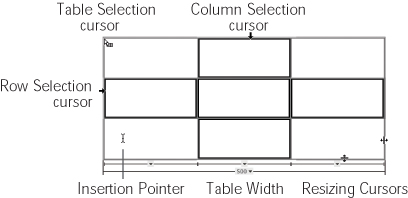
When a cell is selected, it has a dark border around it. When multiple cells are selected, each cell has a dark border (see Figure 7-13).

7.4.3 Selecting Cells

To select one or more cells:

  • Drag over adjoining cells. A solid black border appears around a cell when it's selected.

  • To select several cells that aren't necessarily adjacent, Ctrl-click (figs/command.jpg-click) them one at a time. (You can also Ctrl-click (figs/command.jpg-click) an already selected cell to deselect it.)

  • Click a cell, then Shift-click another cell. Your two clicks form diagonally opposite corners of an imaginary rectangle; Dreamweaver highlights all cells within it.

  • Use the tag selector (Section 1.2.2) to select a cell. Click inside the cell you wish to select, and then click the <td> tag in the tag selector. (The <td> tag stands for Table Data, which is how the HTML language refers to a cell.)

  • If the insertion point is inside the cell you wish to select, press Ctrl+A.

    Previous Section  < Day Day Up >  Next Section