5.2. Measuring ImprovementsMeasuring the time it takes to complete a task is one of the most useful metrics when looking at the success of an AJAX implementation. The actual measurement process is broken down into three simple steps:
Deciding which tasks to measure is generally a simple process; you need only find the areas in the application about which users always complain. If a process is slow and clunky, it's a good target for AJAX and therefore a good target for measurement. After choosing the task you need to measure, identify its starting and ending points. It's important that you measure the entire process. You don't want to focus on page loads or the technical pieces, but actual steps taken by the user. If the process is complex, you may find it useful to watch users in action to see how things are actually done. Once you've identified the start and end points, you need to add instrumentation. In most cases, you can do this by making some simple AJAX requests to a recording script. One call marks the beginning of the process, and a second records the ending. In our example case, we'll be recording the time it takes to select a user to edit, as shown in Figure 5-5. This example is extremely artificial, but useful, because the goal is to show how to instrument a process, not how to build an AJAX user editor. Figure 5-5. Selecting a user
The breakdown of this task is as follows: Load the page, search for a user, and then select the user from the results. The start of this task could be considered the loading of the page or the clicking of the Search for User button. In our example, we use the clicking of the Search for User button because it will help reduce the amount of variance in our measurement. The end of the process occurs when the selectUser JavaScript function runs; in an actual implementation, this would either redirect us to a user editor or populate an editing form below the selection section. A unique ID will also need to be created so that the start and end times can be matched together, but as long as the client is making only one request at a time, this ID can be created and stored in our data-storing script. To implement the instrumentation, we will be using our basic HttpClient XMLHttpRequest wrapper. We will be making an AJAX call to process.php at the beginning and the end of the process. process.php will store this data in the session, and then process.php's endProcess function will match it with a second end request that happens when the process is complete. A simple report (see Figure 5-6) can then be run to see how long each attempt to select a user took. The data storage is basic in this implementation and would need to be replaced with a database if you wanted to collect data from multiple machines. The reusable parts of the measurement process are the process.php storage script shown in Listing 5-1 and the Monitor JavaScript class shown in Listing 5-2. Listing 5-1. process.php
Listing 5-1 uses a PHP session to store its data, so the script starts out by setting this up. We start the session on line 2 and then set some default values on lines 49. Lines 1241 define three functions, one for each of the actions the script can take. The startProcess function (lines 1220) first checks if we have a current ID stored in the session; this check allows us to ignore multiple start requests for the same process. If there isn't a stored ID, startProcess stores the current time, creates a new random ID, and then puts this data, along with the process name, into the session. The endProcess function (lines 2226) stores the current time as the end time and then clears out the ID to allow another process to start. These two functions provide the basic data-gathering capabilities of the script. The third function, printStats (lines 2841), creates a table that provides basic reporting. It loops over the data stored in the session and creates an HTML table. While doing this, it uses the start and end times to calculate how long each process took. The output from this function is shown in Figure 5-6. Lines 4353 control which of the functions is called. The function to call is selected by the GET variable action. On the HTML side, JavaScript monitoring code makes AJAX requests to process.php to store the usage data. Figure 5-6. A simple report of how long attempts to select a user took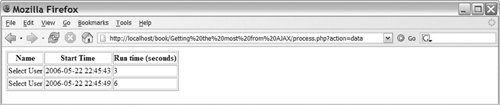
Listing 5-2. Monitor.js
The monitor class is quite simple; it sets up an instance of HttpClient for asynchronous operation in its constructor (lines 37) and then defines two functions. The first startProcess sends a request to process.php, which triggers its startProcess function. The second function, endProcess (lines 1316), sends a similar request to process.php, but this time, the AJAX request triggers the matching endProcess PHP function. The main purpose of this class is to make it easier to instrument application pages, so it takes care of the boilerplate code for you. It is also a good place to add other methods if you find yourself needing to collect other data, such as which actions a user performs. Now that we have a basic instrumentation framework set up to collect process times, we need to add it to a script. The process-time data can be useful in AJAX-driven pages to collect data that is generated by changes you are making. It is also useful in non-AJAX pages to help measure slow processes and to find ones that should be updated. Data collection like this can also be useful in making decisions on what data to prefetch, but normally, more data than simple timings is necessary because you need to identify which actions the user is most likely to perform. Listing 5-3 shows a simple user-selection script that uses the Monitor JavaScript class from Listing 5-2 to record how long each selection takes. Listing 5-3. selectUser.class.php
The actual searching takes place in a related class, selectUser. This class does all its searching against an array to keep the example as simple as possible, but in most cases, this process would be database-driven. The class has a single method search (lines 1524), which takes an input. The method then case-insensitively checks this input to see if it exists in the array of any of the users stored in the class. Last, the method builds an array from the matching results and then returns this array. The HTML user interface is built in Listing 5-4, which uses the selectUser class to handle POST requests to the page. Listing 5-4. selectUser.php
The script starts with some basic setup; then, line 6 includes the XMLHttpRequest wrapper, and line 7 includes the JavaScript Monitor class. Line 9 creates an instance of the Monitor class so that we can easily call startProcess and endProcess throughout the page. Lines 1013 define the JavaScript function that is called at the end of the user-selection process; this function just outputs a selected message and then runs endProcess. Lines 2025 provide the basic HTML UI of the page; this is a form that POSTs its results to the current page. The search input box runs a start process when you click it to start entering your search term. Lines 2740 perform the search after the form is POSTed to the page. An instance of the selectUser class does the actual searching. The results from this search are then looped over, creating a radio button for each result. An onclick action is added to each radio button, which calls the selectUser function defined in lines 1013. The basic workflow of this page is shown in Figure 5-7.
Figure 5-7. Workflow measuring how long it takes to select a user
Data collection is an important first step to making good decisions about how and when to implement AJAX. If the user-selection process is already fast, it doesn't make sense to spend time adding AJAX to it; instead, you'll want to find a different process to upgrade. If the process is slow, you can build an AJAX version that adds instrumentation to it and then obtain real numbers on how effective the process is. Ultimately, you may find that an AJAX version of the form won't give you the increased speed that you need, because searching by name doesn't scale to the number of users in your system; instead, your best results might be accomplished by limiting the search results using other criteria, such as department or job title. |
