Select-and-Go Navigation
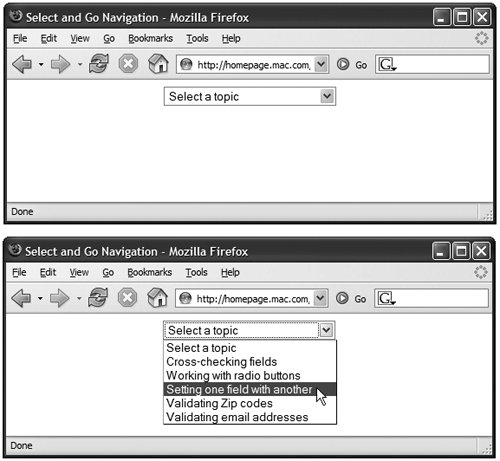
You've probably seen lots of examples of the standard navigation menu on the Web; you pick a choice from a menu and click a Go button, which takes you to your destination. For example, many online stores use such menus to move you to different departments. But with a bit of JavaScript, you can launch users on their way with just the menu choice, eliminating the Go button (Figure 7.1). This makes your site feel snappier and more responsive, which is always a good idea. We call these JavaScript-enhanced menus select-and-go menus, and they're easy to create. The HTML is in Script 7.1, and the JavaScript is shown in Script 7.2. You'll never want to use a Go button again!
Script 7.1. The HTML for a select-and-go menu is fairly simple.
<!DOCTYPE html PUBLIC "-//W3C//DTD XHTML 1.0 Transitional//EN">
<html xmlns="http://www.w3.org/1999/xhtml">
<head>
     <title>Select and Go Navigation</title>
     <script language="Javascript" type="text/javascript" src="script01.js">
     </script>
</head>
<body bgcolor="#FFFFFF">
<div align="center">
     <form action="gotoLocation.cgi">
        <select id="newLocation">
            <option selected="selected">Select a topic</option>
            <option value="script06.html">Cross-checking fields</option>
            <option value="script07.html">Working with radio buttons</option>
            <option value="script08.html">Setting one field with another</option>
            <option value="script09.html">Validating Zip codes</option>
            <option value="script10.html">Validating email addresses</option>
        </select>
        <noscript>
            <input type="submit" value="Go There!" />
        </noscript>
     </form>
</div>
</body>
</html>
|
Script 7.2. You can use JavaScript and forms for active site navigation.
window.onload = initForm;
window.onunload = function() {};

function initForm() {
     document.getElementById("newLocation"). selectedIndex = 0;
     document.getElementById("newLocation"). onchange = jumpPage;
}

function jumpPage() {
     var newLoc = document.getElementById ("newLocation");
     var newPage = newLoc.options [newLoc.selectedIndex].value;

     if (newPage != "") {
        window.location = newPage;
     }
}
|
To create a select-and-go menu:
1. |
window.onload = initForm;
window.onunload = function() {};
When the window loads, call the initForm() function. The next line needs some explanation, because it is a workaround for the odd behavior of some browsers.
When the window unloads (i.e., when it is closed or the browser goes to another location), we call an anonymous function, that is, a function that doesn't have a name. In this case, it not only doesn't have a name, it doesn't have anything at all. It's here because we have to set onunload to somethingotherwise, the onload event isn't triggered when the browser's back button is clicked, because the page is cached in some browsers, such as Firefox and Safari. Having onunload do anything at all causes the page to be uncached, and therefore, when we come back, the onload happens.
The anonymous part of the term refers to the fact that there's no name between function and (). This is the simplest way to trigger onunload but not have it do anything. The braces are just like any function; they would hold the contents of the function. They're empty here because this particular function does nothing.
| | | 2. |
document.getElementById ("newLocation").selectedIndex = 0;
document.getElementById ("newLocation").onchange = jumpPage;
In the initForm() function, the first line gets the menu on the HTML page, which has the id of newLocation, and sets its selectedIndex property to zero, which forces it to say "Select a topic".
The second line tells the script to call the jumpPage() function when the menu selection changes.
| 3. |
First, create the new function jumpPage.
| 4. |
var newLoc = document.getElementById
("newLocation");
The newLoc variable looks up the value chosen in the menu by the visitor.
| 5. |
var newPage = newLoc.options [newLoc.selectedIndex].value;
Start from the code inside the brackets and work outward. The object newLoc.selectedIndex will be a number from 0 to 5 (because there are six possible menu choices; remember that JavaScript is often zero-based). Given that number, we next get the value for the corresponding menu option, which is the name of the Web page we want to jump to. Then we assign the result to the variable newPage.
| 6. |
if (newPage != "") {
  window.location = newPage;
This conditional first checks to see that newPage is not equal to nothing (that is, it's not empty). In other words, if newPage has a value, then tell the window to go to the URL specified by the menu option chosen.
|
 Tips Tips
One of the nicest things about this script is that once the JavaScript function has been added, there's no need to modify the function when pull-down options are added, modified, or changed. Only the values of the options (i.e., the URLs that the menu options jump to) need to be set. For this reason, this script works well with WYSIWYG page editors. As mentioned above, Firefox caches pages, causing onload events to not be triggered when the back button is clicked. One way to work around this is covered above; another way we could have done this would have been to add the line: window.onpageshow = initForm;
We didn't use this because it doesn't work in Safari (the other caching troublemaker). But if you are specifically targeting Firefox, it's worth knowing that there are two new non-standard window event handlers, onpageshow and onpagehide, which can be used to handle events that we only want triggered in Firefox. We call these "select-and-go" menus, which isn't especially elegant but clearly tells you what's going on. You may see other names for the same functionality; for example, Dreamweaver calls them "jump menus." By the way, if you're a Dreamweaver user and need a great book on getting the most out of Dreamweaver 8, let us suggest Macromedia Dreamweaver 8 for Windows and Macintosh: Visual QuickStart Guide (Peachpit Press, 2006), by, uh, us.
|
The point of this task is to use JavaScript to eliminate the need for a Go button when using a form to jump from one page to another. But what if the user has an old, non-JavaScript- capable browser, or just has JavaScript turned off? No problem; the script handles those users just fine, by putting in a Go button that's only visible in the absence of JavaScript.
The only way to get from one page to another with a form but without JavaScript is to use a CGI, a program running on the Web server. Script 7.1 sets that up in this line:
<form action="gotoLocation.cgi">
The form tag has the action attribute, which calls the CGI. But a form action requires the user to click a submit button, and there's no such button in Figure 7.1. Ah, but there is in Figure 7.2, which shows what happens when you turn JavaScript off. These lines contain the button, wrapped in the noscript tags, which are only executed if JavaScript is missing.

<noscript> <input type="submit" value="Go There!"> </noscript>
The really cool thing about all this is that the CGI only ever gets called if JavaScript is missing; if the user has a JavaScript-enabled browser, then the submit button doesn't appear, and the CGI is unnecessary.
|
|