An easy way to create PivotTables programmatically is by assigning a record source to a form. That way, you can program the PivotTable view for the form. If you specify PivotTable as the form's default view, users will see your PivotTable immediately upon opening the form. Alternatively, you can work with a normal Access form. You programmatically create a PivotTable for the form and save it, but you don't make the PivotTable view the form's default view. This approach allows users to open the form and view the data in Form view. Then, when they're ready, users can change the view and examine a PivotTable based on the form's record source. A form can have only one PivotTable at a time. However, since PivotTables are programmable, you can create them dynamically, so that one form can organize data in several PivotTable views.
To manage PivotTable or PivotChart objects programmatically, your VBA project needs a reference to the Microsoft Office 2003 Web Components. An item for the Web components does not appear automatically in the References dialog box generated by the Tools, References command. However, you can use the Browse button on the References dialog box to navigate to the owc11.dll file in the \Program Files\Common Files\Microsoft Shared\Web Components\11 folder. This adds a reference named Microsoft Office Web Components 2003 to the project. Without this reference, any Dim statement declaring an object based on a member of the library will fail.
| Note |
After adding a reference to the Microsoft Office Web Components 2003 library, you can use the Object Browser to discover the objects, properties, methods, and events exposed by the library. Use these elements to add as well as manage PivotTable and PivotChart objects on forms programmatically. |
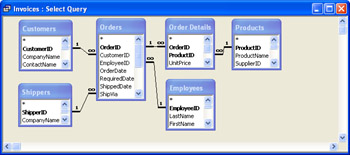
All the samples in this section process the Invoices query. This query ties together most of the Northwind tables that have anything to do with orders. The .mdb file for this chapter contains the tables and the Invoices SQL string that ties them together. While examining the query's SQL statement, it can be helpful to see a diagram of the relationships between tables that the query specifies. Figure 7-5 shows such a diagram. You can view the SQL code by opening the SQL window for the query.
To create a form as the basis for a PivotTable, you just need to assign a record source to it. This form's record source then becomes the record source for the PivotTable view. You can programmatically create a form and assign it a record source with just a handful of code lines.
The following sample actually goes beyond the requirements for creating a form as the basis for a PivotTable; the code creates a text box control on the form for each field in the record source behind the form. Though not absolutely necessary, having the text boxes makes it possible to examine the field values for individual records in Form view. This sample is very elementary—it just adds text box controls without adding label controls for each text box. For samples that demonstrate how to add label controls that correspond to text box controls, see Chapter 6. The following sample demonstrates the use of the CreateControl method, which follows the same general syntax and conventions as the CreateReportControl method used in Chapter 6. However, the CreateControl method is used with forms here instead of reports.
The initial sample to build a PivotTable that we'll examine relies on three procedures. The first procedure, CreateAFormWithPivotTableOnInvoices, which serves as a main routine, merely calls two other procedures, and it passes a return value from the first called procedure to the second one. The CreateAFormWithPivotTableOnInvoices procedure invokes the FormName procedure and passes it the name of a query: Invoices. The FormName procedure is a function procedure, so it returns a value that the CreateAFormWithPivotTableOnInvoices procedure stores in strFormName. This return value is the name of the custom form, automatically generated by Access, that uses the Invoices query as a record source. Next, the main routine invokes the CreatePivotTableForInvoices procedure and passes the called procedure the value in strFormName. That second called procedure builds a PivotTable view for the record source behind the form whose name is in strFormName.
Sub CreateAFormWithPivotTableOnInvoices()
Dim strFormName As String

'Create a form with controls for all the fields in
'the Invoices query
strFormName = FormName("Invoices")

'Create a PivotTable view for the new form
'with the selected row, column, and detail fieldset members
CreatePivotTableForInvoices strFormName

End Sub
The FormName function procedure takes a single argument as a string variable indicating the record source and returns a string value that's the name of the form it creates. The first three lines after the declarations and two lines for saving the form toward the end of the procedure are absolutely necessary here. The first line after the declarations starts by invoking the Application object's CreateForm method. Because the method belongs to the top-level object in Access, you do not need to precede it with the object's name. The first line establishes frm1 as a pointer to the form created by the method. The second line assigns the query named in the argument passed to the procedure as the form's RecordSource property. The third line designates the PivotTable view as the default view for the form. When users open the form from the Database window, they will automatically see the PivotTable view instead of the Form view.
After constructing the form, the procedure creates an ActiveX Data Objects (ADO) recordset based on the same record source as the form. The procedure loops through the Fields collection of the Recordset object to add a text box to the form for each field in the recordset. The most important line of code within the For loop for the recordset's Fields collection invokes the CreateControl method. This is another method of the Access Application object; its purpose is to add a control to a form. The two arguments for the method designate the form name to add a control to and the type of control to add. Another important line within the loop assigns the current field name value to the ControlSource property for the text box control. A third line worthy of special attention is the one assigning the Name property to the text box created by the CreateControl method. The prefix for the Name property setting is always txt, and the body of the name setting is the field name for the ControlSource property. This is normally just the field name for the underlying table, unless two tables for the Invoices query have the same column name. In this situation, Access uses the table name as a qualifier for the column name. The remaining lines within the loop and the four lines before the loop assist in spacing the text box controls evenly along the length of the form.
The first two lines after the loop perform two critical functions. The first of these lines saves the name of the form created by the procedure as the return value from the function procedure. The second line after the loop closes the form and saves the changes. This commits the RecordSource and ControlSource property assignments. Let's take a look at the procedure now:
Function FormName(strSourceName As String) As String
Dim frm1 As Access.Form
Dim txt1 As Access.TextBox
Dim rst1 As ADODB.Recordset
Dim fld1 As ADODB.Field
Dim intLeft As Integer
Dim intLastTop As Integer
Dim intOffset As Integer
Dim intWidth As Integer
Dim intHeight As Integer

'Create a form with the specified record source
Set frm1 = CreateForm
frm1.RecordSource = strSourceName
frm1.DefaultView = acFormPivotTable

'Create a recordset using the specified source
Set rst1 = New ADODB.Recordset
rst1.Open strSourceName, CurrentProject.Connection

'Assign control size and position parameters
intLeft = 144
intOffset = 72
intWidth = 4320
intHeight = 288

'Iterate through recordset fields and create
'corresponding text box controls on the form
For Each fld1 In rst1.Fields
    Set txt1 = CreateControl(frm1.Name, acTextBox)
    With txt1
        .ControlSource = fld1.Name
        .Left = intLeft
        .Top = intLastTop + intHeight + intOffset
        intLastTop = .Top
        .Width = intWidth
        .Height = intHeight
        .Name = "txt" & fld1.Name
    End With
Next fld1

'Close the form, save changes, and pass its name back
FormName = frm1.Name
DoCmd.Close acForm, frm1.Name, acSaveYes

'Clean up objects
rst1.Close
Set rst1 = Nothing
Set frm1 = Nothing
Set txt1 = Nothing

End Function
After you have a form with a RecordSource setting, you can create a PivotTable view for the data behind the form. The CreatePivotTableForInvoices procedure creates a PivotTable view for the form generated by the FormName procedure. The procedure begins by opening the form in Design view. This view is necessary to make an assignment for a form's DefaultView property. The sample uses the conPivotTableDefaultView constant to assign a value of 3 to the property. This property value causes a form to open automatically with a PivotTable view instead of the default Form view from the Access UI. After saving this change to the form, the procedure reopens the form. This time the procedure opens the form in PivotTable view so that it can make changes to the design of the PivotTable.
A PivotTable view organizes selected fields in the record source for a form with a crosstab. The format arranges detail data field values according to their column and row field values. When you programmatically refer to the fields in a record source, your code refers to them as PivotFieldset objects.
After referencing a field in the form's record source, use the InsertFieldset method to assign the fieldset object to a drop area in the PivotTable. The code sample in CreatePivotTableForInvoices invokes the InsertFieldset method four times. First, it assigns the Shippers_CompanyName field to the column drop area. Visual Basic for Applications (VBA) refers to this area as the ColumnAxis property of the Fieldsets collection for a PivotTable. Next, the code sample assigns the ProductName field to the row drop area (RowAxis). Then, the last two assignments assign the Quantity and ExtendedPrice fields to the detail drop areas (DataAxis). The PivotTable organizes the field values in the detail drop areas according to the row and column drop area field values. After making all the fieldset assignments, the procedure commits the changes to the form by closing the form and saving the changes.
Sub CreatePivotTableForInvoices(strFormName As String)
Dim frm1 As Access.Form
Dim fset1 As PivotFieldSet
Const conPivotTableDefaultView = 3

'Create reference to form on which to base PivotTable,
'but first set PivotTable as the default view
DoCmd.OpenForm strFormName, acDesign
Set frm1 = Forms(strFormName)
frm1.DefaultView = conPivotTableDefaultView
DoCmd.Close acForm, strFormName, acSaveYes
DoCmd.OpenForm strFormName, acFormPivotTable
Set frm1 = Forms(strFormName)

With frm1.PivotTable.ActiveView
    'Assign fieldset members to the column, row, and detail sections of
    'the PivotTable
    Set fset1 = .FieldSets("Shippers_CompanyName")
    .ColumnAxis.InsertFieldSet fset1
    Set fset1 = .FieldSets("ProductName")
    .RowAxis.InsertFieldSet fset1
    Set fset1 = .FieldSets("Quantity")
    .DataAxis.InsertFieldSet fset1
    Set fset1 = .FieldSets("ExtendedPrice")
    .DataAxis.InsertFieldSet fset1
End With
'Close form with its PivotTable view
DoCmd.Close acForm, strFormName, acSaveYes

End Sub
Figure 7-6 presents an excerpt from the PivotTable view created by the preceding sample. Notice from the window's title bar that the form has the name Form1. If Form1 already exists in the database, the sample creates Form2, and so on. Observe that the row, column, and detail field names appear with the control names for the corresponding record source fields. These control names are derived from the record source's field name and have a txt prefix. The FormName procedure assigns this prefix when it assigns the Name property of each text box on a form. You can modify this convention and use any naming rule that meets the requirements of your application.
| Note |
The sample in this section uses default naming conventions for the forms. Code samples in the section "Programmatically Creating PivotCharts" demonstrate how to assign custom form names programmatically. These techniques apply equally to PivotCharts and PivotTables. |
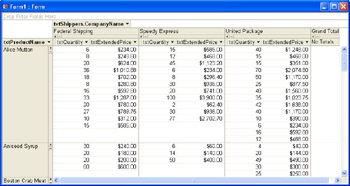
In Figure 7-6, the No Totals cells in the Grand Total column are empty by default. By clicking the + Show/Hide Details control, you can display all the values in the preceding columns for each row. If there are more values than can fit in a PivotTable cell, click inside the cell. The PivotTable will display a scroll bar that lets you scroll up and down the list of values for that PivotTable cell. The ProductName row values also have + Show/Hide Details controls. Clicking the - control hides all the detail values in any row. However, if any totals were computed in the PivotTable, they would still appear in the row.
Sometimes you might not know the name of a fieldset, which means that you won't be able to use it as an index for Fieldsets collection members. Such a fieldset name usually will match the record source field name, but there are exceptions. For example, the ControlSource setting for the text box named txtShippers.CompanyName is Shippers.CompanyName. However, the corresponding fieldset name is Shippers_CompanyName. If you forget the naming convention for a fieldset, or if you just want to verify the fieldset names on a PivotTable, use the following code sample. The first procedure assigns a form name with a PivotTable view and calls the second procedure, which is a utility that enumerates the fieldset names. This second procedure reports to the Immediate window the total number of members in the Fieldsets collection for a PivotTable view and the names of each of those fieldset members.
Sub CallUtilityToNameFieldSetMembersForm1()
Dim strFName As String
strFName = "Form1"
UtilityToNameFieldSetMembers strFName
End Sub

Sub UtilityToNameFieldSetMembers(strFName As String)
Dim frm1 As Access.Form
Dim fset1

'Open a form named strFName
DoCmd.OpenForm strFName, acFormPivotTable
Set frm1 = Forms(strFName)

'Enumerate names of elements in the Fieldsets collection.
'This is useful for compound names, such as Shippers_CompanyName.
Debug.Print frm1.PivotTable.ActiveView.FieldSets.Count
For Each fset1 In frm1.PivotTable.ActiveView.FieldSets
    Debug.Print fset1.Name
Next fset1

'Clean up objects
Set frm1 = Nothing

End Sub
The preceding sample application organized the Quantity and ExtendedPrice fields from the Invoices query in a PivotTable. However, it did not develop any summary statistics for the Quantity and ExtendedPrice field values. One typical reason for composing a PivotTable is to compute summary statistics for the values in the detail drop area. The main vehicle for adding summary statistics to a PivotTable view is the AddTotal method. The samples that follow illustrate how to apply this method to the PivotTable returned by the ActiveView property of the PivotTable for a form.
The AddTotal method creates a new Totals field, which contains summary statistics for another field in a PivotTable. The Totals field that the method creates appear both in the PivotTable and in the PivotTable Field List through the Access UI for PivotTable views. The AddTotal method takes three arguments. First, you name the new Totals field. Use a string for this. Next, you reference a field, such as one of the fields in the detail drop area. Then, you specify a function for computing the summary statistic on the field. These functions are the standard aggregate functions available in many contexts throughout Access. They compute the average, count, maximum value, minimum value, and sum, as well as the sample and population standard deviation and variance.
When you attempt to add a new Totals field to a PivotTable, the field cannot already exist. Attempting to add a new Totals field that has the same name as an existing one generates a run-time error. Because the insertion of a Totals field adds it to the PivotTable's detail drop area and the PivotTable Field List, you need to remove it from both locations before attempting to add a new field with the same name.
The following pair of procedures demonstrates the syntax for adding two Totals fields to the PivotTable created by the preceding sample. The Totals fields compute the sum of the Quantity and the ExtendedPrice field values. The corresponding cells in the PivotTable will reflect the total business handled by a shipper for a product. The first procedure names the form to process and passes that name to the second procedure, which actually creates the two Totals fields. For this sample to work, you have to verify the name of the form created by the preceding sample. In my sample, the name of this form is Form1. However, it could be Form2, Form3, or Formx, depending on how many times you run the sample without deleting the previously created sample forms. In the section "Adding a PivotChart View to a Custom Form," I will show you how to assign a specific name to the form with a PivotTable view that you create. However, you will always have to specify the name of a form when processing its PivotTable view.
The second procedure includes two important variable declarations. First, it specifies fld1 as a PivotField, which is a field in a PivotTable. Next, the procedure specifies tot1 as a PivotTotal. A PivotTotal represents a total in a PivotTable, such as one created by the AddTotal method. The sample reuses the fld1 and tot1 variables. First, the code adds the sum of ExtendedPrice to the PivotTotal, and then it adds the sum of Quantity to the PivotTotal.
After the declarations, the procedure opens the form corresponding to the name passed to it. Then, the code assigns the form to the frm1 object reference. This simplifies subsequent code in the sample.
Next, the procedure opens a With…End With block of code that operates on the form reference. The block contains two groups of lines. The first group adds the sum of ExtendedPrice to the PivotTable, and the second group applies the same function to compute the sum of Quantity. Adding a Totals field involves three steps. First, you reference the field that the Totals field summarizes. Second, you invoke the AddTotal method to create the Totals field. Third, you assign the new Totals field to the PivotTable. The procedure executes this third step in two lines. The first line assigns the Totals field to an object reference, tot1. The second line inserts that object into the detail section of the PivotTable by using the InsertTotal method.
One reason to add Totals fields to a PivotTable is to summarize detail data. Often, presenting detail data and summary data in the same PivotTable can be distracting. Therefore, the sample invokes two methods that highlight the display of summary statistics in the resulting PivotTable. First, the code invokes the HideDetails method. This forces the suppression of all detail data. With this one step, a user could restore the visibility of the detail data if he so desired. However, as the creator of the PivotTable view, you can disable this capability by assigning a value of False to the AllowDetails property for the PivotTable. The sample illustrates this optional step.
Whenever you make changes to a PivotTable, you must save them if you want them to persist the next time a user views the PivotTable. Therefore, the procedure concludes by closing the form and saving the changes as it closes. Let's examine the procedure now:
Sub CallTotalExtendedPriceAndQuantity()
Dim strFName As String

'Set strFName so that it points at the form with the
'PivotTable view that you want to revise
strFName = "Form1"
TotalExtendedPriceAndQuantity strFName

End Sub

Sub TotalExtendedPriceAndQuantity(strFName As String)
Dim frm1 As Access.Form
Dim fld1 As PivotField
Dim tot1 As PivotTotal

'Open a form named strFName
DoCmd.OpenForm strFName, acFormPivotTable
Set frm1 = Forms(strFName)

With frm1
    'Add total for sum of ExtendedPrice field
    Set fld1 = .PivotTable.ActiveView.FieldSets("ExtendedPrice"). _
        Fields("ExtendedPrice")
    .PivotTable.ActiveView.AddTotal "Sum of Price", fld1, plFunctionSum
    Set tot1 = .PivotTable.ActiveView.Totals("Sum of Price")
    .PivotTable.ActiveView.DataAxis.InsertTotal tot1

    'Add total for sum of Quantity field
    Set fld1 = .PivotTable.ActiveView.FieldSets("Quantity").Fields("Quantity")
    .PivotTable.ActiveView.AddTotal "Sum of Quantity", fld1, plFunctionSum
    Set tot1 = .PivotTable.ActiveView.Totals("Sum of Quantity")
    .PivotTable.ActiveView.DataAxis.InsertTotal tot1
End With

'Hide detail rows
Screen.ActiveDatasheet.PivotTable.ActiveData.HideDetails
frm1.PivotTable.AllowDetails = False

'Save changes as you close the form's PivotTable view
DoCmd.Close acForm, frm1.Name, acSaveYes

End Sub
Figure 7-7 shows an excerpt of how Form1 looks when you open it after running the CallTotalExtendedPriceAndQuantity procedure. Recall that the PivotTable is the default view for the form, so this is what a user sees when she initially opens the form. Compare the appearance of the PivotTable in this screen shot with the one shown in Figure 7-6. The new version of the PivotTable suppresses all detail data and presents only summary data. Therefore, it's much easier to identify the differences between cells in the PivotTable shown in Figure 7-7. Invoking the HideDetails method in the procedure suppresses the detail data.

I purposely included the outer Access window in Figure 7-7 so that you could see how many toolbar controls are disabled. The PivotTable does not allow the operation of any controls that expand and collapse rows and columns or that show and hide fields in the detail drop areas. The controls for showing and hiding details on the PivotTable are not visible in this figure. The inoperability of these features is the direct result of setting the AllowDetails property to False.
When working with PivotTables, you might want to redefine the formula you use for a Totals field. To do this, you must first remove the old Totals field from the detail drop area as well as from the collection of Totals fields for the PivotTable.
Use the RemoveTotal method to eliminate the appearance of a Totals field in the detail section of a PivotTable. This method applies to the DataAxis property of the PivotTable returned by the ActiveView property of a form's PivotTable. RemoveTotal takes a single argument, a string variable that names the Totals field you want to eliminate from the PivotTable's detail drop area.
A Totals field is not completely removed from a PivotTable until you also remove it from the Totals fields collection. To do so, invoke the DeleteTotal method. This method applies directly to the PivotTable returned by the ActiveView property. Like the RemoveTotal method, the DeleteTotal method takes a single string variable as an argument that names the Totals field to strike from the Totals fields collection of the PivotTable.
The following pair of procedures demonstrates the correct syntax for the RemoveTotal and DeleteTotal methods. The first procedure passes a form name to the second procedure. The form has the PivotTable from which the second procedure eliminates the Totals fields. The second procedure starts by opening the form and setting an object reference, frm1, to it. Next, the procedure removes the two summary fields from the PivotTable detail drop area and from the Totals fields collection. This occurs inside a With…End With block.
Before closing, the second procedure restores the visibility of detail field values and enables users to show and hide fields as well as expand and collapse rows and columns. The procedure's final line closes the form and saves these changes. After running the CallRemovePriceAndQuantityTotals procedure, the PivotTable view for Form1 returns to its initial condition (the way it appeared after running the sample that created it). Here are the two procedures:
Sub CallRemovePriceAndQuantityTotals()
Dim strFName As String

'Set strFName so it points at the form with the
'PivotTable view that you want to revise
strFName = "Form1"
RemovePriceAndQuantityTotals strFName

End Sub

Sub RemovePriceAndQuantityTotals(strFName As String)
Dim frm1 As Access.Form

'Open a form named strFName
DoCmd.OpenForm strFName, acFormPivotTable
Set frm1 = Forms(strFName)

'Remove totals from datasheet and Totals field list setting
With frm1.PivotTable.ActiveView
    .DataAxis.RemoveTotal "Sum of Price"
    .DataAxis.RemoveTotal "Sum of Quantity"
    .DeleteTotal "Sum of Price"
    .DeleteTotal "Sum of Quantity"
End With

'Show Detail Rows
Screen.ActiveDatasheet.PivotTable.ActiveData.ShowDetails
frm1.PivotTable.AllowDetails = True

'Save changes as you close form's PivotTable view
DoCmd.Close acForm, frm1.Name, acSaveYes

End Sub
One of the most valuable features of PivotTables is the ease with which you can include and exclude records for processing. Use the IncludedMembers property to specify members that you want to include in a PivotTable. Assign values to the ExcludedMembers property to designate fields you want excluded. You can assign an individual field name to these properties, or if you want to filter on more than one field value, you can assign an array of field names. Since the array technique works for individual field names as well as sets of field names, you can use it for all your assignments to the IncludedMembers and ExcludedMembers properties.
The IncludedMembers and ExcludedMembers properties apply to PivotTable Fields collections. Recall that these Fields collections belong to a Fieldsets collection. When working with hierarchical data—such as cities, which reside within states, which reside within countries, which reside within continents—the Fieldsets collection represents the top-level node, or Fields collection member, and the set of Fields collection members denotes the individual members within the Fieldsets collection. When working with most columns of a relational table or a query based on relational tables (as in the current sample), the Fieldsets and Fields collection members are identical. Regardless of whether the Fieldsets and Fields collection members match in a one-to-one fashion or in a one-to-many fashion, you need to designate them separately.
The sample we'll look at next demonstrates the syntax for filtering on a single column field value for the data in the PivotTable for Form1. The syntax shows a reference to the ColumnAxis property of the PivotTable. Then, the Fieldsets and Fields collections specifically point at the Shippers_CompanyName field in the record source behind the PivotTable. The IncludedMembers property next opens a filter for the values the procedure assigns to it. In this sample, the filter designates rows in the Invoices query with a shipper value of United Package. You can add another field value by following United Package with a comma and a second field value. For example, the following excerpt from the FilterFor2Shippers procedure in the Chapter07.mdb file filters to include rows with a shipper value of either Federal Shipping or Speedy Express:
With frm1.PivotTable
    .ActiveView.ColumnAxis.FieldSets("Shippers_CompanyName"). _
        Fields("Shippers_CompanyName").IncludedMembers = _
        Array("Federal Shipping", "Speedy Express")
    .AllowFiltering = False
End With
By setting the AllowFiltering property for the form's PivotTable to False, you remove users' ability to change your filtering setting. You do not need to make this assignment to open a PivotTable with a custom filter. AllowFiltering and AllowDetails are two independent properties. For example, setting AllowDetails to False still enables a user to manually filter a PivotTable. Here's the syntax:
Sub FilterFor1ShipperAfterPriorFilter()
Dim frm1 As Access.Form
Dim strFormName As String

'Open a form name strFormName
strFormName = "Form1"
DoCmd.OpenForm strFormName, acFormPivotTable
Set frm1 = Forms(strFormName)

'Assign single-shipper filter
With frm1.PivotTable
    .ActiveView.ColumnAxis.FieldSets("Shippers_CompanyName"). _
        Fields("Shippers_CompanyName").IncludedMembers = _
        Array("United Package")
    .AllowFiltering = False
End With

End Sub
When you assign fields to the IncludedMembers property, you must specify all the items to be included. Therefore, a design such as the preceding sample is awkward because you have to manually edit the procedure by updating the number of members of the Array function used to assign values to the IncludedMembers property. As a workaround, you could instead designate the IncludedMembers values with a parameter array. Then, your code would be able to use the UBound function to determine the number of parameters passed, and it would automatically branch to an assignment statement for IncludedMembers with the correct number of arguments.
The two procedures in the following sample demonstrate this approach. The first procedure, CallFilterForShippers, designates the shipper names to filter for. The second procedure, FilterForShippers, opens Form1 and counts the number of values passed in the parameter array. The procedure then uses a Select Case statement to branch to the correct assignment statement for the IncludedMembers properties. If a user does not enter any filter values for the parameter array or enters more than three values, the procedure resets the PivotTable to show data for all shippers and reenables manual filtering. In addition, the procedure presents a message box to remind the user that the submitted number of filter values is invalid.
Sub CallFilterForShippers()

'Run this to include just two shippers
FilterForShippers "Federal Shipping", "Speedy Express"

'Run this to restore all shippers by submitting an
'invalid list of shippers
'FilterForShippers "Federal Shipping", "Federal Shipping", _
'    "Federal Shipping", "Federal Shipping"
End Sub

Sub FilterForShippers(ParamArray ShipperArray() As Variant)
'Sub FilterForShippers(strFilter As String)
Dim frm1 As Access.Form
Dim strFormName As String
'Dim ShipperArray As Variant

'Open a form named strFormName
strFormName = "Form1"
DoCmd.OpenForm strFormName, acFormPivotTable
Set frm1 = Forms(strFormName)

'Include one, two, or three shippers
With frm1.PivotTable
    Select Case UBound(ShipperArray())
        Case 0
            .ActiveView.ColumnAxis.FieldSets("Shippers_CompanyName"). _
                Fields("Shippers_CompanyName").IncludedMembers = _
                Array(ShipperArray(0))
        Case 1
            .ActiveView.ColumnAxis.FieldSets("Shippers_CompanyName"). _
                Fields("Shippers_CompanyName").IncludedMembers = _
                Array(ShipperArray(0), ShipperArray(1))
        Case 2
            .ActiveView.ColumnAxis.FieldSets("Shippers_CompanyName"). _
                Fields("Shippers_CompanyName").IncludedMembers = _
                Array(ShipperArray(0), ShipperArray(1), ShipperArray(2))
        Case Else
            .ActiveView.ColumnAxis.FieldSets("Shippers_CompanyName"). _
                Fields("Shippers_CompanyName").IncludedMembers = _
                Array("Federal Shipping", "Speedy Express", _
                    "United Package")
            .AllowFiltering = True
            MsgBox "Not a valid filter.", vbInformation, _
                "Programming Microsoft Access 2003"
            Exit Sub
    End Select
    .AllowFiltering = False
End With

End Sub