This section introduces the basics of user-level security, with a special emphasis on techniques for managing it manually. First, we'll look at core notions, such as the Admin user and workgroups. Second, a three-step process to implement user-level security is described. The section closes with a brief review of the impact of the settings made during the three-step process. This review acquaints you with the kinds of security that can be enforced with user-level security.
User-level security manages the security of Jet database files through the interaction of two files. One of these is the traditional .mdb file. This file tracks objects in a database, such as tables and queries, as well as permissions to use those objects. The second file is an .mdw file, which is commonly referred to as a workgroup information file. The .mdw file stores information about individual users and groups of users in a workgroup. User-level security tracks identification codes for the users and groups within a workgroup as well as the overall workgroup in the .mdw file. When an .mdb file joins an .mdw file, the users and groups defined in the .mdw file inherit the permissions specified for them in the .mdb file. Figure 10-2 graphically depicts the relationship between the two files as well as major functions of each file type.

Besides the .mdb and .mdw files, there are several other core concepts to grasp as you begin to apply user-level security.
These concepts start with the definition of a workgroup administrator. You can think of the workgroup administrator as a user within the workgroup who has unlimited permissions, including permission to assign permissions to other users.
A second core notion is that every workgroup must have a workgroup administrator. By default, Access designates the Admin user as the workgroup administrator. To customize the security of your user-level security architecture, I recommend that you always designate another user as the workgroup administrator.
The third core notion is that the Admin user account should be stripped of all the permissions because of its status as the default workgroup administrator. In addition, you need to assign a password to the Admin account. This assignment is necessary for the popup dialog that asks for a user name and password when logging on to a database file. If anyone can log on as the Admin user because the account does not have a password and you have not stripped it of permissions, then anyone can enjoy unrestricted permissions in the database.
User-level security does not use passwords to track users. Instead, user-level security relies on a user name and a personal identifier (PID). A workgroup administrator, or other user empowered to administer a workgroup, must assign these when creating a user account for a workgroup information file. User-level security stores the user account information in the workgroup information file (.mdw), but you create a user account from the database file (.mdb). The password is an extra identifier in addition to the user name requested for identifying a user at logon. Users can change their passwords, but not their PIDs. If a user has no password or erases the password for a user account, that person can still log on by leaving the Password box empty in the Logon dialog box.
| Note |
A workgroup information file can become unavailable for a variety of reasons, including erasure or corruption. When this happens, you need to obtain a new copy of the workgroup information file to gain access to the database file. For this reason, it is good practice to back up a workgroup information file on a regular basis. See the following Web site for tips on recovering from an unavailable .mdw file and other links that drill down on selected user-level security topics: http://msdn.microsoft.com/library/default.asp?url=/library/en-us/off2000/html/achowRebuildCorruptedDeletedMSAccessWorkgroupS.asp. |
In three relatively easy steps, you can create a database file guarded with user-level security. The overall process requires you to start Access from the Windows Start button twice. Each step involves multiple actions. Collectively, the actions in each step contribute to achieving the goal for a step.
Start this first step by opening a new Access session from the Windows Start button. From an empty Access session with no database, choose Tools, Security, Workgroup Administrator. Click Create in the Workgroup Administrator dialog box.
When Create is clicked, the Workgroup Owner Information dialog box opens. This dialog offers three boxes for you to create a unique identification for your workgroup. By default, the Workgroup Administrator populates the Name and Organization boxes with values used when you installed Access. Since it is relatively easy to guess the default Name and Organization entries, you should change these and type a value in the Workgroup ID box. User-level security combines the contents of all three text boxes to create a unique identification code for the workgroup. Therefore, it is wise to record these values if you need to recreate the Workgroup file later.
| Note |
The Workgroup ID field must contain between four and 20 characters. It is case sensitive. |
After specifying the values identifying a workgroup and clicking OK, designate path and file names for the workgroup information file in the Workgroup Information File dialog box. If you created an Access11Files folder off your root directory of the C: drive, you could specify C:\Access11Files\SystemDemo.mdw. By default, Access locates .mdw files in the ApplicationData\Microsoft\Access folder for the current user profile. In addition, it names a new .mdw file, Systemx, where x is a sequential number based on the last Systemx.mdw file in the default folder. You can override both the default folder and the file name (as the instructions for this example do). You should record the path and file name. This is because a computer using a database file secured by a workgroup must join the workgroup. In order to accomplish this, a computer user (or at least the application) needs to know the path and file name of the .mdw file. Before creating the workgroup information file, Access gives you a final chance to confirm the workgroup identification field values as well as the path and file names for the .mdw file containing the workgroup information. Figure 10-3 shows the Confirm Workgroup Information dialog box for the current example. It can be convenient to copy the confirmation dialog box image, because if necessary you can use the vital information in this image for re-creating the workgroup information file. Once a new workgroup information file is completed, the current Access session is automatically joined to the workgroup.
The next task in the first step involves designating a new administrator for the workgroup. Start the task by choosing Tools, Security, User And Group Accounts. You can start to create a new user to serve as an administrator by clicking New on the Users tab of the User And Group Accounts dialog box. In this example, I assigned Chap10Admin as the name and PMA11 as the personal ID for the user. Then, I used the arrows between the Available Groups and Member Of lists to add the Chap10Admin user to the Admins group. This completes the task of creating a new workgroup administrator named Chap10Admin. Figure 10-4 shows the User And Group Account dialog box after adding the new member to the Admins group.

The concluding element of the first step is to manipulate settings for the Admin user in ways permitted by the User And Group Accounts dialog box. This dialog box allows you to perform two actions for the Admin user. First, you can remove the Admin account from the Admins group. This deprives the account of its built-in status as an administrator for the workgroup. Second, you can assign a password to the Admin user. By default, the Admin user has no password. After you assign a password to the Admin user, Access automatically prompts with a Logon dialog box the first time a user attempts to perform some action guarded by user-level security.
| Note |
Clearing the password for the Admin user is a simple way to disable user-level security. |
To remove the Admin user from the Admins group, you must select the Admin user from the Name drop-down list. Then, with Admins selected in the Member Of list, click the << Remove button.
You can assign a password to the Admin on the Change Logon Password tab of the User And Group Accounts dialog box. Since you are assigning an initial password, leave the Old Password box empty and populate the New Password and Verify boxes with the same string value, such as password. After assigning a password to the Admin user, exit Access and close the window for the Access session.
You cannot assign a password to the Chap10Admin user from the User And Group Accounts dialog box in the session for Step 1. This is because you used the default user account of Admin when you opened the Access session, and you can assign a password with this dialog box only for the user in the current session. Since Step 1 does not assign a password to the Chap10Admin user, the administrator for the workgroup has a blank password. Recall that the assignment of passwords to user accounts is optional for all accounts except the Admin user when you invoke user-level security.
The second step creates a new database with Chap10Admin as the owner. In this example, I call the database ManualDemo.mdb. The example continues to add a table to the database. Step 3 creates a couple of users and then assigns distinct permissions for the table to the users. A subsequent section demonstrates how the different permissions enable one user to perform tasks that another user is unable to perform.
Start a new Access session and click the Blank database link on the New File Task Pane. Assign the name ManualDemo to the database and select a Save In folder of Access11Files (if you created such a folder to follow along with the demonstrations in this book). In the Logon dialog box, enter Chap10Admin in the Name box and leave the Password box empty. These steps create the ManualDemo.mdb file with Chap10Admin as the owner.
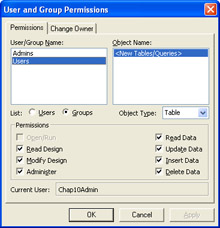
Before adding a table to the database, it is necessary to strip the Admin user and any groups to which it belongs of permissions for new database objects. While the Admin user does not enjoy any direct permissions for new objects in the ManualDemo database, it still belongs to the Users group (recall that you cannot delete the Admin user in a workgroup). By default, Access grants members of the Users group all permissions that apply to any new tables or queries (see Figure 10-5). Since the Admin user belongs to the Users group, it inherits these permissions. Therefore, to strip the Admin user of all permissions for tables, you have to remove all permissions from the Users group. This operation has the side benefit of eliminating unlimited permissions from other users that you may add to the workgroup. You can strip the Users group of all permissions by clicking the Read Design check box. This clears the other check boxes in the dialog box shown in Figure 10-5.
Next, use the File, Import command to add the Shippers table from the Northwind database to the ManualDemo database. This operation makes available a database object for which different users can have different permissions. You can create your own table manually or programmatically instead of importing it. Importing the Shippers table from the Northwind database concludes the second step.
The third step adds two users and then assigns different permissions to each user. It is not necessary to restart Access for this step. In fact, you should stay in the same database in which you concluded Step 2.
Start to add the users by opening the User And Group Accounts dialog box as described in Step 1. Add two new users named ReadOnly and ReadUpdate. These users automatically belong to the Users group. However, since we stripped that group of all permissions for new tables and queries before adding the Shippers table to the ManualDemo database, the two users have no permissions yet for the Shippers table.
Next, open the User And Group Permissions dialog box as described in Step 2. In Step 3, the instructions apply to users instead of groups. Therefore, select the Users option for List, if it is not already selected. Then, select ReadOnly in the User/Group Name list. In addition, make sure the Shippers table is selected from the Object Name list. These selections let you apply permissions for the Shippers table to the ReadOnly user. Assign the permission by selecting the Read Data check box. This action automatically selects the Read Design check box as well. Click Apply to confirm your permission settings for the ReadOnly user. Next, select the ReadUpdate user. Then, select the Update Data check box. In this case, Access automatically selects the Read Data and Read Design check boxes as well. Confirm your permission assignments for the ReadUpdate user by clicking Apply. This completes the steps for assigning the permissions to the two new users. You can exit Access at this point.
If you want to do so, you can add passwords for the other users in the workgroup besides the Admin user. Recall that users do not require passwords, and they can always change or remove them on their own. The process of adding a new password to any user is the same as for the Admin user. However, you must initially open Access by logging on as that user first. To do this, you can open a new Access session from the Windows Start button. Then, choose Tools, Security, User And Group Accounts. Before Access opens the dialog box for the command, it prompts with a Logon dialog box. Enter the name of the user for which you want to assign a password. From the Change Logon Password tab of the User And Group Accounts dialog box, complete the process of assigning a password. To assign a password to another user, you must exit Access. Then, open Access again from the Windows Start button. Log on to Access as the user for which you want to assign a password. In this example, we leave the password for all users unset, except for the Admin user.
After completing the preceding three steps, you will have four users with different permissions for the Shippers table in the ManualDemo.mdb file. Because each has different permissions, the users' experiences will be unique from one other. The following table lists the users, passwords (if they exist), and permissions for the Shippers table in the ManualDemo database.
|
User name |
Permission Summary |
Password |
|---|---|---|
|
Chap10Admin |
Unlimited permissions because of its status as workgroup administrator |
Null |
|
ReadUpdate |
Permission to view and update values in the Shippers table |
Null |
|
ReadOnly |
Permission to view, but not update, values in the Shippers table |
Null |
|
Admin |
No permission (not even to view) for the Shippers table |
password |
|
User name |
Permission Summary |
Password |
|
Chap10Admin |
Unlimited permissions because of its status as workgroup administrator |
Null |
|
ReadUpdate |
Permission to view and update values in the Shippers table |
Null |
|
ReadOnly |
Permission to view, but not update, values in the Shippers table |
Null |
|
Admin |
No permission (not even to view) for the |
