As mentioned in Chapter 11, SQL-DMO, or SQL Distributed Management Objects, is a hierarchical programming model for SQL Server administration and data definition tasks. You can use SQL-DMO to enumerate databases and their objects on a server. With this capability, you can perform such tasks as referencing all the databases on a server or all the stored procedures within a database. You can also view and edit the contents of databases and the objects they contain, as well as create new objects. With SQL-DMO, developers can view and edit the design of tables, triggers, views, and stored procedures within databases. In addition, you can create new instances of SQL-DMO objects. For example, you can create a new table within a database. You can even copy the script for a table from one database to create a duplicate table within another database. In fact, you use SQL-DMO programming to copy the contents between different instances of SQL Server on different computers. For example, you can detach a database from one server, copy its files to another server, and then attach those database files for use on a second server. Chapter 12 described how to do this manually, but it took more than a couple of steps—which is enough steps for a casual user to cause a failure. With SQL-DMO, you can create a solution that completes the process with the press of a button.
There are three main reasons for Access developers (and other developers using Microsoft SQL Server 2000 Desktop Engine) to become familiar with SQL-DMO:
Administration is much more important for SQL Server databases than Access databases. By programmatically performing database administration chores, you improve your ability to manage SQL Server databases. You can even write Access applications that enable others to edit SQL Server databases in ways that you prescribe.
Neither Microsoft SQL Server 2000 Desktop Engine (MSDE 2000) nor Microsoft Data Engine (MSDE) ships with Enterprise Manager, a graphical client management tool that offers many more database administration features than the Access project UI. This tool is available to users of all other SQL Server editions. Because Microsoft programmed Enterprise Manager with SQL-DMO, you can incorporate selective subsets of Enterprise Manager functionality into your custom applications.
SQL-DMO is a hierarchical model for SQL Server components. Access developers who have a history of working with hierarchical models will feel comfortable adapting to its programming conventions as opposed to the more procedurally oriented T-SQL programming environment.
SQL-DMO installs with either MSDE 2000 or any other version of SQL Server 2000. Installing either MSDE 2000 or SQL Server 2000 adds sqldmo.dll and sqldmo.rll to a workstation. The .dll file implements SQL-DMO, and the .rll file is a localized resource file. Except for MSDE 2000, all versions of SQL Server 2000 ship with sqldmo80.hlp, the file that provides context-sensitive help. However, MSDE 2000 developers can get support for SQL-DMO from the downloadable version of Books Online (http://www.microsoft.com/sql/techinfo/productdoc/2000 /books.asp). To reference the SQL-DMO object model, your project must have a reference to the Microsoft SQLDMO Object Library in the References dialog box that the Tools-References command opens. SQL-DMO files also ship with SQL Server 7 and MSDE. SQL-DMO scripts developed with the SQL Server 7 version will run in SQL Server 2000 and MSDE 2000. Because of new features and an incompatible type library file, SQL-DMO scripts developed for SQL Server 2000 do not run in SQL Server 7. On the other hand, the SQL Server 2000 version of SQL-DMO provides new capabilities and features not available with SQL Server 7. For example, SQL-DMO for SQL Server 2000 supports user-defined functions. To tap the features associated with the latest version of SQL-DMO, you must use new object class names. One of this chapter's SQL-DMO samples demonstrates an approach to this task.
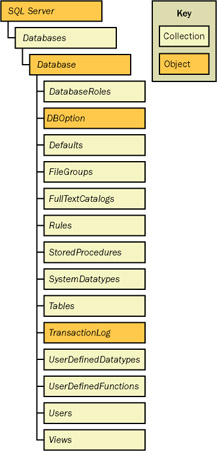
Figure 13-2 presents an excerpt from the SQL-DMO object model for SQL Server 2000. Your SQL-DMO applications will frequently start by connecting to a SQLServer object. The SQLServer object represents your application's connection to a SQL Server database server. SQL-DMO doesn't share this connection with ADO or other SQL Server client software. This is because the objects from the ADODB and SQLDMO libraries are not compatible. After specifying a connection to a server, your application can "walk the model" to return information about individual databases on a server and the objects within them. For example, SQL-DMO makes it easy to enumerate the databases on a server or the views within those databases. You can easily list and update the T-SQL script for a view.
| Note |
SQL-DMO for SQL Server 2000 readily supports multiple instances of SQL Server running on a single computer. This feature is only available with the version of SQL-DMO that comes with SQL Server 2000. (However, you can install a SQL Server 2000 instance alongside a SQL Server 7 installation.) The topic of installing and managing multiple instances of SQL Server on a single computer is outside the scope of this book. See Books Online for more coverage of this topic, which, by the way, is easy to accomplish. |
Chapter 11 offered detailed coverage of several objects and collections portrayed in Figure 13-2. In fact, SQL Server databases, tables, views, stored procedures, and user-defined functions all received extensive coverage in that chapter. The Users collection and DatabaseRoles collection support SQL Server security. The remaining collections and individual objects from Figure 13-2 pertain to SQL Server database administration and data definition features. See Books Online for coverage of these topics.
When you connect to a server, you can use either of two types of authentication: Microsoft Windows authentication or SQL Server authentication. Authentication is the process by which a client application verifies its credentials to connect to a SQL server. The "Authentication" section in this chapter is an overview of the topic.
When a SQL-DMO application connects to a SQL server instance with the login for a Windows user, the application must assign True to the SecureLogin property for the SQL Server object representing the instance. The following sample illustrates the syntax for doing this as well as enumerating the databases on a server. The first procedure merely specifies the name of a SQL Server instance and passes the information along to the second procedure as an argument. The name for a SQL Server instance is typically the name of the computer on which the program runs. This sample designates the SQL server named CabSony1. If you move the application from one computer to another, you'll have to specify a new instance name when you reference the local server on the second computer. Alternatively, you can designate the server name as the string "(local)". This second approach ensures that you always reference the local default SQL Server instance. But what if you want to connect to a specific server regardless of the workstation your application runs from? To do so, you must name the specific server to which your application needs to connect. There are advantages to both ways of designating a computer. Use the one that best suits your needs.
The second procedure in the next sample begins by instantiating an instance of the SQLServer object as srv1. Then the sample sets the LoginSecure property of srv1 to True. This property sets the authentication method that a login attempt uses to connect to SQL Server instance with Windows authentication. The next line invokes the Connect method for the srv1 object instance. This method attempts to connect to a server. The method can take up to three arguments. The sample uses a single argument to represent the Name property of the SQLServer object. If you don't use any arguments for the Connect method, the code attempts to point the SQLServer object at the main instance of SQL Server running on the local computer. A subsequent sample demonstrates the use of additional arguments.
After making a connection to the CabSony1 server, the sample prints the number of databases on the server by referencing the Count property of the Databases collection for srv1. Then the second procedure uses a For…Next loop to enumerate the members of the Databases collection.
Sub CallLoginSecureAndListDBs()
Dim srvName As String

'Assign name to server
srvName = "CabSony1"

'Pass server name to login routine
LoginSecureAndListDBs srvName

End Sub

Sub LoginSecureAndListDBs(srvName As String)
Dim srv1 As SQLDMO.SQLServer
Dim dbs1 As SQLDMO.Database

'Instantiate a SQLServer object, and connect
'using integrated security
Set srv1 = New SQLDMO.SQLServer
srv1.LoginSecure = True
srv1.Connect srvName

'Report the count of the databases on a server
Debug.Print "Server " & srv1.Name & " has " & _
    srv1.Databases.Count & " on it." & vbCr & _
    "Their names are:" & vbCr

'Enumerate the names of databases
For Each dbs1 In srv1.Databases
    Debug.Print vbTab & dbs1.Name
Next dbs1

'Clean up objects
srv1.DisConnect
set srv1 = Nothing

End Sub
When an organization's IT structure or resources make using mixed authentication desirable, you might need to change from a Windows-only authentication mode to a mixed mode that lets users connect to a SQL Server instance with login accounts managed by SQL Server or Windows. The next sample shows how to create and manage this transition. If you install MSDE 2000 on a Windows NT or Windows 2000 computer, your installation automatically starts with Windows-only authentication. If you prefer to use mixed authentication, you can use the following sample to set up the sa login account and your server for mixed authentication. Recall that the sa account has broad control within a SQL Server instance, and that it is impossible to delete the sa login.
This sample uses four procedures. The first one designates the server's name and demonstrates the syntax for explicitly referencing a computer's local SQL server. The first procedure passes the name of the server to the second procedure.
The second procedure attempts to log in to the server with SQL Server credentials. In other words, the Connect method specifies a login account and password for SQL Server. There are at least two ways that the attempt to log in can fail. First, the authentication mode can be set to Windows-only authentication. You can fix this by changing the server's authentication style. Second, the password for the sa login might be incorrect. You can remedy this problem by assigning a new password to the login and then using it. The second procedure uses error traps to detect either of these conditions. If the attempt to log in fails because the login request designates SQL Server credentials when the SQL Server instance is in Windows-authentication mode, the second procedure calls the WindowsToMixedAuthentication procedure. This procedure changes the security mode from Windows to mixed-mode authentication, permitting the use of logins authenticated by either SQL Server or Windows. If the attempt to log in fails because of a faulty password, the second procedure calls AssignNewPassword. This procedure assigns a known password to the sa login. For both error conditions, the second procedure tries to log in again after fixing the detected error. The second procedure starts by assigning a string to NewPassword. The value of the string in the listing is password. You can change this to any string that your needs dictate. This string contains the new password that the procedure will assign to the sa login account. The second procedure then instantiates an instance of the SQLServer object and attempts to log in with SQL Server credentials. Notice that the procedure doesn't set the LoginSecure property of srv1 to True; a property setting of True is necessary only for a Windows user or group account with Windows authentication. The property's default value is False when designating SQL Server authentication. The Connect method specifies sa as the login account, and it references the value of NewPassword for sa's password. If the attempt succeeds, the procedure exits normally. This happens when the server permits mixed-mode security and the sa password equals the value set for NewPassword.
When the authentication mode for the server is Windows-only, you have to alter the security mode to accommodate SQL Server authentication. The second procedure detects the need for this alteration when the Connect method generates an error number of -2147203052. The second procedure calls WindowsToMixedAuthentication and passes the server name. The called procedure requires the name of the server to change the authentication mode for a SQL Server instance. After control returns to the second procedure, the second procedure attempts to log in again with SQL Server authentication by invoking the Resume method. If this second attempt fails, it can generate an error number of -2147203048. This number is consistent with the error generated by a bad password. Therefore, the procedure updates the password for the sa account by calling the AssignNewPassword procedure. Then the second procedure passes the server name and the string value for the new password. When control returns from the called procedure, the second procedure tries to connect again to the local server. If this attempt succeeds, the procedure exits normally. Otherwise, you get another error, and the procedure writes a message to the Immediate window. (For example, the Connect method can fail because of a faulty physical connection.)
Sub CallAddSQLServerAuthentication()
Dim srvName As String

'Specify server name
srvName = "(local)"

'Pass server name
AddSQLServerAuthentication srvName

End Sub

Sub AddSQLServerAuthentication(srvName As String)
On Error GoTo SQLAuth_Trap
Dim srv1 As SQLDMO.SQLServer
Dim NewPassword As String

'Override assigned password, if you prefer
NewPassword = "password"

'Attempt to log in with sa and assigned password
Set srv1 = New SQLDMO.SQLServer
srv1.Connect srvName, "sa", NewPassword

SQLAuth_Exit:
srv1.DisConnect
Set srv1 = Nothing
Exit Sub

SQLAuth_Trap:
Select Case Err.Number
    Case -2147203052
'If no trusted connection, enable
'SQL Server authentication
        WindowsToMixedAuthentication srvName
        Resume
    Case -2147203048
'If sa login fails, set password for sa to password
        AssignNewPassword srvName, NewPassword
        Resume
    Case Else
        Debug.Print Err.Number, Err.Description
End Select

'Clean up objects
srv1.DisConnect
Set srv1 = Nothing

End Sub
The WindowsToMixedAuthentication procedure opens a connection using Windows authentication to the server named in the argument passed to it. This permits the Connection method to succeed even when SQL Server authentication is not in place. Next, the procedure sets the SecurityMode property to SQLDMOSecurity_Mixed. This property assignment applies to the IntegratedSecurity object instead of the SQLServer object. This assignment denotes mixed authentication to permit connections with logins authenticated by either SQL Server or Windows. Two other possible SecurityMode property settings include SQLDMOSecurity_Integrated for Windows authentication and SQLDMOSecurity_Normal for exclusive SQL Server authentication.
Just making the property assignment does not enforce the setting. You must stop and restart the server for the setting to become active. This involves several steps, which the balance of the procedure manages. The trickiest of these steps is the loop after the invocation of the Stop method. When your code issues the Stop method, the SQL server does not instantly stop. Therefore, trying to restart the computer can result in a situation in which your code attempts to restart a server that's still running, which causes a run-time error. The Status property of the SQLServer object can detect when a server stops. After issuing the Stop method, the procedure loops until the server's Status property indicates that the procedure responded completely to the invocation of the method. Next, the procedure restarts the server. This is essential if you plan to use the server any further because SQL-DMO cannot use the Connect method to connect to a stopped server.
Sub WindowsToMixedAuthentication(srvName As String)
Dim srv1 As SQLDMO.SQLServer

'Instantiate a SQLServer object and connect
'using integrated security
Set srv1 = New SQLDMO.SQLServer
srv1.LoginSecure = True
srv1.Connect srvName

'Set security mode to mixed Windows/SQL Server
'authentication
srv1.IntegratedSecurity.SecurityMode = _
    SQLDMOSecurity_Mixed
srv1.DisConnect

'Invoke command to stop server and wait
'until it stops
srv1.Stop
Do Until srv1.Status = SQLDMOSvc_Stopped
Loop

'Restart server with SecurityMode setting
srv1.Start True, srvName

'Clean up objects
srv1.DisConnect
Set srv1 = Nothing

End Sub
The AssignNewPassword procedure takes as many as three arguments, but it only requires two: the server name and the string for the new password. The third password is the login account name. This is an optional argument with a default value of sa. This value will automatically change the password for the sa login unless the calling procedure explicitly specifies another login. Because the AddSQLServerAuthentication procedure does not change the password, the AssignNewPassword procedure sets the sa password to password.
Sub AssignNewPassword(srvName As String, _
    NewPassword As String, _
    Optional lgnName As String = "sa")
Dim srv1 As SQLDMO.SQLServer

'Instantiate a SQLServer object, and connect
'using integrated security
Set srv1 = New SQLDMO.SQLServer
srv1.LoginSecure = True
srv1.Connect srvName

'Assign new password to login
srv1.Logins(lgnName).SetPassword "", NewPassword

 'Clean up objects
srv1.DisConnect
Set srv1 = Nothing

End Sub
Without much comment, I give you two other utility procedures for managing security mode and password. I found these utilities useful while developing the preceding sample, and you might find them useful for other purposes. The first utility procedure has the name MixedToWindowsAuthentication. It does what its name implies. The second procedure, BlankPasswordForsa, assigns a blank password to the sa login for the local SQL server. Although you definitely should not run a production system with a blank password for sa, some developers find it convenient to build an application with at least one account that has no password.
| Note |
If you are going to run a SQL server with an sa login that has no password, you should restrict the connectivity of the server so that it exists on a network that is not accessible from the Internet. The best practice is to always assign a password to the sa login. |
Sub MixedToWindowsAuthentication()
Dim srv1 As SQLDMO.SQLServer

'Assign whatever server name you like;
'default is (local)
srvName = "(local)"

'Instantiate a SQLServer object, and connect
'using integrated security
Set srv1 = New SQLDMO.SQLServer
srv1.LoginSecure = True
srv1.Connect srvName

'Set security mode to mixed Windows/SQL Server
'authentication
srv1.IntegratedSecurity.SecurityMode = SQLDMOSecurity_Integrated
srv1.DisConnect

'Invoke command to stop server and wait
'until it stops
srv1.Stop
Do Until srv1.Status = SQLDMOSvc_Stopped
Loop

'Restart server with mixed security
srv1.Start True, srvName

'Clean up objects
srv1.DisConnect
Set srv1 = Nothing

End Sub

Sub BlankPasswordForsa()
Dim NewPassword As String
Dim lgnName As String

NewPassword = ""

AssignNewPassword "(local)", NewPassword

End Sub
Because of its hierarchical design, SQL-DMO is particularly convenient for enumerating the objects within a database. An earlier sample showed how to enumerate the databases on a server to the Immediate window. This is easy to do with SQL-DMO because the Databases collection is hierarchically dependent on the server. You also can enumerate the tables, views, stored procedures, and user-defined functions within a database easily because collections for these objects are hierarchically dependent on a database. The next sample shows how to do this with a custom Access form.
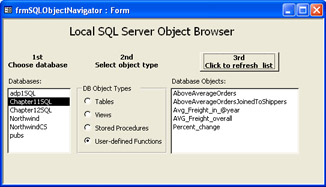
Figure 13-3 shows an Access form, frmSQLObjectNavigator, that illustrates one approach to browsing the database objects on the local server. When the form opens, it automatically displays the names of the databases on the local SQL server in its first list box. Users can display the names of tables, views, stored procedures, and user-defined functions on the local SQL server in the last list box by following three steps. First, select a database name from the list box on the left. Second, click an option button to select a type of object from the option group control. Third, click the button above the list box on the right. The second step is optional because the form automatically selects Tables as the default database object type. However, users must select a database name for the browser to return the names of an object type in a database.
The form's layout has three critical input controls and one critical output control. I added the first and last list boxes without using the Controls Wizard. The only customization I performed was the sizing and positioning of the list boxes. Event procedures behind the form set the sources for both list boxes. The first list box, lstDBs, is an input control because a user must make a selection from it. The last box, lstDBObjects, is an output control that displays the objects on the local server when a user clicks the button above it. The opgDBObjectTypes option group control always displays the same four objects, so I used the Controls Wizard for its design. However, I chose not to select a default value when building the control. This is because the sample application uses an event procedure behind the form to assign a default value to the control. By making the assignment in the event procedure, your application can adjust the default setting for the option group control along with any other desired settings. The last critical control is the command button above lstDBObjects. A click to the cmdRefreshList command button updates the display in lstDBObjects according to the values of lstDBs and opgDBObjectTypes.
With just two short event procedures, you can manage the contents of the controls. However, the event procedures rely on two function procedures in Module1 of the VBA project for the Access project with the samples for this chapter (Chapter13.adp).
| Note |
Chapter13.adp connects to the Chapter11SQL database created in Chapter 11. The Access project needs this connection in order for code samples that draw on the Connection property of the CurrentProject object (CurrentProject.Connection) to point at the right database. Alternatively, you can update these samples with explicit Connection objects pointing at the Chapter11SQL database. |
The Form_Open event procedure (shown next) performs three main tasks. First, it populates the lstDBs control by setting its RowSourceType and RowSource properties. Notice that the RowSourceType property is set to "Value List". The procedures makes this assignment because it sets the RowSource property for lstDBs to the return value for the LoginSecureandListDBs2 function. This function takes a single argument, the name of a server. It returns a semicolon-delimited list of names for the databases on the server specified in its argument. This is a valid format for a RowSourceType property setting of Value List. Second, the Form_Open event procedure assigns a value of 1 to the opgDBObjectTypes control. You can change this value to 2, 3, or 4, which respectively designate views, stored procedures, and user-defined functions. Finally, the Form_Open event procedure performs some minor formatting to remove form display elements for data selection and record navigation—functions that do not apply to this form.
The Click event procedure for the cmdRefreshList command button performs just two tasks. First, it checks the value of lstDBs. The sample requires the user to make a selection from the first list box. If the user does not make this selection, the attempt to develop a list of objects within a database can generate a run-time error. When the event procedure doesn't detect a selection, it prints a message reminding the user to make this selection and exits before the command generates the error. Second, the procedure uses the DBObjectsList function in Module1 to populate the RowSource property for the lstDBObjects control. The function procedure returns a semicolon-delimited list of objects based on the selections for database name and object type from the local server.
Private Sub cmdRefreshList_Click()

'Abort if user did not select a database
If IsNull(Me.lstDBs) Then
    MsgBox "Please select a database before " & _
        "attempting to list the objects within it.", _
        vbInformation, _
        "Programming Microsoft Access 2003"
    Exit Sub
End If

'Populate database object list box based on
'server name, database name, and object type
Me.lstDBObjects.RowSourceType = _
    "Value List"
Me.lstDBObjects.RowSource = _
    DBObjectList(srvName, lstDBs, opgDBObjectTypes)

End Sub
LoginSecureAndListDBs2 is an adaptation of a procedure described earlier in this section that had the same name except for the trailing 2. The adaptation uses a function procedure format instead of the sub procedure format of the earlier version. There are two additional distinctions between the two procedures. This version of the procedure uses the SystemObject property to exclude system databases. This prevents users from browsing the objects in system databases such as the master database. Exposing the contents of the master database without a specific need is not recommended. Also, the function procedure constructs its return value in a format suitable for the RowSource property to a list box with a Value List RowSourceType setting. This simply involves appending a trailing semicolon and a space to each database name. After passing through the list of databases on the server, the procedure clips off the last semicolon and space by using the Left function.
Function LoginSecureAndListDBs2(srvName As String) As String
Dim srv1 As SQLDMO.SQLServer
Dim dbs1 As SQLDMO.Database

'Instantiate a SQLServer object, and connect
'using integrated security
Set srv1 = New SQLDMO.SQLServer
srv1.LoginSecure = True
srv1.Connect srvName

'Store delimited names of databases in function
For Each dbs1 In srv1.Databases
    If dbs1.SystemObject = False Then
        LoginSecureAndListDBs2 = _
            LoginSecureAndListDBs2 & dbs1.Name & "; "
    End If
Next dbs1

'Strip trailing delimiter
LoginSecureAndListDBs2 = _
    Left(LoginSecureAndListDBs2, _
        Len(LoginSecureAndListDBs2) - 2)

'Clean up objects
srv1.DisConnect
Set srv1 = Nothing

End Function
The DBObjectList function procedure appears next. This procedure returns a semicolon-delimited list of database objects based on the database name and object type selected in the frmSQLObjectNavigator form shown in Figure 13-3. The argument list accepts the value of the opgDBObjectTypes control as bytObjectType, which has a Byte data type declaration. This procedure begins by making a selection to the server name passed to it. The sample's Form_Open event procedure designates the local server, but you can change the code to reference another server. When you change the assignment in the Form_Open event procedure, it automatically affects the DBObjectList and LoginSecureAndListDBs2 function procedures.
The heart of the DBObjectList procedure is a Select Case statement that has a separate case for each of the four values that the opgDBObjectTypes control can return. When I created the opgDBObjectTypes control, I set these values to 1 through 4. If you change the Option button control settings within the option group control so that they return other values, be sure to update the Case values accordingly.
When the opgDBObjectTypes control equals 1 in the sample, the procedure enumerates the user-defined Tables collection within the database name selected on the form. If the opgDBObjectTypes control value is either 2 or 3, the procedure enumerates user-defined views or stored procedures, respectively. The code for enumerating views and stored procedures must exclude some object names that begin with ~TMPCLP. Although SQL Server generates objects with this prefix for its own internal use, it considers such objects user defined.
An opgDBObjectTypes control value of 4 causes the code to enumerate user-defined functions. SQL Server 2000 is the first version of SQL Server to introduce this object class. Therefore, SQL-DMO must use the Database2 object as opposed to the default Database object used for the other object collections. The declaration for dbs2 at the beginning of the procedure illustrates the syntax for an object reference to the new Database2 object class. The code for the clause when the Case bytObjectType value equals 4 illustrates how to use this object to enumerate the user-defined functions in a database.
Function DBObjectList(srvName As String, _
    DBname As String, _
    bytObjectType As Byte) As String
Dim tbl1 As SQLDMO.Table
Dim vew1 As SQLDMO.View
Dim spr1 As SQLDMO.StoredProcedure
Dim dbs2 As SQLDMO.Database2
Dim udf1 As SQLDMO.UserDefinedFunction

'Instantiate a SQLServer object, and connect
'using integrated security
Set srv1 = New SQLDMO.SQLServer
srv1.LoginSecure = True
srv1.Connect srvName

'Pass back from function-delimited object names function.
'All objects used are available with Databases collection
'(default of SQL Server 7), except for UserDefinedFunctions,
'which require a Database2 object.
Select Case bytObjectType
    Case 1
        For Each tbl1 In srv1.Databases(DBname).Tables
            If tbl1.SystemObject = False Then
                DBObjectList = _
                    DBObjectList & tbl1.Name & "; "
            End If
        Next tbl1
    Case 2
        For Each vew1 In srv1.Databases(DBname).Views
            If vew1.SystemObject = _
                False And Left(vew1.Name, 7) <> "~TMPCLP" Then
                DBObjectList = _
                    DBObjectList & vew1.Name & "; "
            End If
        Next vew1
    Case 3
        For Each spr1 In srv1.Databases(DBname).StoredProcedures
            If spr1.SystemObject = _
                False And Left(spr1.Name, 7) <> "~TMPCLP" Then
                DBObjectList = _
                    DBObjectList & spr1.Name & "; "
            End If
        Next spr1
    Case 4
        Set dbs2 = srv1.Databases(DBname)
        For Each udf1 In dbs2.UserDefinedFunctions
            If udf1.SystemObject = False Then
                DBObjectList = _
                    DBObjectList & udf1.Name & "; "
            End If
        Next udf1
End Select

'Strip trailing delimiter
If DBObjectList <> "" Then
    DBObjectList = _
        Left(DBObjectList, _
        Len(DBObjectList) - 2)
Else
        DBObjectList = "None"
        Exit Function
End If

'Clean up objects
srv1.DisConnect
Set srv1 = Nothing

End Function
If you become even moderately handy with SQL-DMO, you can get it to do your T-SQL programming for you. The following sample demonstrates how to use SQL-DMO to copy a table's design from one database to another. In this particular instance, the code copies the Pic_Addresses table initially created in Chapter 11. The sample re-creates the table in the database for this chapter's Access project by copying the T-SQL for the table from the Chapter11SQL database, editing it slightly, and then running the altered code in the current database. After the code generates a new table, the procedure next copies the data from the table in the other database. Although both Access projects and SQL Server offer graphical means of achieving the same objectives, this code sample shows how to tightly integrate the functionality within applications that you program for clients.
The sample first opens a connection to the server with the database containing the table we plan to copy. In my environment, this is the CabSony1 server. You can use any server that maintains the database for Chapter 11 (Chapter11SQL.) If you haven't run the samples for creating the database and the Pic_Addresses table along with populating the table, now is a good time to do so. The code uses SQL Server authentication with the sa login and a password string of password. You can change the login style, login name, and password string to match the setup of your database server and the password for the sa login.
The trick to getting SQL-DMO to write the T-SQL syntax for a database object is to use the Script method. This method returns the T-SQL batch to re-create an object. Script automatically creates the T-SQL batch for any object to which you apply it. Unfortunately, the T-SQL batch ends with a GO command for Query Analyzer, a SQL Server client management tool we discussed in Chapter 11. To use the batch in a VBA module, we need to strip the trailing GO command, which appears in the last eight characters of the script. The following sample demonstrates the use of this technique for the Pic_Addresses table in the Chapter11SQL database. After editing the script, this sample removes any prior version of the Pic_Addresses table from the current database. Then it runs the edited T-SQL statement for creating a new copy of the Pic_Addresses table. Notice that the procedure uses an ADO Connection object to execute the T-SQL strip. Chapter 11 demonstrated and described this technique.
After creating the table based on the script, you're left with an empty table. The next step is to populate the table with data from the original table in the other database, Chapter11SQL. An INSERT INTO statement can facilitate this. Use a SELECT statement instead of a VALUES list as the source for the data to insert. In the FROM clause of the SELECT statement, specify the table in the source database. After constructing the string, the sample invokes the statement with an ADO Connection object.
Sub CreatePic_Addresses()
Dim srv1 As SQLDMO.SQLServer
Dim str1 As String
Dim cnn1 As ADODB.Connection
Dim int1 As Integer
#Const PrintScript = True

'Assign server name
srvName = "CabSony1"

'Make connection to remote server
Set srv1 = New SQLDMO.SQLServer
srv1.Connect srvName, "sa", "password"

'Copy, optionally print, and edit script for table
str1 = srv1.Databases("Chapter11SQL"). _
    Tables("Pic_Addresses").Script
#If PrintScript Then
    Debug.Print str1
#End If
int1 = Len(str1) - 8
str1 = Left(str1, int1)

'Execute edited script for table;
'drop prior version of table, if necessary
Set cnn1 = CurrentProject.Connection
Drop_a_table cnn1, "Pic_Addresses"
cnn1.Execute str1

'Insert descriptions and addresses from Pic_addresses
'in Chapter11SQL database on CabSony1 server
str1 = "INSERT INTO Pic_Addresses " & _
    "SELECT Pic_description, Pic_address " & _
    "FROM Chapter11SQL.dbo.Pic_Addresses"
cnn1.Execute str1

'Refresh Database window to show new table
RefreshDatabaseWindow

'Clean up objects
srv1.DisConnect
Set srv1 = Nothing

End Sub

Sub Drop_a_table(cnn1 As ADODB.Connection, TableName As String)
Dim str1 As String

'Delete the table if it exists already
str1 = "IF EXISTS (SELECT TABLE_NAME " & _
    "FROM INFORMATION_SCHEMA.TABLES " & _
    "WHERE TABLE_NAME = '" & TableName & "') " & _
    "DROP TABLE " & TableName
cnn1.Execute str1

End Sub
If you want to populate the table with new data, you'll need a slightly different version of the VBA procedure to create Pic_Addresses. This alternate version will still use the Script method to derive the T-SQL for the Pic_Addresses table. However, the alternate procedure uses a simple VALUES list, as in the samples shown in Chapter 11. The alternate procedure, CreatePic_Addresses2, appears in Chapter13.adp, which is with the companion content for this book.
As I developed this sample, it was useful to scan the end of the T-SQL batch statement generated by the Script method. In particular, I needed to examine the characters toward the end of the method's return value. The following pair of procedures demonstrates one approach to printing an index number and a string value for each of the last 50 characters in the string returned from the Script method. You can use this code sample to verify the number of characters to cut from the end of the Script method's return value. You can easily adapt this code sample to examine any number of characters at the end of any string.
Sub CallTrailingCharactersInString()
Dim srv1 As SQLDMO.SQLServer
Dim str1 As String

'Assign server name
srvName = "CabSony1"

'Make connection to remote server with sa login
Set srv1 = New SQLDMO.SQLServer
srv1.Connect srvName, "sa", "password"

'Copy script for table to str1
str1 = srv1.Databases("Chapter11SQL"). _
    Tables("Pic_Addresses").Script

'Print trailing 50 characters in table script
TrailingCharactersInString str1, 50

'Clean up objects
srv1.DisConnect
Set srv1 = Nothing

End Sub

Sub TrailingCharactersInString(str1 As String, _
    bytCharacters As Byte)
Dim int1 As Integer
Dim int2 As Integer

int1 = Len(str1)

'Print bytCharacter trailing characters in str1
For int2 = 1 To int1
    If (int1 - int2) <= bytCharacters Then _
        Debug.Print int2, Mid(str1, int2, 1)
Next int2

Debug.Print "Total number of characters in str1: " & int1

End Sub
Attaching and detaching database files is a flexible way to transfer databases between different SQL servers. Chapter 12 describes how to attach a database file (actually, an .mdf file) with manual techniques based on the Database menu for an Access project. Because this is an administrative function, SQL-DMO also offers good support for this kind of activity. In fact, you can easily automate working with sets of files. This section starts with a pair of samples for attaching and detaching individual files. Then it moves on to manipulate a set of database files all at once.
| Note |
files. For example, see the "sp_attach_db" topic in Books Online. |
The following pair of procedures shows how to attach a single SQL Server database file with an .mdf extension to the local server. Access developers are used to thinking of an .mdb file as a database. However, with SQL Server, the database file is not visible until you attach it to a server. Once you do, users interact with the database by addressing the server. They never have direct access to the file as is common with Access file-server applications.
The sample's first procedure specifies the database name and the .mdf file name. Then it passes this information to the AttachADB procedure. This second procedure starts by making a connection to the local server. Then it invokes the SQLServer object's AttachDB method. This method requires a function specification in which you set the function's return value to a string.
Sub CallAttachADB()
Dim DBName As String
Dim MdfFilePath As String

'Specify database name and filepath to .mdf
DBName = "adp4SQL"
MdfFilePath = "C:\Access11Files\Chapter13\adp4sql.mdf"
AttachADB DBName, MdfFilePath

End Sub

Sub AttachADB(DBName As String, MdfFilePath)
Dim srv1 As New SQLDMO.SQLServer
Dim str1 As String

'Connect to local server
srv1.LoginSecure = True
srv1.Connect "(local)"

'Attach database with passed arguments
str1 = srv1.AttachDB(DBName, MdfFilePath)

End Sub
The AttachDB method is very flexible. For example, its argument list can optionally include a log file with an .ldf extension. If the database spans multiple operating system files, you can specify up to 16 files for it. You can also use this method to attach database files to a server other than the one on your workstation.
Detaching a database file is even easier than attaching one. First, use the DetachDB method for a server. Then specify the name of the databases on the server. The following code shows a sample that detaches adp4SQL from the local server:
Sub CallDetachADB()
Dim DBName As String

'Specify database name
DBName = "adp4SQL"
DetachADB DBName

End Sub

Sub DetachADB(DBName As String)
Dim srv1 As New SQLDMO.SQLServer

srv1.LoginSecure = True
srv1.Connect "(local)"

srv1.DetachDB (DBName)
End Sub
If you're attaching a file to another database, it's common to derive the file by detaching it from another server. You cannot copy or move a database file until you first detach it from a server. After processing a database file for use on another server (for example, to make a copy of it), you can reattach the original .mdf file to the server from which you detached it.
The AttachDB method can be particularly handy when you want to attach a set of database files between servers on the same or a different computer. After detaching the files that you need from a server, copy the .mdf file for each database to a destination folder. Then reattach the original files to their server. The "Opening an Access Project for an .mdf File" sidebar and the reference to it in the "Creating a Form Based on a Table with One Click" section of Chapter 12 describe a manual approach for opening an Access project connected to the database corresponding to an .mdf file. The process described in the sidebar creates a database on a server for the .mdf file. You can repeat this process manually for each .mdf file for which you want to create a corresponding database on a server. This section includes a sample for attaching and detaching a set of files programmatically.
The next sample consists of a couple of procedures that demonstrate how to attach multiple .mdf files from a target folder. The first procedure requires a reference to the Microsoft Scripting Runtime library. This procedure uses the library to facilitate looping through the files in a target folder, which in this case is the C:\Access11Files\Chapter13\ directory. For each .mdf file that the procedure discovers in the target folder, the sample creates a database name (DBName) based on the filename (less the extension). In addition, the procedure assigns a value to the MdfFilePath variable and the filename for the .mdf database file (including the extension). The second procedure in the sample is the AttachADB procedure discussed earlier. The sample calls this procedure once for each .mdf in the target folder.
'Requires Microsoft Scripting Runtime reference
Sub AttachDataFiles()
Dim fso1 As Scripting.FileSystemObject
Dim str1 As String
Dim fil1 As Scripting.File
Dim DBName As String
Dim MdfFilePath As String

'Set reference to FileSystemObject
Set fso1 = New Scripting.FileSystemObject

'Loop through files in target folder
'attempt to attach .mdf files to local
'database server
str1 = "C:\Access11Files\Chapter13\"
For Each fil1 In fso1.GetFolder(str1).Files
    If fil1.Type = "Database File" And _
        Right(fil1.Name, 3) <> "ldf" Then
        DBName = Left(fil1.Name, Len(fil1.Name) - 4)
        MdfFilePath = str1 & fil1.Name
        AttachADB DBName, MdfFilePath
    End If
Next fil1

End Sub
The code in the preceding sample excludes the processing of files with an .ldf extension in the target folder. This is purely a convenience for the sample. As mentioned in the preceding section, the AttachDB method can process multiple types of database files, including .ldf files. This requires that your application pass the method a SQL-DMO multistring with the names of all files comprising the database. See the "Using SQL-DMO Multistrings" topic in Books Online for instruction on how to work with multistrings.
You can also automatically detach a collection of databases. The sample that demonstrates an approach to the detaching process also serves as a sample for attaching a set of files; the difference is that you repeatedly invoke DetachADB instead of the AttachADB procedure. Because the process is so similar to attaching multiple database files, refer to Module1 of the Chapter13.adp file for the program listing. The sample procedure has the name DetachDatabaseFiles.