In this chapter we will create an empty ASP.NET application that will use integrated Windows authentication.

|
Source Code | |
|---|---|---|
|
You can find the source code for this chapter in the Examples\VB\SAWindowsVB (or Examples\CS\SAWindowsCS) folder in the Secure Access installation folder. |
||
-
Create a new ASP.NET project or open an existing one.
-
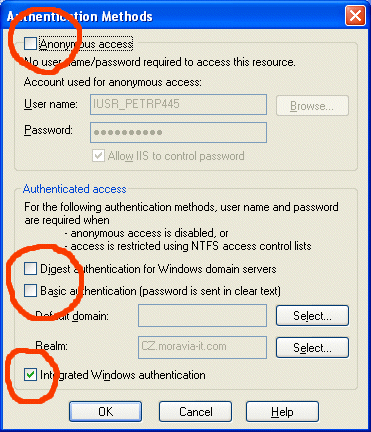
Set proper authentication on the virtual directory in the Internet Information Services console (you can find it in the Control Panels, in the Administrative Tools folder): Locate your Web application in the tree and view its properties. Choose the "Directory Security" tab, click on the "Edit..." button and make sure that only the "Integrated Windows Authentication" box is checked and the "Anonymous access", "Digest authentication" and "Basic authentication" boxes are unchecked.
-
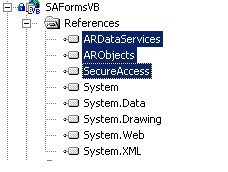
Add reference to the Secure Access libraries into your project:
-
Choose "Project" - "Add Reference..." item in the main menu.
-
Choose the ".NET" tab on the "Add Reference" dialog and click "Browse...". Choose ARDataServices.dll, ARObjects.dll and SecureAccess.dll files in the "DLLs" subfolder in the installation folder. Click the "Select" button and then click the "OK" button.
-
-
Add following lines in the "configuration" section of the Web.config file:
<appSettings>
		 <add key="SecureAccessConnectionString" value="data source=localhost;initial catalog=SecureAccess;user id=portsight;password=p0sight%.x" />
</appSettings>
Modify data source, initial catalog, user id and password to appropriate values. -
Add following lines in the "system.web" section (or replace the same settings if it already exists):
<authentication mode="Windows" />You set up the ASP.NET security for the Windows authentication.
Impersonation If you need the authenticated user to access to resources, such as SQL Server using Windows authentication or access files on the file system through your application, you need to impersonate the user. You can do it by adding following lines to the Web.config file: <authentication mode="Windows" /> <identity impersonate="true"/>
-
Add or modify the "authorization" element in the "system.web" section so that it looks like this one:
<authorization> <deny users="?" /> </authorization> -
Open your Global.asax file and add following lines at the beginning of its code-behind:
[Visual Basic]

Imports System.Web.Security
Imports System.Resources
Imports PortSight.SecureAccess.ARDataServices
Imports PortSight.SecureAccess.ARObjects
Imports System.Threading
Imports System.Globalization


[C#]

using System.Web.Security;
using System.Resources;
using PortSight.SecureAccess.ARDataServices;
using PortSight.SecureAccess.ARObjects;
using System.Threading;
using System.Globalization;
-
Add following code to the Application_Start event in the Global.asax:
[Visual Basic] 'create resource manager and store it in the application variable Dim assmbl As System.Reflection.Assembly = System.Reflection.Assembly.Load("SecureAccess") Dim Resman As ResourceManager = New ResourceManager("SecureAccess.strings", assmbl) Application("RM") = Resman [C#] //create resource manager and store it in the application variable System.Reflection.Assembly assmbl = System.Reflection.Assembly.Load("SecureAccess"); ResourceManager Resman = new ResourceManager("SecureAccess.strings", assmbl); Application["RM"] = Resman; -
Add following lines in the Session_Start event in the Global.asax:
[Visual Basic] 'create user ticket Dim currentUser As ARUser Dim arCN As ARConnection If User.Identity.IsAuthenticated Then arCN = New ARConnection() arCN.ConnectToCatalog() currentUser = arCN.GetUserByLogin(User.Identity.Name) If currentUser Is Nothing Then 'user was not found in the database arCN.Close() Response.Redirect("AccessDenied.aspx") Else If currentUser.IsLocked Then 'account is locked -> access denied arCN.Close() Response.Redirect("AccessDenied.aspx") Else 'account has been found and is not locked 'create user ticket and store it in the session variable Session("ARUserTicket") = New ARUserTicket(currentUser) arCN.Close() End If End If End If [C#] //create user ticket ARUser currentUser; ARConnection arCN; if (User.Identity.IsAuthenticated) { arCN = new ARConnection(); arCN.ConnectToCatalog(); currentUser = arCN.GetUserByLogin(User.Identity.Name); if (currentUser == null) { // user was not found in the database arCN.Close(); Response.Redirect("AccessDenied.aspx"); } else { if (currentUser.IsLocked()) { //account is locked -> access denied arCN.Close(); Response.Redirect("AccessDenied.aspx"); } else { //account has been found and is not locked //create user ticket and store it in the session variable Session["ARUserTicket"] = new ARUserTicket(currentUser); arCN.Close(); } } } -
Now, create the "AccessDenied.aspx" page with some informative text. The users will be redirected there if their account cannot be found in the database or has been locked.
-
Create the default.aspx page that will contain information available for authenticated users only. Right click the page in the Solution Explorer and set this page as start page.
-
Add following lines at the beginning of the default.aspx code-behind:
[Visual Basic]

Imports PortSight.SecureAccess.ARDataServices
Imports PortSight.SecureAccess.ARObjects


[C#]

using PortSight.SecureAccess.ARDataServices;
using PortSight.SecureAccess.ARObjects;
-
Add a new Label control on the default.aspx form and name it Label1. Add following code in the Page_Load method:
[Visual Basic] Dim userTicket As ARUserTicket userTicket = CType(Session("ARUserTicket"), ARUserTicket) If Not userTicket Is Nothing Then Label1.Text = "Hi " & userTicket.ObjectName & ", welcome to the PortSight Secure Access demo." End If [C#] ARUserTicket userTicket; userTicket = (ARUserTicket) Session["ARUserTicket"]; if (userTicket != null) { Label1.Text = "Hi " + userTicket.ObjectName + ", welcome to the PortSight Secure Access demo."; } -
Open the Secure Acces user interface and make sure that the list of users contains an account that has the same login name as you have for your current domain, including the domain name. You should use something like this: MAINDOMAIN\JohnF. Make sure you use back slash.
-
Compile and run the project. You should see the default.aspx page now. You should see the welcome message with your name.