This section will guide you through the process of setting up the import from Microsoft Active Directory.
First, choose the catalog you want to import external data to and then click "New" in the "Directory Ports" dialog. The "Directory Port Settings Wizard" opens.
Step 1 - Name and Type of the Directory Port
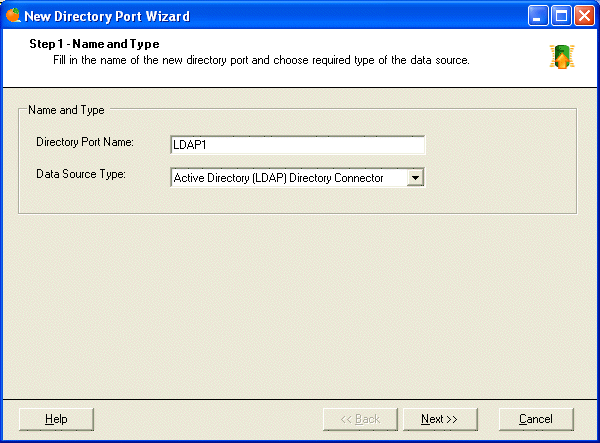
Enter some name and choose required type of the data source. Click "Next".
Step 2 - Data Source Configuration
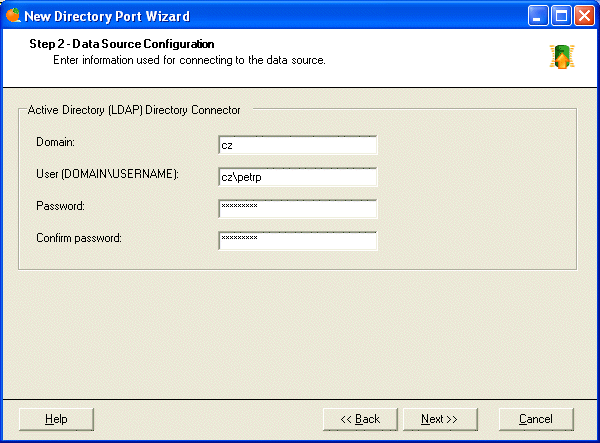
Fill out the following fields:
- Domain - Name of the Active Directory domain.
- User - name of the user account that will be used for reading data from the domain. Please use the full domain name, such as "MyDomain\JohnD". The user must have access for reading domain information.
- Password - password of the user account.
- Confirm password - repeat password here.
Note: The password is stored in an encrypted file catalogs.xml.
Click "Next" to continue.
Step 3 - Choosing Types of Selected Objects

Here you can choose what will be imported from the domain:
- Users - import users.
- Groups - import domain user groups.
- Organizational Units - import organizational units.
- Membership - import information about membership of users in groups and membership of groups in other groups.
You can also choose if you want to delete accounts in the Secure Access database after they were deleted from the domain.
During the import there are generated various events (before/after importing new user, group, organizational units) and you may hook up these events and programmatically respond to them. In the "Custom Event Handler" section you may specify for each object type path to the DLL that contains specified event handler class. Handling events may be useful when you need to update details of the newly imported accounts or you need to perform some cleaning after deleting an account. For more details about how to write your own event handler class please refer to the Writing Custom Event Handler chapter.
Step 4 - Choosing Objects to Be Imported

In this step, you can specify items that will be or will NOT be imported. By default, all items found in the data source are imported. You can modify this by choosing one of two modes:
- Import all except selected items - all items except those you select (in the right list box) will be imported. If new user or group is created, it will be imported automatically.
- Import only selected items - only items you select (in the right list box) will be imported. If new user or group is created, it won't be imported unless you modify this settings manually.
This is useful if you need to exclude system accounts from the import.
Step 5/6/7 - Mapping Properties of Users, User Groups and Organizational Units

In this step, you can map properties of the source object (user or group) to the target object. The left-most column contains source fields (properties of the domain user). The right-most column contains the target field (property of the user in the Secure Access catalog).
There are the following default source fields:
- AR_ObjectGUID - a unique identifier (typically a GUID or some other ID) in the data source. It should be an identifier that doesn't change when the user's name or login name changes. It must always be mapped.
- AR_Login - loginname of the user in the external data source.
- AR_ObjectAlias - a unique property (typically loginname) in the external data source that may be used as the Object Alias in the Secure Access catalog.
- AR_ObjectName - a source field (typically the full name) that will be displayed as a name of the object in the Secure Access.
In the right-most column you can choose the target field the value will be stored in. The drop-down list contains names of the target properties (marked as "internal") as well as custom-defined properties. If you need to create a new custom property, you can do it by entering it alias in the "New Property Alias" field and clicking "Create".

|
Important Notes - PLEASE READ THIS | |
|---|---|---|
|
||
Step 8 - Schedule Import
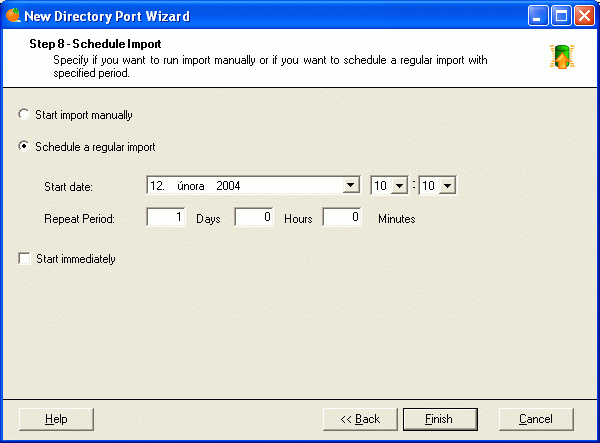
Specify if you want to run import manually or if you want to schedule a regular import with specified period. Click "Finish" to complete the wizard. Now you can either wait until the import runs automatically (if you chose the regular import) or you can click the "Import Now" in the "Directory Ports" dialog to start import immediately.