Resource-based authorization is a little more complicated than the previous methods, but it's more flexible. You can define your resources that represent applications or application parts, you can define your permission types (such as "Read") and then check if user has particular permission. This gives you more flexible control of permissions since you can define the permissions with higher granularity. You can also define your roles and grant them typical sets of permissions. Later, when the security logic changes, you can simply modify the permission matrix without modifying your code.
This sample shows you how to incorporate resource-based authorization into your application:
-
Open your project with Secure Access authentication implemented. Add a new page called CheckPermissions.aspx.
-
Add following lines at the beginning of the page code-behind, so that you can use Secure Access libraries in this page.
[Visual Basic]

Imports PortSight.SecureAccess.ARDataServices
Imports PortSight.SecureAccess.ARObjects


[C#]

using PortSight.SecureAccess.ARDataServices;
using PortSight.SecureAccess.ARObjects;
-
Put a label on the form and name it "Label1". Change its text to "Label placed on a secured page."
-
Add following one line in the Page_Load event:
[Visual Basic] Private Sub Page_Load(ByVal sender As System.Object, ByVal e As System.EventArgs) Handles MyBase.Load If Not ARHelper.IsAuthorized(User.Identity.Name, "WorkReports", "Read") Then Response.Redirect("AccessDenied.aspx") End Sub [C#] private void Page_Load(object sender, System.EventArgs e) { if (!ARHelper.IsAuthorized(User.Identity.Name, "WorkReports", "Read")) Response.Redirect("AccessDenied.aspx"); } -
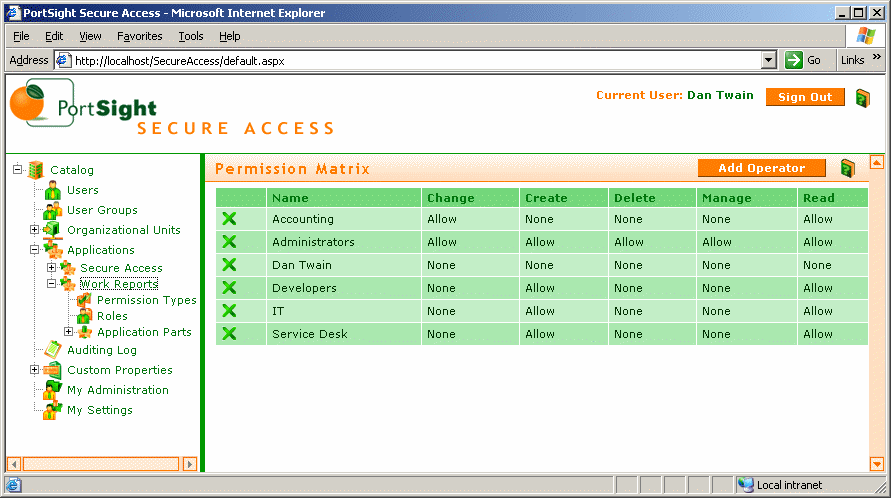
Open the Secure Access user interface. If you still haven't created the "Work Reports" application definition, enter a new application called "Work Reports" with alias "WorkReports". Now create a new permission type called "Read" with alias "Read". Click the "Work Reports" item in the left menu and you will see the permission matrix on the right. Add your account to the permission matrix using the "Add operator..." button and grant him read permission.
-
Compile and run your application. Log on and navigate to the CheckPermissions.aspx page. You should see the page with label "Label placed on a secured page.". Now, if you change the permissions - e.g. if you deny the "Read" permission to your account - you will be redirected to the "AccessDenied.aspx" page.
