Viewing and Navigating Table Data
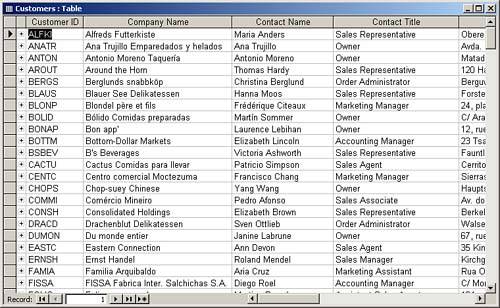
Tables are the basis of everything that you do in Access. Most of the data for a database resides in tables, so if you're creating an employee payroll database, the employee data will be stored in a table, your payroll codes might be stored in a table, and your past payroll records could be stored in a table. A table contains data about a specific topic or subject (for example, customers, orders, or employees). Tables are arranged in rows and columns, similarly to a spreadsheet. The columns represent the fields, and the rows represent the records (see Figure 2.1).
Opening an Access Table
Before you can view the data in a table and work with its records, you must open the table. To open a table in Datasheet view, follow these steps:
Select Tables in the list of objects in the Database window.  Select the table you want to open and click the Open button in the database window or double-click the table you want to open. Select the table you want to open and click the Open button in the database window or double-click the table you want to open.
Navigating Around a Table
You can move around a table by using the keyboard or mouse. When you are editing or adding records, your hands are on the keyboard and you might find it easiest to move around a table by using the keyboard. However, if you are looking for a specific record, you might find it most convenient to use the mouse.
Table 2.1 shows the keyboard and mouse actions for moving around a table and their resulting effects. As you can see, Microsoft Access provides numerous keyboard and mouse alternatives for moving around a table.
Table 2.1. Keyboard and Mouse Actions to Move Around a Table|
Tab or right arrow | Click the right arrow on the bottom scrollbar. | Moves one field to the right of the current field. | Shift+Tab or left arrow | Click the left arrow on the bottom scrollbar. | Moves one field to the left of the current field. | Down arrow | Click the next record button  . . | Moves down one record. | Up arrow | Click the previous record button  . . | Moves up one record. | Page Down | (No equivalent mouse action.) | Moves down one screen of records. | Page Up | (No equivalent mouse action.) | Moves up one screen of records. | Home | (No equivalent mouse action.) | Selects the first field of the current record. | End | (No equivalent mouse action.) | Selects the last field of the current record. | Ctrl+Home | Click the first record button  . . | Moves to the first record of the table. | Ctrl+End | Click the last record button  . . | Moves to the last record of the table. | F2 | Click and drag within a field. | Selects the text in the field. |
 | The insertion point does not change locations just because you move the mouse; only the mouse pointer moves when you move the mouse. You need to click within a field before you begin typing, or the changes occur in the original mouse location. |
The Table window includes tools that allow you to scroll through the fields and records, move from record to record, expand and collapse to show and hide related records, and more. Figure 2.2 illustrates these features. Table 2.2 provides a list of these features and provides a description of each.
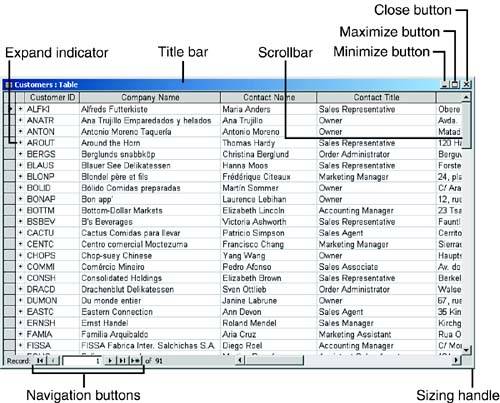
Table 2.2. The Components of the Table Window|
Title bar | You can move a window by putting the mouse pointer on the title bar, holding down the mouse button, and dragging. | Close button | Clicking the close button closes the table. | Maximize button | You can click the maximize button, which is a square, to maximize the window. The datasheet then fills the applications window. | Minimize button | You can click the minimize button, which looks like an underscore within a square, to minimize the window. The icon appears on the taskbar. You can restore the window by clicking the icon. | Sizing handle | To change the size of the window, you put the pointer on the lower-right corner, hold down the mouse button, and drag. When the window is the size you want, you release the button. | Scrollbar | You can use the scrollbars to move up and down and right and left in the table. | Navigation buttons | These icons allow you to select the first record, last record, next record, or previous record in the table. | Expand indicator | The expand indicator allows you to view the data hierarchy by showing you any subdata records that are linked to the main record. |
Closing a Table
When you are finished working with a table, you need to close it. To close a table, you choose File | Close or click the close button in the upper-right corner of the Table window.
 | Access often prompts you as you close a table, asking if you want to save changes to the layout of the table. It is important that you understand that Access is not asking you if you want to save changes to the data. As you'll learn in a moment, Access saves changes to data the moment you move off a record. When you close a table and Access prompts you, it is asking you if you want to save formatting changes, such as changes to column width, to the look of the datasheet, and so on. |
 |