Query Basics
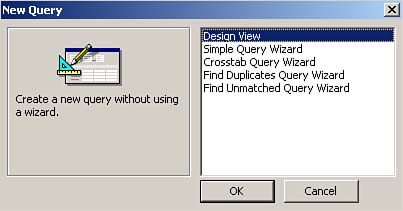
Creating a basic query is easy because Microsoft has provided a user-friendly, drag-and-drop interface. There are two ways to start a new query in Access 2003. The first way is to select the Queries icon from the Objects list in the Database window; then double-click the Create query in Design View icon or the Create query by using wizard icon (see Figure 10.1). The second method is to select the Queries icon from the Objects list in the Database window and then click the New command button on the Database window toolbar. The New Query dialog box appears (see Figure 10.2). This dialog box lets you select whether to build the query from scratch or use one of the wizards to help you. The Simple Query Wizard walks you through the steps of creating a basic query. The other wizards help you create three specific types of queries: Crosstab, Find Duplicates, and Find Unmatched queries.

Adding Tables to Queries
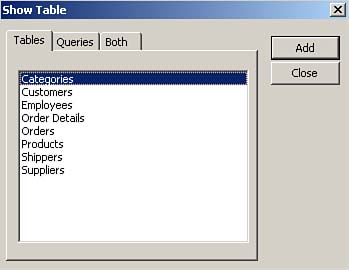
If you choose to use Design view rather than one of the wizards, the Show Table dialog box appears (see Figure 10.3). In this dialog box, you can select the tables or queries that supply data to a query. Access doesn't care whether you select tables or queries as the foundation for queries. You can select a table or query by double-clicking the name of the table or query you want to add or by right-clicking the table and then selecting Add from the context menu. You can select multiple tables or queries by holding down the Shift key while you select a contiguous range of tables or the Ctrl key while you select noncontiguous tables. After you have selected the tables or queries you want, you click Add and then click Close. This brings you to the Query Design window, shown in Figure 10.4.
 | An alternate way to add a table is to first select Tables from the Objects list in the Database window and then select the table on which you want to base the query. With the table selected, you select New Query from the New Object drop-down list box on the toolbar or choose Insert | Query. The New Query dialog box appears. This is an efficient method of starting a new query based on only one table because the Show Table dialog box never appears. |
Adding Fields to Queries
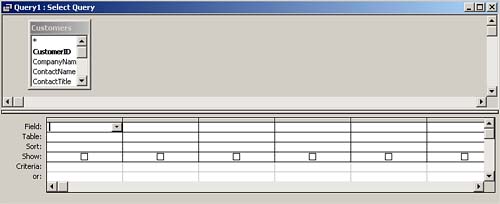
After you add tables to a query, you can select the fields you want to include in the query. The query shown in Figure 10.4 is based on the Customers table from the Northwind database that ships with Microsoft Access. Notice that the query window is divided into two sections: The top half of the window shows the tables or queries that underlie the query you're designing, and the bottom half shows any fields that you will include in the query output. You can add a field to the query design grid on the bottom half of the query window in several ways:
You can double-click the name of the field you want to add. You can click and drag a single field from the table in the top half of the query window to the query design grid below. You can select multiple fields at the same time by using the Shift key (for a contiguous range of fields) or the Ctrl key (for a noncontiguous range). You can double-click the title bar of the field list to select all fields and then click and drag any one of the selected fields to the query design grid.
 | You can double-click the asterisk in the field list to include all fields within the table in the query result. Although this is very handy in that changes to the table structure magically affect the query's output, this "trick" is dangerous. When you select the asterisk, you include all table fields in the query result, whether you need them or not. This can cause major performance problems in a local area network (LAN), wide area network (WAN), or client/server application. |
|  The easiest way to run a query is to click the Run button on the toolbar. (It looks like an exclamation point.) You can click the Query View button to run a query, but this method works only for Select queries, not for Action queries. The Query View button has a special meaning for Action queries (explained in Hour 15, "Power Query Techniques"). Clicking Run is preferable because when you do that, you don't have to worry about what type of query you're running. After you run a Select query, you should see what looks like a datasheet that contains only the fields you selected. To return to the query's design, you click the Query View button. The easiest way to run a query is to click the Run button on the toolbar. (It looks like an exclamation point.) You can click the Query View button to run a query, but this method works only for Select queries, not for Action queries. The Query View button has a special meaning for Action queries (explained in Hour 15, "Power Query Techniques"). Clicking Run is preferable because when you do that, you don't have to worry about what type of query you're running. After you run a Select query, you should see what looks like a datasheet that contains only the fields you selected. To return to the query's design, you click the Query View button.
|
| Access 2002 introduced shortcut keys that allow you to easily toggle between the various query views: Ctrl+>, Ctrl+period, Ctrl+<, and Ctrl+comma. Ctrl+> and Ctrl+period take you to the next view; Ctrl+< and Ctrl+comma take you to the previous view. |
Removing a Field from the Query Design Grid
To remove a field from the query design grid, follow these steps:
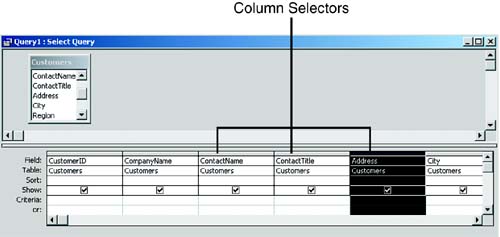
Find the field you want to remove. Click the column selector (that is, the small horizontal gray button) immediately above the name of the field. The entire column of the query design grid should become black (see Figure 10.5).
Press the Delete key or select Delete from the Edit menu. Access removes the field from the query.
Inserting a Field After a Query Is Built
The process for inserting a field after you have built a query depends on where you want to insert the new field. If you want to insert it after the existing fields, it's easiest to double-click the name of the field you want to add. If you prefer to insert the new field between two existing fields, it's best to click and drag the field you want to add and drop it onto the field you want to appear to the right of the inserted field.
Moving a Field to a Different Location on the Query Design Grid
Although the user can move a column while in a query's Datasheet view, sometimes you want to permanently alter the position of a field in the query output. You can do this as a convenience to the user or, more importantly, to use the query as a foundation for forms and reports. The order of the fields in the query becomes the default order of the fields on any forms and reports you build by using any of the wizards. You can save yourself quite a bit of time by ordering queries effectively.
To move a single column, follow these steps:
Select a column while in the query's Design view by clicking its column selector. Click the selected column a second time, and then drag it to a new location on the query design grid.
Follow these steps to move more than one column at a time:
Drag across the column selectors of the columns you want to move. Click any of the selected columns a second time, and then drag them to a new location on the query design grid.
 | Moving a column in Datasheet view doesn't modify the query's underlying design. If you move a column in Datasheet view, subsequent reordering in Design view isn't reflected in Datasheet view. In other words, Design view and Datasheet view are no longer synchronized, and you must reorder both manually. This actually serves as an advantage in most cases. As you will learn later in this hour, if you want to sort by the Country field and then by the CompanyName field, the Country field must appear to the left of the CompanyName field in the design of the query. If you want the CompanyName field to appear to the left of the Country field in the query's result, you must make that change in Datasheet view. The fact that Access maintains the order of the columns separately in both views allows you to easily accomplish both objectives. |
Saving and Naming Queries
To save a query at any time, you can click the Save button on the toolbar. If the query is a new one, Access prompts you to name the query.
| Access supplies default names for the queries that you create (for example, Query1, Query2). I suggest that you supply a more descriptive name. A query name should begin with qry so that you can easily recognize and identify it as a query. |
It's important to understand that when you save a query, you're saving only the query's definition, not the actual query result.
Task: Creating a Simple Query
 | To practice the skills you've learned so far, in this task you create a simple query. You should use the Northwind database so that you have a good source of existing data as the foundation for the query. Here's the process: |
Open the Northwind database that comes with Access. If you want to prevent the Startup form from appearing, hold down the Shift key as you open the database. Select Queries in the list of objects and then click the New icon on the Database toolbar. Select Design View in the New Query dialog box. Add the Customers table to the query. Click the CustomerID field. Hold down the Shift key and click the ContactTitle field. This should select the CustomerID, CompanyName, ContactName, and ContactTitle fields. Scroll down the list of fields by using the vertical scrollbar until the Region field is visible. Hold down the Ctrl key and click the Region field. With the Ctrl key still held down, click the Phone field. You should now have selected all six fields. Click and drag any of the selected fields from the table on the top half of the query window to the query design grid on the bottom. All six fields should appear in the query design grid. You might need to use the horizontal scrollbar to view some of the fields on the right. Assume that you have decided to remove the Region field from the query design grid. Use the horizontal scrollbar to see the Region field on the query design grid. Click the column selector immediately above the Region field. The entire column of the query design grid should become black, and the cursor should turn into a downward-pointing arrow. Press the Delete key to remove the Region field from the query design grid. To insert the Country field between the ContactTitle and Phone fields, click and drag the Country field from the table until it's on top of the Phone field. Then drop the Country field. The field is inserted in the correct place. To run the query, click Run on the toolbar. Move the ContactName and ContactTitle fields so that they appear before the CompanyName field. Do this by clicking and dragging from ContactName's column selector to ContactTitle's column selector. Both columns should be selected. Click again on the column selector for either column and then click and drag until the thick black line jumps to the left of the CompanyName field. Return to the Design View of the query. To save your work, click Save on the toolbar. When you're prompted for a name, call the query qryCustomers.
|