| [ Team LiB ] |
|
Recipe 10.1 Properly Secure Your Database10.1.1 ProblemThe database you've developed contains sensitive data to which you wish to limit access. You'd like to be able to create different classes of users so that some users have no access to this data, others can read the data but can't change it, and still others can modify the data. At the same time, you don't want to secure every object in the database this way; you'd like to apply security only to selected objects. Is this possible with Access? 10.1.2 SolutionAccess supports two forms of security: workgroup-based security and database-password security. If you use the simpler database-password security system, you can assign only a single password to the entire database, which is inadequate for your purposes. Fortunately, your needs can be met by using the more sophisticated workgroup-based security system. However, securing a database this way can be tricky. This solution guides you through the process, starting with a completely unsecured database and finishing with a well-secured database that should meet your needs. Before you can properly secure your database, you must have a security plan. Consider who will be using the database and what security permissions those users should have for each database object. With a plan in place, you can go about securing your database. 10.1.2.1 Make a security planThe first step in creating a security plan is to make a list of the people who will be using the database. Write out the names of the users and put them into distinct groups. A user can be a member of more than one group, but you need to assign each user a unique name. Users will have to type in their usernames each time they log into Access, so you may wish to keep the names as short as possible (but still unique). In a small workgroup, you may be able to use an individual's first name; in larger settings, you may need to use the first name plus the first letter of the last name or some similar scheme to ensure uniqueness. For example, if you were charged with designing a secured database for the solution company, you might come up with the users and groups in Table 10-1.
There are several things to note in Table 10-1. First, Paul is both a manager and a programmer. Second, two individuals in this company are named Tom but, to ensure uniqueness, we've assigned one of the Toms the username Thomas. Third, we recommend using the following convention: make usernames singular and group names plural. Finally, you need to identify members of a special built-in group called Admins. This group of users will have full access to all objects and will also be able to administer the security system. Once you have come up with a plan of users and groups of users, you need to inventory your database objects and determine which groups of users can do what with which objects. While you can assign each user a separate set of permissions, it's better to assign permissions to groups of users; this makes adding or subtracting users later much easier. An object inventory for the solution company database (10-01UNS.MDB) is shown in Table 10-2.
10.1.2.2 Secure your databaseNote that Access ships with a Security Wizard that will help you secure your database. With a plan in hand, you can now begin to secure your database, following these steps:
Figure 10-1. Creating a new workgroup file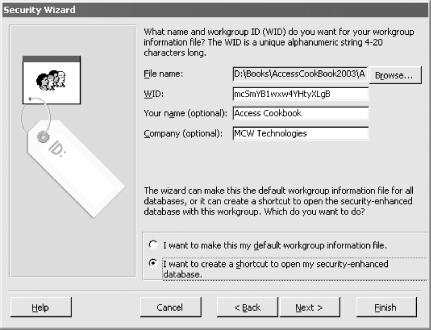
Figure 10-2. Selecting the objects to secure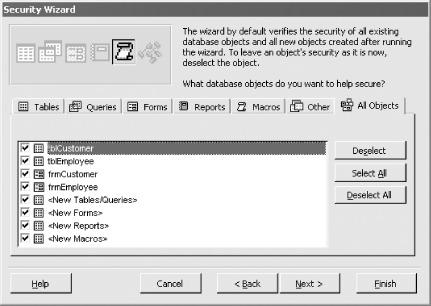
Figure 10-3. Creating default groups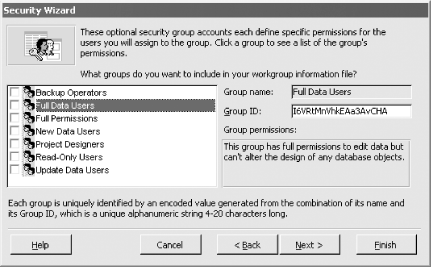
Figure 10-4. Setting a password for the Administrator account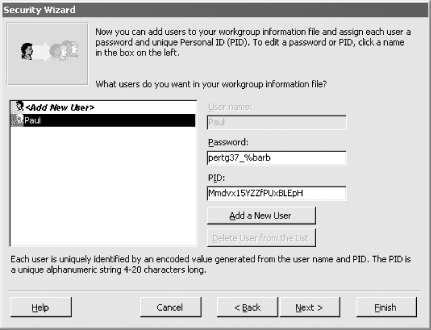
Figure 10-5. Adding users to groups
Figure 10-6. Creating a backup file of the secured database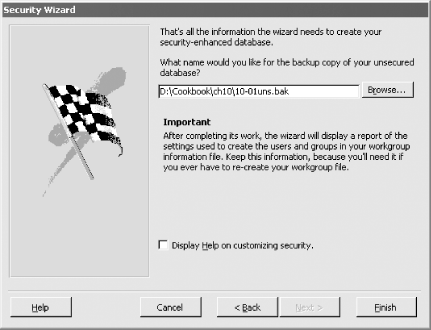 The one-step Security Wizard report is then displayed. This report lists all the security options you've chosen, along with the settings for users, groups, and Personal IDs (PIDs). You should save this and lock it away in a safe place. Should you ever need to recreate your workgroup file, you can use the same settings. Be careful: if your workgroup file is irretrievably lost and you can't restore it from a backup or recreate it, you could be locked out of your database forever. The wizard will save the report in snapshot format. The
wizard then notifies you that the database has been encoded (prior
versions of Access refer to this as encrypted) and that you must log
onto the secured database using the new workgroup file (see Figure 10-7). This means that the database
can't be read by a text editor and
can't be compressed by file-compression utilities.
If being able to compress the database means more to you than the
remote chance that someone will use a text editor to read strings out
of the .MDB file, you can decode (decrypt) the
database using Tools Figure 10-7. The wizard notifies you that the database has been encoded 10.1.2.3 Work with the secured databaseOnce the Security Wizard has finished, you need to shut down Access and restart. The Security Wizard creates a shortcut that automatically connects you to the newly secured database. Figure 10-8 shows the property settings of the shortcut. Note that the Target includes the /wrkgrp switch that points to the new workgroup file. Figure 10-8. The property settings of the database shortcut Follow these steps to manually create your users and groups according to the security model you've planned:
Figure 10-9. Creating custom groups and users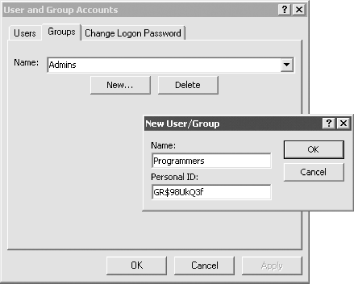
10.1.3 DiscussionAccess's workgroup-based security model consists of two parts:
In Step 1 of this solution, the wizard created a new securable workgroup file. Do not use the default workgroup file that Access installed on your system. That file, called system.mdw, contains a null WID and is the same across all Access installations. Therefore, someone trying to break into your database can easily recreate it. The wizard created the Administrator account, a new member of the Admins group, and then removed the default Admin user account from the Admins group. Although the Admin user and the Admins group have similar names, they are very different in Access security. The Admin user account is the default user account for all new workgroups. Its presence in every workgroup allows you to ignore security until you need it, because Access attempts to log you on as Admin with a blank password whenever you start Access. By changing the password for this account, you are unhiding security. Once you assign a password to Admin, however, you must create a new administrator-level user account (in the example, we used the account Paul), since the Admin account is the same across all Access workgroups and is thus unsecurable. Unlike the unsecurable Admin user account, the Admins group account is securable. In fact, this account is the key account in any secured Access database and derives its PID from the workgroup's WID. Each Admins group account is unique across Access workgroups. Therefore, you can't use the Admins account in one workgroup to try to break into another Access workgroup. Members of this account are able to modify and administer every object in every database associated with that workgroup. The Security Wizard secures your database by removing all permissions to objects from all users other than the members of the Admins group and the person who ran the wizard. While it's certainly possible to secure your database without using the Security Wizard, it's easy to make a mistake and create a database with one or more security holes. Thus, using the wizard is a very good idea! It's best not to assign object permissions explicitly to individual users; you'll find it easier to manage the security for a workgroup by considering the security of only groups. Occasionally, however, you may want to give a single user some special set of permissions. The actual level of permissions users get for a particular object is the sum of the permissions they have been assigned plus the permissions of each group in which they have membership. Again, remember not to assign any permissions to either the Admin user account or the Users group account, as these accounts are the same in all workgroups and are thus unsecured. |
| [ Team LiB ] |
|
 Security