[ Team LiB ] Previous Section Next Section

Recipe 9.3 Create a Geographical Map Interface

9.3.1 Problem

You want to display a map and allow users to click on regions of the map. You want the form to react based on which region is clicked on. The regions aren't necessarily rectangular. How can you do this?

9.3.2 Solution

You can accomplish this task using a combination of bitmaps and transparent command buttons. Depending on how far from rectangular your shapes are, this task may be trivial or quite involved. By making the command buttons transparent, you make the application appear to react directly to mouse clicks on the map.

Open frmWesternUS in 09-03.MDB (Figure 9-7). This form has been created with an imported bitmap file as the background. Above each state's image on the map there's at least one command button with its Transparent property set to Yes. Figure 9-8 shows the form named frmWesternUSDesign, in which the buttons are not transparent. Here you can see the actual layout of the command buttons.

Figure 9-7. The finished map form, frmWesternUS, with transparent buttons
figs/acb2_0907.gif
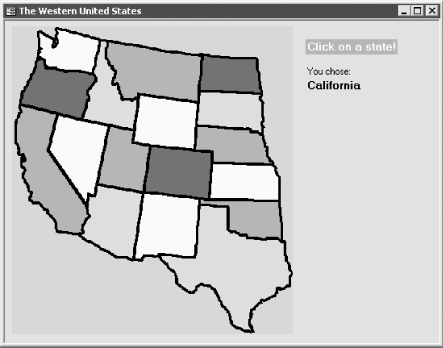
Figure 9-8. The same bitmap form with buttons showing
figs/acb2_0908.gif

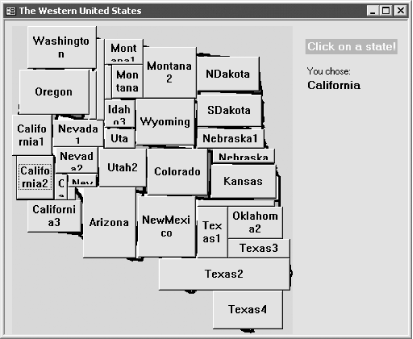
To implement similar functionality in your own forms, follow these steps:

  1. Create a new form. Click anywhere in the detail section of the form, and select Insert Object (or use the form design toolbox to place an unbound object frame control form on the form). Once you release the mouse button, Access displays a dialog requesting information about the object. At this point, you can create a new object by launching an application such as Microsoft Paint, or you can create an object from an existing file. If you choose the latter, a Browse button will appear. Click on the Browse button to select a file (see Figure 9-9). Choose the appropriate image for the background. For the example form, use USWEST.BMP.

Figure 9-9. Browsing a file from the Insert Object dialog
figs/acb2_0909.gif
  1. Set the bitmap's SizeMode property to Clip. This disallows resizing of the bitmap, as you'll be overlaying the bitmap with command buttons.

Using Shift and Ctrl plus the arrow keys is helpful in achieving exact placement of the command buttons. Use Shift-arrow to expand and contract the size of a control one pixel at a time; use Ctrl-arrow to move the control one pixel at a time.


  1. Overlay each defined area of the bitmap with a command button, naming each as desired. Figure 9-8 shows the completed process for the sample form. You'll find that for odd-shaped regions, you'll need to use multiple buttons, as demonstrated for Idaho, Texas, and Nevada on the map.

  2. Select all the command buttons (hold down the Shift key and click on each). On the properties sheet, set the Transparent property to Yes, making the selected controls invisible yet active. Figure 9-10 shows the sample form in design view; note that you can still see a faint outline of each button.

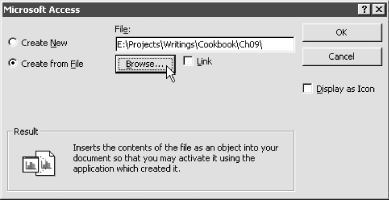
Figure 9-10. The sample map form in design view
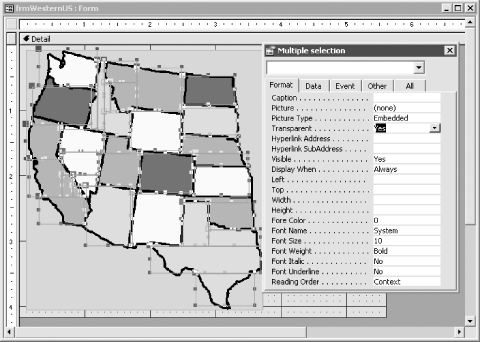
figs/acb2_0910.gif
  1. For each transparent command button, call a function, passing it the name that describes the defined area (in this example, the name of the selected U.S. state) from the button's OnClick event property. For example, the OnClick event property for the command button overlaying the state of Wyoming calls the HandleStateClick function, passing it "Wyoming":

    =HandleStateClick("Wyoming")
  2. Create the function called in Step 5. This function can be either in the form's module (as we have created) or in a global module. It's up to you to decide what to do with the information passed to the function. In the sample form, the name of the state is passed to an unbound text box. The HandleStateClick function is shown here:

    Private Function HandleStateClick(strState As String)
        Me.txtChosenState = strState
    End Function

9.3.3 Discussion

Because each button has its Transparent property set to Yes (which is very different from having its Visible property set to No!), it's still active. You can click on transparent buttons and they can react to events. Each transparent button corresponds to some physical region on the bitmap, so you can have the buttons' Click event procedures react according to their location on the bitmap. If only Windows supported irregularly shaped command buttons!

The size of the bitmap is key to the effectiveness of this technique. If you lay out the buttons all over the bitmap and then decide to resize it, your buttons' locations will no longer be correct. Make sure that you've fixed the size of the bitmap before you start laying out buttons. Although you can select all the buttons and resize them as a group, this is not a perfect solution.

Don't spend too much time getting the transparent buttons placed exactly. On the example form, the buttons' placement is fairly precise, but that works only because most of the states in the west are generally rectangular (you'll notice that there's no eastern seaboard on the map). Users will typically click in the center of the region, so covering each pixel on the edge isn't a serious concern.

    [ Team LiB ] Previous Section Next Section