Hack 56. Distribute a Split Database with Predefined Table Links
If you follow this interesting distribution game plan, users will not have to link their local database files to the data tables on the system. The technique known as database splitting, which involves a tables-only back-end Access file on a network share, copies of front-end Access files (with forms, reports, and so on) on each user's C:\ drive, and the use of linked tables, has been around for quite some time. The benefits of such client/server database configurations are widely known and documented. However, it can be a challenge to deal with split databases during periods of frequent updates, especially during the development phase. For some users, their Office installation doesn't even include the Linked Table Manager, so they can get prompted for the Office installation CD when they attempt to refresh and change links. Other users might simply be uncomfortable or unfamiliar with how linked tables work. Frequent relinking, especially for users who were used to just sharing an MDB from one location, can be problematic. When frequent rounds of revisions are being submitted to end users during the initial prototyping stage of development, it makes sense to keep the project in only one file. But once the data model is signed off, it's time to split the database. You can do this in two ways:
Then the back-end database (the one with the tables) goes on a network share, while the front-end database is distributed to users and is run from their PCs. The problem is that the front-end database must be linked to the tables in the back-end database. Simulating these links on your development PC before distributing the front end is the point here. If you can set the links so that they are the same as those in the production environment, users will not have to deal with establishing the links themselves from their PCs. In other words, you can distribute the front end prelinked. All of this is based on the assumption that a drive-mapping standard is in place and that all users will have an identical map path. 6.3.1. Copying the Network Drive to Your Development MachineThe SUBST DOS command is all you need to copy the network drive to your development machine. On your development machine, you can use SUBST to create a map that matches the one users need. First, create a directory on your computer that matches the folder on the share where the back-end database will go. If the network path includes subdirectories, create a path that matches that path structure on your development machine. The syntax for using SUBST requires the new drive letter and the path it is set to, like this: SUBST <New Virtual Drive Letter:> <Path to map to that letter> For example, if you have a subfolder named XYZ_Corp in your C:\Clients folder, and you want to map that folder to an S:\ drive, click Start/Run; type command (Windows 98, Me) or CMD (Windows NT, 2000, XP); click OK; and enter this at the command line: SUBST S: C:\Clients\XYZ_Corp Figure 6-1 shows how you do this in the Command Prompt box. Figure 6-1. Using SUBST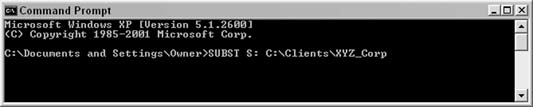
If users are accessing a subfolder under the S: drive, create matching folder names under the folder that was substituted to the S: drive. Place the back-end database in the appropriate folder. Now, when you are in the front-end database file and are linking the back-end tables, browse to your new S: drive to find the back-end database, thereby keeping the links the same as what the users need. When you send your users an update, they should not have to relink anything. This new drive letter will even show up when you open My Computer. The new virtual drive letter will last until the next time you restart. If you decide you no longer need a virtual drive, you can get rid of it with the /d switch: SUBST S: /d It's important to note that this removes the virtual mapping; it doesn't delete the folder or its files. Also, you can't use SUBST if you already have a drive using that letter, so if your keychain flash drive is using G:\, you have to safely remove it before SUBSTing a folder to use the G: drive. Of course, this technique works only in extremely stable environments, where all users have the same drive letter mapped to the given share. Although S: might work for your primary contact, other users of the application might have a different letter mapped to that location, or they might not have any letter mapped. They could be accessing the folder through its Universal Naming Convention (UNC) name (\\ServerName\ShareName). If this is the case, you can emulate this on your PC as well as long as you are willing to rename your PC to match the server's name (you can always change it back later). 6.3.2. Using UNC InsteadIf you want to use UNC instead, you need to rename your computer. First, you need to know the server name at the client site and the full path of folders and subfolders to the share that will hold your back-end datafile. To rename your computer to match the server, bring up your PC's System Properties by right-clicking My Computer and clicking Properties, or by double-clicking the System icon in the Control Panel to open the System Properties dialog box. Select the Computer Name tab, and then click the Change button. When you see the Computer Name Changes dialog box, shown in Figure 6-2, type the desired name for the computer. It will require a reboot to take effect. Of course, this assumes you will be creating a name conflict on the network. The assumption is that your development machine isn't on the production network. If it is, you can disconnect your computer during this process. Figure 6-2. Changing the name of the computer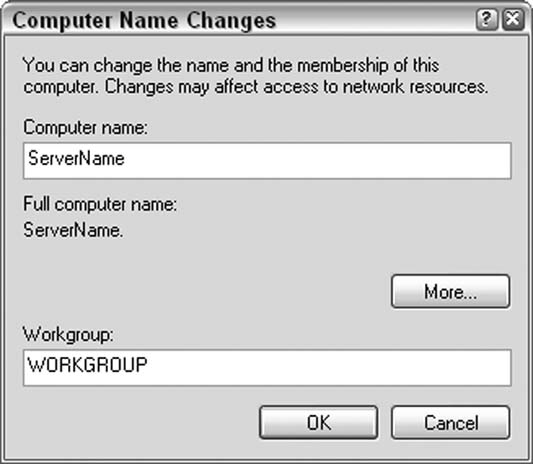
So, if XYZ Corp.'s server, called ServerName, has a DeptShare folder and a subfolder called DataFolder that will hold your datafile, change your computer's name to ServerName. Then, create a folder named DeptShare off the root of your C: drive, and create a subfolder called DataFolder inside the DeptShare folder. Once the folder structure is in place, browse to the DeptShare folder, rightclick in an empty area of the folder, and then click Properties. Select the Sharing tab, and make selections to share the folder, as shown in Figure 6-3. Figure 6-3. Sharing a folder
Now go to My Network Places, and click Add a Network Place. Click Next on the wizard's first screen, and the wizard will ask you where to create the new network place; select "Choose another network location." Click Next, and in the Internet or Network Address box, type \\ServerName\DeptShare. Click Next; Windows will ask what to call the share. If the name isn't already in the box, type DeptShare for ServerName. Click OK, and then click Finish. Finally, back in your Access application file, delete all the linked tables. This time, when relinking the tables, make sure to go through My Network Places/Entire Network in the link dialog to browse to the datafile, or type \\servername\deptshare into the dialog to browse to the datafile. This causes Access to create the links to use the UNC naming convention. If you use the My Computer shortcut to your share, Access recognizes that it is local and uses the C: drive path to create the link. To ensure that your link is using UNC, type this in the debug window:
?Currentdb.TableDefs("<your table name>").Connect
Make sure to put the name of one of the linked tables in the code line where you see the <your table name> prompt. The response should look like this: ;DATABASE=\\Servername\DeptShare\DataFolder\Project_dat.mdb Note that you will see the name of your database; you won't see Project_ dat.mdb. If you get the following response, you need to try again, making sure you go through the entire network, workgroup, computer name, and share name when browsing to your datafile: ;DATABASE=C:\DeptShare\DataFolder\Project_dat.mdb Once this is correct, end users at the client site shouldn't need to relink, regardless of which drive letter (if any) they have mapped to the network location. Steve Conklin |
 Database Utilities). This automatically creates an Access file with just the tables and, at the same time, removes the tables from the database running the utility.