Hack 33. Create a Slideshow in Access
Use images and the OnTimer event to create a controllable visual show. Incorporating pictures into Access is a great thing. It provides a way to depict products, personnel, or any other items you want to show via pictures instead of via a textual description. Typically you do this by storing the paths to graphics files in a table field. In this manner, the graphics and the table data are connected. On a form, when a record is displayed, an image control can be updated with the graphic found at the related path. This hack doesn't imitate such a data-based scenario. Instead, it works with an unbound form to display unbound graphics. You can mix the functionality described here with a data-bound solution. For example, while a form displays database records, the unbound graphics functionality could be incorporated into the form header or footer. This hack uses the image control to display the graphics and shows how to update the graphics being displayed on a periodic basis, typically a few seconds. The hack also shows you how to let users drive the graphic display update on demand. 4.7.1. The GraphicsFor the example in this hack, all the graphics are in the same directory. The directory is hardcoded in the code, but the code can easily be updated to handle multiple directories, passed paths from a dialog, and so on. For now, let's say that a group of .jpg files sit in a directory, as shown in Figure 4-21. Figure 4-21. Picture files in a directory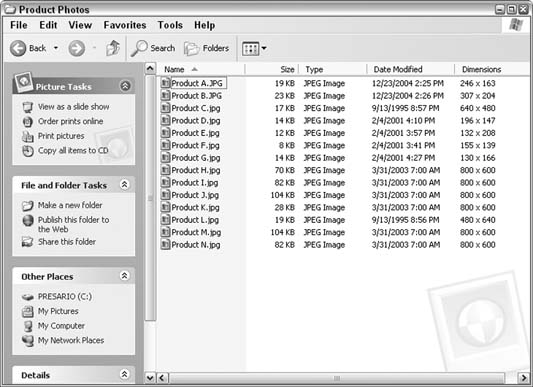
Note that all the files don't have to be in the .jpg format. You also can use other graphics types, such as bitmaps (.bmp) and TIFF (.tif) files (this is also specified in the code). 4.7.2. The Form DesignFigure 4-22 shows the form in Design mode. It contains just a few controls: some buttons, a checkbox, and the image control. The image control has an initial picture, but this is overridden as the slideshow runs. Figure 4-22. The design of the slideshow form
As you can see, the user can either run an automated slideshow or navigate through the graphics manually. The Next and Previous buttons allow the user to move forward and backward through the graphics while not in an automated mode. These buttons just cycle through a VBA collection of paths to the graphics, and the user can use them to update the image control's Picture property. The checkbox is used to set the mode. If it's checked, the slideshow runs. Regardless of whether the user lets the graphics change automatically, she must press the Start button. This is a nice feature because it gives the user control over when to start the show. After all, someone might still be getting popcorn! However, because there is a Start button, it makes sense to also have a Stop button. Clicking the Stop button merely changes the value of a Boolean-type public variable, named stop_show, from false to true. 4.7.3. The CodeA vital piece of this application is the use of the form's OnTimer event. In the following code, note that the Timer Interval has a setting of 2000. This tells the form to fire its OnTimer event every two seconds. You can change this value to accommodate other intervals:
   Option Compare Database
   Public stop_show As Boolean
   Public pixpaths As Collection
   Public pixnum As Integer
   '
   Private Sub Form_Open(Cancel As Integer)
   '
   'set initial properties
   '

	  Me.chkRunContinuous = False
      Me.cmdNext.Enabled = False
      Me.cmdPrevious.Enabled = False
   End Sub
   '
   Private Sub cmdStart_Click()
   '
   'read paths of graphics into a collection
   'displays the first graphic
   '

	 stop_show = False
     If Me.chkRunContinuous = False Then
       Me.cmdNext.Enabled = True
       Me.cmdPrevious.Enabled = True

    End If
    'replace with your path!!
    pix_path = "C:\Product Photos"
    Set pixpaths = New Collection
    Set fs = Application.FileSearch
    With fs
      .LookIn = pix_path
      .FileName = "*.jpg"
      If .Execute() > 0 Then
	    For i = 1 To .foundfiles.Count
          pixpaths.Add Item:=.foundfiles(i)
        Next i
      Else
	    MsgBox "No files found!"
      End If
    End With
    'load first pix
    Me.imgPixHolder.Picture = pixpaths(1)
    pixnum = 1
  End Sub
    '
    Private Sub cmdNext_Click()
    '

	  'advances to the next graphic
	  'cycles forward through collection
      '

        If pixnum = pixpaths.Count Then
          pixnum = 1
        Else
          pixnum = pixnum + 1
        End If
        Me.imgPixHolder.Picture = pixpaths(pixnum)
      End Sub
      '
	  Private Sub cmdPrevious_Click()
	  '
	  'displays the previous graphic
	  'cycles backward through collection
	  '

        If pixnum = 1 Then
          pixnum = pixpaths.Count
        Else
          pixnum = pixnum - 1
        End If
		Me.imgPixHolder.Picture = pixpaths(pixnum)
      End Sub
	  '
	  Private Sub cmdStop_Click()
	  '
	  'sets global variable to false
	  'disables Previous and Next buttons
	  '

        stop_show = True
		Me.cmdNext.Enabled = False
		Me.cmdPrevious.Enabled = False
      End Sub
	  '
	  Private Sub Form_Timer()
	  '
	  'if the mode is to run continuously and the
	  'stop button has not been clicked, then keep cycling graphics
		If Me.chkRunContinuous = True _
		 And stop_show = False Then cmdNext_Click
     End Sub
This code module contains a handful of routines. The form's Open event builds a collection of paths to the graphics, found within a specified directory. The specific directory and graphics file type are hardcoded. The FileSearch object uses these values to find the graphics files. You can expand this to look in more than one directory and/or for more than one file type. Read up on the FileSearch object in the Help system or on the Internet for more information. The chkRunContinuous checkbox determines how the application will run. If it is unchecked, the Next and Previous buttons are used to navigate through the graphics. When the user clicks either button, the index to the collection is increased or decreased, and the Picture property of the image control is updated to the particular collection item. If the user checks the chkRunContinuous checkbox, the Next and Previous buttons are disabled, and the slideshow runs on its own. The time that elapses between each graphic is based on the Timer Interval. The slideshow will run continuously until the user clicks the Stop button. When the Stop button is clicked, it sets the stop_show variable to true. This causes the Timer event to skip updating the graphic because the update occurs only when stop_show is false. 4.7.4. Hacking the HackYou can enhance this basic slideshow in several ways. One thing to consider is that the graphics have no supporting text. Keeping an unbound approach, one way around this problem is to provide a way to display details about a graphic when it is clicked. The image control has a Click event, which you can use to return the value of the Picture property, as shown in Figure 4-23. Figure 4-23. Taking advantage of the image control's Click event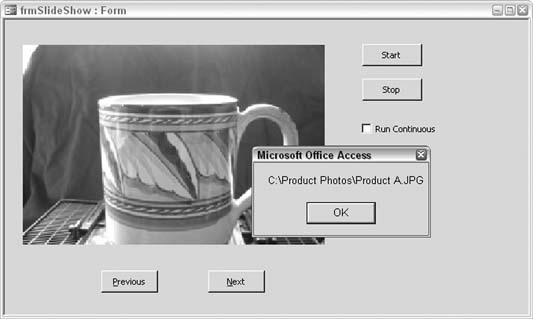
Because the picture being displayed can provide its name, you can use the image control's Click event to find and display anything pertaining to the particular graphic. For example, because the graphic's filename can be isolated, you can gather additional information about the graphic from a text file or other source. Of course, another approach is to simply bind the image control to paths stored in a table. Another field can then supply textual information about the picture in a text box. In fact, this is the more standard approach. I didn't point this out earlier because it requires more work to update the paths in table records than just once in the code. Also, if you adapt the code to work with a user-supplied path, of course the unbound approach makes more sense because there would be no preentered paths. |