Hack 59. Import Noncontiguous Ranges of Data from Excel
A standard import lets you get only one data range at a time. Here are a couple of workarounds to get you more. When importing data from an Excel workbook into Access, you can select to import a worksheet or a range. You can select a range only when the workbook includes established named ranges. Figure 7-1 shows the first screen of the Import Spreadsheet Wizard. This wizard appears after you select File Whether you're importing a worksheet or a range, the problem is that you can select only one item in the list. Usually, single worksheets are imported because a wealth of data can sit on a single worksheet. Ranges are a different story. You might need to import more than one range. It's tedious to run the Import Spreadsheet Wizard over and over again. Figure 7-1. Importing data from Excel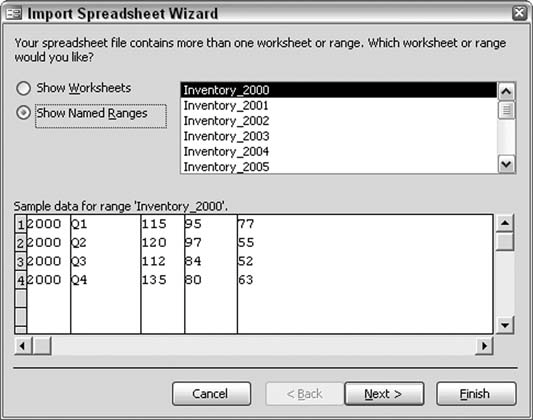
7.2.1. Using Macros for Multiple ImportsAn easy way around the one-range-at-a-time import is to create a macro that uses multiple transferSpreadsheet actions. Each occurrence of this action imports a single range, but you can create a sequence of them in a single macro. You should consider whether the ranges are to be imported as new tables, or whether the ranges are to be accumulated into a single table. 7.2.1.1 Import Excel data into separate tablesFigure 7-2 shows a macro that imports five ranges into five tables. Each import puts data into a separate Access table. Each table name is specified in the Table Name argument of each TRansferSpreadsheet action. The first five actions of the macro delete the existing tables just before the imports. The imports place the Excel data into tables with the same name as the tables being deleted Here is a potential problem: if you don't delete the tables first, the data is appended to the tables because they already exist. Most likely you don't want to do this. Deleting the Access tables first guarantees that the tables are recreated with just the newly imported data. Figure 7-2. A macro that creates separate Access tables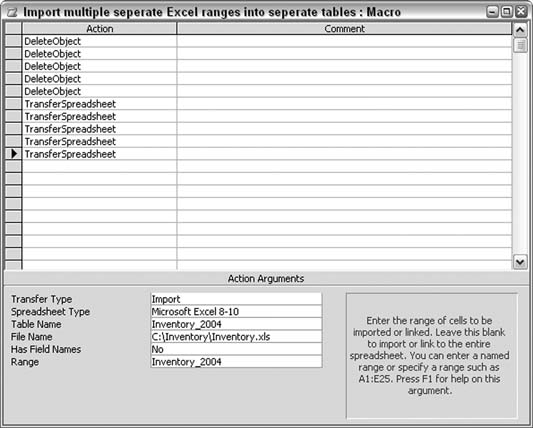
You set the actualtransferSpreadsheet actions such that each addresses a different range in the Excel data. You set this in the Range argument, shown in Figure 7-2; it's an acceptable way to gather data from different Excel ranges. 7.2.1.2 Import Excel data into a single tableIf you want to combine the data from different Excel ranges into one Access table, the Table Name argument of each transferSpreadsheet action should be identical. You still must empty the destination table first. In this macro, you do so with the RunSQL action, which runs a simple Delete operation: Delete * From Inventory_All Prior to this, turn off warnings so that the process isn't interrupted with a confirmation message. After the Delete operation, the transferSpreadsheet actions fill the nowempty Inventory_All table. All the data is appended to the table. Figure 7-3 shows how this macro is structured. Figure 7-3. A macro that populates one Access table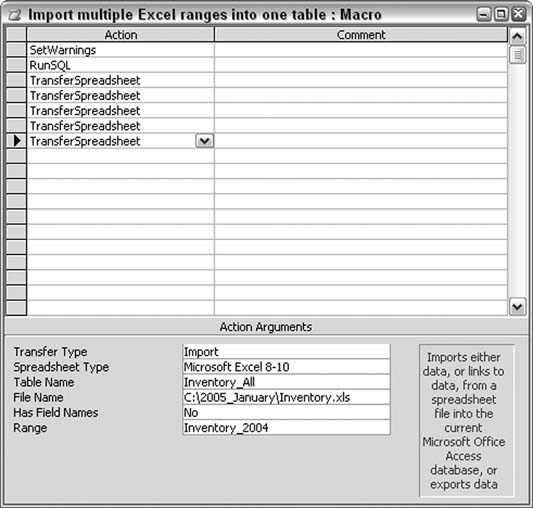
7.2.2. Importing Noncontiguous Data from Excel Without Using RangesMacros are handy but are limited in power. As shown in the previous section, you can import ranges easily enough. You can even import areas of a workbook by address. In other words, you can enter A1:D15 to import part of an Excel worksheet. That's about it, though. A macro can't do anything much more sophisticated than that. This is where some VBA comes in handy. Figure 7-4 shows an Excel worksheet. The data consists of product amounts broken out by years and quarters. Figure 7-4. Excel data to be imported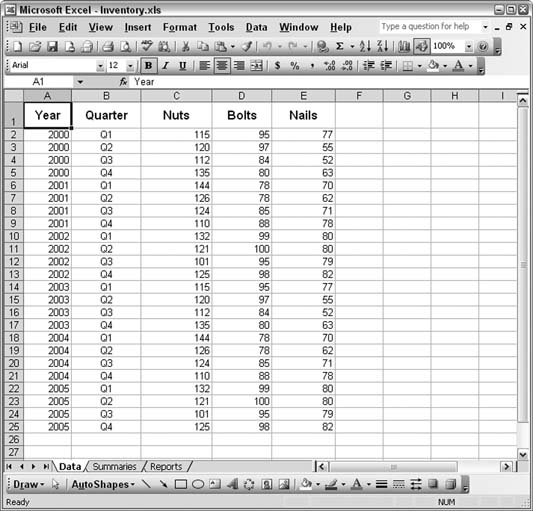
To import, say, just the second-quarter figures for each year requires a process that tests each row to see if the quarter is Q2. Here is a code routine that does just that:
	 Sub get_excel()
	 Dim test_quarter As Integer
	 Dim conn As ADODB.Connection
	 Set conn = CurrentProject.Connection
	 Dim xl As Object
	 Set xl = GetObject("C:\Inventory\Inventory.xls")
	 'first delete existing records
	 conn.Execute "Delete * From Inventory_All"
	 With xl
	   With .Worksheets("Data")
	     For test_quarter = 2 To 25 'known row numbers on worksheet
	       If .Cells(test_quarter, 2) = "Q2" Then
			 ssql = "Insert Into Inventory_All Values("
			 ssql = ssql & .Cells(test_quarter, 1) & ", "
			 ssql = ssql & "'" & .Cells(test_quarter, 2) & "',"
   ssql = ssql & .Cells(test_quarter, 3) & ", "
			 ssql = ssql & .Cells(test_quarter, 4) & ", "
			 ssql = ssql & .Cells(test_quarter, 5) & ")"
			 conn.Execute ssql
		   End If
		  Next test_quarter
	   End With
     End With
	 xl.Close
	 Set xl = Nothing
	 MsgBox "done"
	 End Sub
This code uses automation to create an Excel object and sets the workbook to the object. It then cycles through the worksheet rows. A test sees if the value in column 2 is Q2. When this is true, all five columns of the row are inserted into the Inventory_All Access table. Of course, you can alter the code to test on other conditions. Also, you don't have to hardcode the Q2 test. Figure 7-5 shows the Access table populated with just the second-quarter records. Figure 7-5. Populating the table with portions of the Excel workbook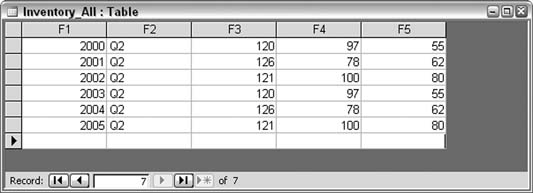
A little code can go a long way. Setting the reference to the Excel workbook is a simple process with the GetObject function. Once the routine is connected to a workbook, you can do many things with a little knowledge of Excel's programmatic model. |