|
|
< Day Day Up > |
|
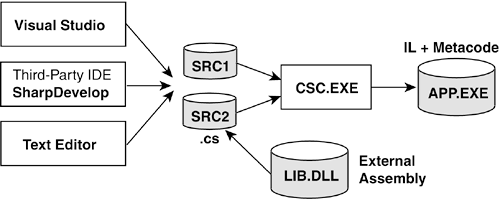
1.5. Understanding the C# CompilerMany developers writing nontrivial .NET applications rely on Visual Studio or some other Integrated Development Environment (IDE) to enter source code, link external assemblies, perform debugging, and create the final compiled output. If you fall into this category, it is not essential that you understand how to use the .NET SDK and raw C# compiler; however, it will increase your understanding of the .NET compilation process and give you a better feel for working with assemblies. As a byproduct, it will also acquaint you with the command line as a way to work with SDK programs. Many of the utilities presented in the previous section are invoked from the command line, and you will occasionally find it useful to perform compilation in that environment rather than firing up your IDE. Figure 1-14 shows the basic steps that occur in converting source code to the final compiled output. The purpose of this section is to demonstrate how a text editor and the C# compiler can be used to build an application. Along the way, it will provide a detailed look at the many compiler options that are hidden by the IDE. Figure 1-14. Compilation process
Locating the CompilerThe C# compiler, csc.exe, is located in the path where the .NET Framework is installed: C:\winnt\Microsoft.NET\Framework\v2.0.40607 Of course, this may vary depending on your operating system and the version of Framework installed. To make the compiler available from the command line in any current directory, you must add this path to the system Path variable. Follow the steps described in the previous section for setting the path for the SDK utilities. Type in the following statement at the command line to verify that the compiler can be accessed: C:\>csc /help Compiling from the Command LineTo compile the C# console application client.cs into the executable client.exe, enter either of the following statements at the command prompt: C:\> csc client.cs C:\> csc /t:exe client.cs Both statements compile the source into an executable (.exe) file梩he default output from the compiler. As shown in Table 1-4, the output type is specified using the /t: flag. To create a DLL file, set the target value to library. For a WinForms application, specify /t:winexe. Note that you can use /t:exe to create a WinForms application, but the console will be visible as background window.
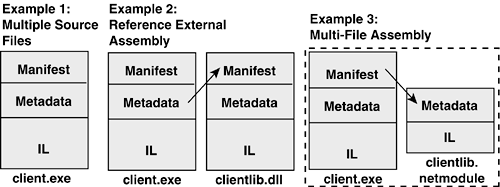
The real value of working with the raw compiler is the ability to work with multiple files and assemblies. For demonstration purposes, create two simple C# source files: client.cs and clientlib.cs. client.cs using System; public class MyApp { static void Main(string[] args) { ShowName.ShowMe("Core C#"); } } clientlib.cs using System; public class ShowName { public static void ShowMe(string MyName) { Console.WriteLine(MyName); } } It's not important to understand the code details, only that the client routine calls a function in clientlib that writes a message to the console. Using the C# compiler, we can implement this relationship in a number of ways that not only demonstrate compiler options but also shed light on the use of assemblies. Example 1: Compiling Multiple FilesThe C# compiler accepts any number of input source files. It combines their output into a single file assembly: csc /out:client.exe client.cs clientlib.cs Example 2: Creating and Using a Code LibraryThe code in clientlib can be placed in a separate library that can be accessed by any client: csc /t:library clientlib.cs The output is an assembly named clientlib.dll. Now, compile the client code and reference this external assembly: csc /r:clientlib.dll client.cs The output is an assembly named client.exe. If you examine this with Ildasm, you see that the manifest contains a reference to the clientlib assembly. Example 3: Creating an Assembly with Multiple FilesRather than existing as a separate assembly, clientlib can also be packaged as a separate file inside the client.exe assembly. Because only one file in an assembly may contain a manifest, it is first necessary to complile clientlib.cs into a Portable Executable[4] (PE) module. This is done by selecting module as the target output:
csc /t:module clientlib.cs The output file is clientfile.netmodule. Now, it can be placed in the client.exe assembly by using the compiler's addmodule switch: csc /addmodule:clientlib.netmodule client.cs The resultant assembly consists of two files: client.exe and clientlib.netmodule. These examples, shown in Figure 1-15, illustrate the fact that even a simple application presents the developer with multiple architectural choices for implementing an application. Figure 1-15. Options for deploying an application
|
|
|
< Day Day Up > |
|