|
|
< Day Day Up > |
|
8.3. ImagesGDI+ provides a wide range of functionality for working with images in a runtime environment. It includes support for the following:
The two most important classes for handling images are the Image and Bitmap class. Image is an abstract class that serves as a base class for the derived Bitmap class. It provides useful methods for loading and storing images, as well as gleaning information about an image, such as its height and width. But for the most part, working with images requires the creation of objects that represent raster images. This responsibility devolves to the Bitmap class, and we use it exclusively in this section. Tasks associated with using images in applications fall into three general categories:
Loading and Storing ImagesThe easiest way to bring an image into memory is to pass the name of the file to a Bitmap constructor. Alternatively, you can use the FromFile method inherited from the Image class.
string fname = "c:\\globe.gif";

Bitmap bmp = new Bitmap(fname);

bmp = (Bitmap)Bitmap.FromFile(fname); // Cast to convert Image
In both cases, the image stored in bmp is the same size as the image in the file. Another Bitmap constructor can be used to scale the image as it is loaded. This code loads and scales an image to half its size: int w = Image.FromFile(fname).Width; int h = Image.FromFile(fname).Height; Size sz= new Size(w/2,h/2); bmp = new Bitmap(Image.FromFile(fname), sz); //Scales GDI+ support images in several standard formats: bitmaps (BMP), Graphics Interchange Format (GIF), Joint Photographic Experts Group (JPEG), Portable Network Graphics (PNG), and the Tag Image File Format (TIFF). These are used for both loading and storing images and, in fact, make it quite simple to convert one format to another. Here is an example that loads a GIF file and stores it in JPEG format: string fname = "c:\\globe.gif"; bmp = new Bitmap(Image.FromFile(fname)); bmp.Save("c:\\globe.jpg", System.Drawing.Imaging.ImageFormat.Jpeg); // Compare size of old and new file FileInfo fi= new FileInfo(fname); int old = (int) fi.Length; fi = new FileInfo("c:\\globe.jpg"); string msg = String.Format("Original: {0} New: {1}",old,fi.Length); MessageBox.Show(msg); // ---> Original: 28996 New: 6736 The Save method has five overloads; its simplest forms take the name of the file to be written to as its first parameter and an optional ImageFormat type as its second. The ImageFormat class has several properties that specify the format of the image output file. If you have any experience with image files, you already know that the format plays a key role in the size of the file. In this example, the new JPEG file is less than one-fourth the size of the original GIF file. To support multiple file formats, GDI+ uses encoders to save images to a file and decoders to load images. These are referred to generically as codecs (code-decode). An advantage of using codecs is that new image formats can be supported by writing a decoder and encoder for them. .NET provides the ImageCodecInfo class to provide information about installed image codecs. Most applications allow GDI+ to control all aspects of loading and storing image files, and have no need for the codecs information. However, you may want to use it to discover what codecs are available on your machine. The following code loops through and displays the list of installed encoders (see Figure 8-14):
// Using System.Drawing.Imaging

string myList="";

foreach(ImageCodecInfo co in ImageCodecInfo.GetImageEncoders())

   myList = myList +"\n"+co.CodecName;

Console.WriteLine(myList);
Figure 8-14. Codecs
The DrawImage method of the Graphics object is used to display an image on the Graphics object's surface. These two statements load an image and draw it full size at the upper-left corner of the graphics surface (0,0). If the Graphics object surface is smaller than the image, the image is cropped (see the first figure in the following example).
Bitmap bmp = new Bitmap("C:\\globe.gif");

g.DrawImage(bmp,0,0);    // Draw at coordinates 0,0
DrawImage has some 30 overloaded versions that give you a range of control over sizing, placement, and image selection. Many of these include a destination rectangle, which forces the source image to be resized to fit the rectangle. Other variations include a source rectangle that permits you to specify a portion of the source image to be displayed; and some include both a destination and source rectangle. The following examples capture most of the basic effects that can be achieved. Note that the source image is 192x160 pixels for all examples, and the destination panel is 96x80 pixels.
The DrawImage variations shown here illustrate many familiar image effects: zoom in and zoom out are achieved by defining a destination rectangle larger (zoom in) or smaller (zoom out) than the source image; image skewing and rotation are products of mapping the corners of the original image to three destination points, as shown in the figure to the left of Example 5. A Note on Displaying IconsIcons (.ico files) do not inherit from the Image class and cannot be rendered by the DrawImage method; instead, they use the Graphics.DrawIcon method. To display one, create an Icon object and pass the file name or Stream object containing the image to the constructor. Then, use DrawIcon to display the image at a desired location.
Icon icon = new Icon("c:\\clock.ico");

g.DrawIcon(icon,120,220);  // Display at x=120, y=220

icon.Dispose();            // Always dispose of object

g.Dispose();
Manipulating Images.NET also supports some more advanced image manipulation techniques that allow an application to rotate, mirror, flip, and change individual pixels in an image. We'll look at these techniques and also examine the advantage of building an image in memory before displaying it to a physical device. Rotating and MirroringOperations that rotate or skew an image normally rely on the DrawImage overload that maps three corners of the original image to destination points that define a parallelogram. void DrawImage(Image image, Point destPoints[]) Recall from an earlier example that the destination points are the new coordinates of the upper-left, upper-right, and lower-left corners of the source image. Figure 8-15 illustrates the effects that can be achieved by altering the destination points. Figure 8-15. Manipulation using DrawImage
The following code is used to create a mirrored image from the original image. Think of the image as a page that has been turned over from left to right: points a and b are switched, and point c is now the lower-right edge.
Bitmap bmp = new Bitmap(fname);               // Get image

// Mirror Image

Point ptA = new Point(bmp.Width,0);           // Upper left

Point ptB = new Point(0,0);                   // Upper right

Point ptC = new Point(bmp.Width, bmp.Height); // Lower left

Point[]dp = {ptA,ptB,ptC};

g.DrawImage(bmp,dp);
Many of these same effects can be achieved using the Bitmap.RotateFlip method, which has this signature: Public void RotateFlip(RotateFlipType rft) RotateFlipType is an enumeration that indicates how many degrees to rotate the image and whether to "flip" it after rotating (available rotations are 90, 180, and 270 degrees). Here are a couple of examples: // Rotate 90 degrees bmp.RotateFlip(RotateFlipType.Rotate90FlipNone); // Rotate 90 degrees and flip along the vertical axis bmp.RotateFlip(RotateFlipType.Rotate90FlipY); // Flip horizontally (mirror) bmp.RotateFlip(RotateFlipType.RotateNoneFlipX); The most important thing to recognize about this method is that it changes the actual image in memory梐s opposed to DrawImage, which simply changes it on the drawing surface. For example, if you rotate an image 90 degrees and then rotate it 90 degrees again, the image will be rotated a total of 180 degrees in memory. Working with a Buffered ImageAll of the preceding examples are based on drawing directly to a visible panel control on a form. It is also possible to load an image into, or draw your own image onto, an internal Bitmap object before displaying it. This can offer several advantages:
To demonstrate, let's input a two-color image, place it in memory, change pixels in it, and write it to a panel. Figure 8-16 shows the initial image and the final image after pixels are swapped. Figure 8-16. Use GetPixel() and SetPixel() to swap pixels
The following code creates a Bitmap object bmpMem that serves as a buffer where the pixels are swapped on the flag before it is displayed. We use the Graphics.FromImage method to obtain a Graphics object that can write to the image in memory. Other new features to note are the use of GetPixel and SetPixel to read and write pixels on the image.
Graphics g = pan.CreateGraphics();  // Create from a panel

Bitmap bmp = new Bitmap("c:\\flag.gif");

g.DrawImage(bmp,0,0);         // Draw flag to panel

Bitmap bmpMem = new Bitmap(bmp.Width,bmp.Height);

Graphics gMem = Graphics.FromImage(bmpMem);

gMem.DrawImage(bmp,0,0);      // Draw flag to memory

// Define a color object for the red pixels

Color cnRed = Color.FromArgb(255,214,41,33);  // a,r,g,b

// Loop through all pixels in image and swap them

for (int y=0; y<bmpMem.Height; y++)

{

   for (int x=0; x<bmpMem.Width; x++)

   {

      Color px = bmpMem.GetPixel(x,y);

      if(px.G > 240)

         bmpMem.SetPixel(x,y, cnRed);         // Set white to red

      else  bmpMem.SetPixel(x,y,Color.White); // Set red to white

   }

}

g.DrawImage(bmpMem,0,0);        // Display reversed flag on panel

gMem.Dispose();

g.Dispose();
Core Note
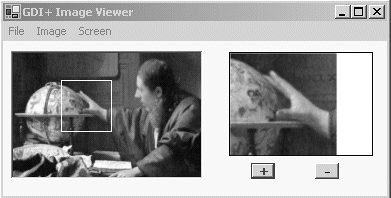
Sample Project: Working with ImagesThis application brings together many of the concepts presented in this chapter: handling the Paint event; using Invalidation to clear portions of a screen; and using DrawImage to rotate, flip, and zoom in and out on an image. The screen for the program is shown in Figure 8-17. It consists of a menu with three main selections: File is used to load an image; Image has options to mirror, flip, or copy an image; and Screen refreshes the screen. The panel control on the left serves as the main viewing window into which an image is loaded. The Image menu options are applied to this panel. The smaller panel is where part of the main image is copied. The + and ?buttons zoom in and out, respectively. Figure 8-17. User interface for Image Viewer [Source: Lourve, Paris]
The copying process is the most interesting part of the application. A user selects a rectangular area of the image by pressing the mouse button and dragging the mouse over the image. When the mouse button is raised, the selected area can be copied to the smaller panel by choosing Image-Copy from the menu. The code for this project is presented in three sections: the menu operations, drawing the selection rectangle, and the functions associated with the small panel (panel2). Implementing Menu OperationsThe following fields are defined at the form level to make them available for menu operations: private Bitmap bmp; // Holds original loaded image private Bitmap newbmp; // Holds latest version of image private bool imageStatus = false; // Indicates image is loaded private int resizeLevel; // Level image magnified/reduced Listing 8-4 contains the code for the menu options to load an image into the viewing panel, flip an image, mirror an image, and refresh the viewing panel. The Image-Copy option is discussed in the code related to manipulating the image on panel2. Listing 8-4. Image Viewer: Menu Items
Private void menuItem6_Click(object sender, System.EventArgs e)

{

   // Load image from file

   OpenFileDialog fd = new OpenFileDialog();

   fd.InitialDirectory = "c:\\" ;

   fd.Filter = "Image Files | *.JPG;*.GIF";

   if (fd.ShowDialog() == DialogResult.OK)

   {

      string fname= fd.FileName;

      using(Graphics g = panel1.CreateGraphics())

      {

         bmp = new Bitmap(fname); // Load image from file

         newBmp = bmp;            // Save copy of image

         // Clear main panel before drawing to it

         g.FillRectangle(Brushes.White,0,0,

               panel1.Width,panel1.Height );

         Rectangle r = new Rectangle(0,0,bmp.Width,

               bmp.Height);

         g.DrawImage(bmp,r);      // Draw image on panel

         ImageStatus = true;      // Indicates image exists

         // Clear small panel

         Graphics gClear= panel2.CreateGraphics();

         g.FillRectangle(Brushes.White,0,0,

               panel2.Width,panel2.Height );

         gClear.Dispose();

      }

   }

}

private void menuItem4_Click(object sender, System.EventArgs e)

{

   // Mirror image

   Graphics g= panel1.CreateGraphics();

   int h = newBmp.Height;

   int w = newBmp.Width;

   Point[] destPts = {

               new Point(w,0),

               new Point(0,0),

               new Point(w,h) };

   Bitmap tempBmp = new Bitmap(w,h);

   Graphics gr= Graphics.FromImage(tempBmp);

   gr.DrawImage(newBmp, destPts);  // Mirror temporary image

   g.DrawImage(tempBmp,0,0);       // Draw image on panel

   newBmp = tempBmp;               // Set to mirrored image

   g.Dispose();

   gr.Dispose();

}

private void menuItem3_Click(object sender, System.EventArgs e)

{

   // Flip image vertically

   newBmp.RotateFlip(RotateFlipType.RotateNoneFlipY);

   Graphics g = panel1.CreateGraphics();

   g.DrawImage(newBmp,0,0);

   g.Dispose();

}

private void menuItem9_Click(object sender, System.EventArgs e)

{

   // Refresh Screen

   panel1.Invalidate();    // Redraw entire panel

   panel1.Update();

   selectStatus = false;   // Refreshing removes selected area

}
The file loading routine displays a dialog box for the user to enter the image file name. If this image file exists, it is opened and displayed in panel1. If the image is larger than the panel, it is cropped. The method that mirrors an image first creates a temporary Bitmap and uses DrawImage, as described earlier, to mirror the image to its surface. The mirrored image is displayed in the panel and saved in newBmp. Flipping could be done in a similar way, but for demonstration purposes, we use the RotateFlip method to directly transform newBmp before it is displayed. The screen refresh routine simply calls Invalidate and Update to redraw the image on panel1. The main effect of this is to remove any selection rectangle (discussed next) that has been drawn on the image. Drawing a Selection Rectangle on the ImageListing 8-5 contains event handlers for Paint, MouseDown, MouseUp, and MouseMove. These routines permit the user to select a rectangular area on the image that can then be copied to panel2. The event handling routines are associated with the events using this code in the constructor: panel1.MouseDown += new MouseEventHandler(Mouse_Down); panel1.MouseUp += new MouseEventHandler(Mouse_Up); panel1.MouseMove += new MouseEventHandler(Mouse_Move); panel1.Paint += new PaintEventHandler(RePaint); The following fields, defined at the form level, are used to keep status information: private Point lastPoint = Point.Empty; // Tracks mouse movement private Point origPoint = Point.Empty; // Mouse down coordinates private Rectangle rectSel; // Selected area private bool selectStatus = false; // True if area selected When a MouseDown occurs, origPoint is set to the x,y coordinates and serves as the origin of the rectangle that is to be drawn. Dragging the mouse results in a rectangle being displayed that tracks the mouse movement. The MouseMove event handler must draw the rectangle at the new position and erase the previous rectangle. It uses lastPoint and origPoint to determine the part of the image to redraw in order to erase the previous rectangle. The new rectangle is determined by the current mouse coordinates and origPoint. When the MouseUp event occurs, rectSel is set to the final rectangle. Listing 8-5. Image Viewer: Select Area of Image to Copy
private void RePaint(object sender, PaintEventArgs e)

{

   Graphics g = e.Graphics;

   // Redraw part of current image to panel

   if (ImageStatus) g.DrawImage(newBmp,

       e.ClipRectangle,e.ClipRectangle, GraphicsUnit.Pixel);

   base.OnPaint(e);

}

private void Mouse_Down(object sender, MouseEventArgs e)

{

   if (lastPoint != Point.Empty)

   {

      panel1.Invalidate(rectSel); // Clear previous rect.

      panel1.Update();

   }

   lastPoint.X= e.X;

   lastPoint.Y= e.Y;

   origPoint = lastPoint;   // Save origin of selected area

   selectStatus=true;

}

private void Mouse_Up(object sender, MouseEventArgs e)

{

   // Selected area complete. Define it as a rectangle.

   rectSel.X = e.X;

   if (e.X > origPoint.X) rectSel.X = origPoint.X;

   rectSel.Y = origPoint.Y;

   rectSel.Width = Math.Abs(e.X- origPoint.X)+1;

   rectSel.Height= Math.Abs(e.Y - origPoint.Y)+1;

   origPoint = Point.Empty;

   if (rectSel.Width < 2) selectStatus=false;

}

private void Mouse_Move(object sender, MouseEventArgs e)

{

   // Tracks mouse movement to draw bounding rectangle

   if (origPoint != Point.Empty)

   {

      Rectangle r;

      Rectangle rd;

      // Get rectangle area to invalidate

      int xop = origPoint.X;

         if (xop > lastPoint.X) xop= lastPoint.X;

         int w = Math.Abs(origPoint.X - lastPoint.X)+1;

         int h = lastPoint.Y - origPoint.Y+1;

         r = new Rectangle(xop,origPoint.Y,w,h);

         // Get rectangle area to draw

         xop = e.X >= origPoint.X ? origPoint.X:e.X;

         w = Math.Abs(origPoint.X - e.X);

         h = e.Y - origPoint.Y;

         rd = new Rectangle(xop, origPoint.Y,w,h);

         Graphics g = panel1.CreateGraphics();

         // Redraw image over previous rectangle

         g.DrawImage(newBmp,r,r);

         // Draw rectangle around selected area

         g.DrawRectangle(Pens.Red,rd);

         g.Dispose();

         lastPoint.X= e.X;

         lastPoint.Y= e.Y;

   }

}
The logic for creating the rectangles is based on establishing a point of origin where the first MouseDown occurs. The subsequent rectangles then attempt to use that point's coordinates for the upper left corner. However, if the mouse is moved to the left of the origin, the upper left corner must be based on this x value. This is why the MouseUp and MouseMove routines check to see if the current x coordinate e.x is less than that of the origin. Copying and Manipulating the Image on the Small PanelThe following code is executed when Image ?Copy is selected from the menu. The selected area is defined by the rectangle rectSel. The image bounded by this rectangle is drawn to a temporary Bitmap, which is then drawn to panel2. A copy of the contents of panel2 is always maintained in the Bitmap smallBmp.
if (selectStatus)

{

   Graphics g = panel2.CreateGraphics();

   g.FillRectangle(Brushes.White,panel2.ClientRectangle);

   Rectangle rd = new

         Rectangle(0,0,rectSel.Width,rectSel.Height);

   Bitmap temp = new Bitmap(rectSel.Width,rectSel.Height);

   Graphics gi = Graphics.FromImage(temp);

   // Draw selected portion of image onto temp

   gi.DrawImage(newBmp,rd,rectSel,GraphicsUnit.Pixel);

   smallBmp = temp;   // save image displayed on panel2

   // Draw image onto panel2

   g.DrawImage(smallBmp,rd);

   g.Dispose();

    resizeLevel = 0;  // Keeps track of magnification/reduction

}
The plus (+) and minus (? buttons are used to enlarge or reduce the image on panel2. The actual enlargement or reduction is performed in memory on smallBmp, which holds the original copied image. This is then drawn to the small panel. As shown in the code here, the magnification algorithm is quite simple: The width and height of the original image are increased in increments of .25 and used as the dimensions of the target rectangle.
// Enlarge image

Graphics g = panel2.CreateGraphics();

if (smallBmp != null)

{

   resizeLevel= resizeLevel+1;

   float fac= (float) (1.0+(resizeLevel*.25));

   int w = (int)(smallBmp.Width*fac);

   int h = (int)(smallBmp.Height*fac);

   Rectangle rd= new Rectangle(0,0,w,h);  // Destination rect.

   Bitmap tempBmp = new Bitmap(w,h);

   Graphics gi = Graphics.FromImage(tempBmp);

   // Draw enlarged image to tempBmp Bitmap

   gi.DrawImage(smallBmp,rd);

   g.DrawImage(tempBmp,rd);   // Display enlarged image

   gi.Dispose();

}

g.Dispose();
The code to reduce the image is similar, except that the width and height of the target rectangle are decremented by a factor of .25: resizeLevel= (resizeLevel>-3)?resizeLevel-1:resizeLevel; float fac= (float) (1.0+(resizeLevel*.25)); int w = (int)(smallBmp.Width*fac); int h =(int) (smallBmp.Height*fac); A Note on GDI and BitBlt for the Microsoft Windows PlatformAs we have seen in the preceding examples, Graphics.DrawImage is an easy-to-use method for drawing to a visible external device or to a Bitmap object in memory. As a rule, it meets the graphics demands of most programs. However, there are situations where a more flexible or faster method is required. One of the more common graphics requirements is to perform a screen capture of an entire display or a portion of a form used as a drawing area. Unfortunately, GDI+ does not provide a direct way to copy bits from the screen memory. You may also have a graphics-intensive application that requires the constant redrawing of complex images. In both cases, the solution may well be to use GDI梥pecifically the BitBlt function. If you have worked with the Win32 API, you are undoubtedly familiar with BitBlt. If not, BitBlt, which is short for Bit Block Transfer, is a very fast method for copying bits to and from a screen's memory, usually with the support of the graphics card. In fact, the DrawImage method uses BitBlt underneath to perform its operations. Even though it is part of the Win32 API, .NET makes it easy to use the BitBlt function. The first step is to use the System.Runtime.InteropServices namespace to provide the DllImportAttribute for the function. This attribute makes the Win32 API available to managed code.
[System.Runtime.InteropServices.DllImportAttribute("gdi32.dll")]

private static extern int BitBlt(

   IntPtr hDestDC,     // Handle to target device context

   int xDest,          // x coordinate of destination

   int yDest,          // y coordinate of destination

   int nWidth,         // Width of memory being copied

   int nHeight,        // Height of memory being copied

   IntPtr hSrcDC,      // Handle to source device context

   int xSrc,           // x coordinate of image source

   int ySrc,           // y coordinate of image source

   System.Int32 dwRop  // Copy is specified by 0x00CC0020

);
This function copies a rectangular bitmap from a source to a destination. The source and destination are designated by handles to their device context. (In Windows, a device context is a data structure that describes the object's drawing surface and where to locate it in memory.) The type of bit transfer performed is determined by the value of the dwRop parameter. A simple copy takes the value shown in the declaration. By changing this value, you can specify that the source and target bits be combined by AND, OR, XOR, and other logical operators. Using bitBlt is straightforward. In this example, the contents of a panel are copied to a Bitmap object in memory. Creating the Graphics object for the panel and Bitmap should be familiar territory. Next, use the Graphics object's GetHdc method to obtain a handle for the device context for the panel and Bitmap. These are then passed to the bitBlt function along with a ropType argument that tells the function to perform a straight copy operation. // Draw an image on to a panel Graphics g = panel1.CreateGraphics(); g.DrawLine(Pens.Black,10,10,50,50); g.DrawEllipse(Pens.Blue,0,30,40,30); // Create a memory Bitmap object to be the destination Bitmap fxMem = new Bitmap(panel1.Width,panel1.Height); Graphics gfxMem = Graphics.FromImage(fxMem); int ropType= 0x00CC0020; // perform a copy operation // Get references to the device context for the source and target IntPtr HDCSrc= g.GetHdc(); IntPtr HDCMem= gfxMem.GetHdc(); // Copy a rectangular area from the panel of size 100 x 100 bitBlt(HDCMem,0,0,100,100,HDCSrc,0,0,ropType); // Release resources when finished g.ReleaseHdc(HDCSrc); gfxMem.ReleaseHdc(HDCMem); g.Dispose(); gfxMem.Dispose(); Always pair each GetHdc with a ReleaseHdc, and only place calls to GDI functions within their scope. GDI+ operations between the statements are ignored. |
|
|
< Day Day Up > |
|