|
|
< Day Day Up > |
|
15.3. SecurityThe centerpiece of .NET security is the Code Access Security model. As the name implies, it is based on code access梟ot user access. Conceptually, the model is quite simple. Before an assembly or component within an assembly may access system resources (files, the registry, event log, and others), the CLR checks to ensure that it has permission to do so. It does this by collecting evidence about the assembly梬here is it located and its content. Based on this evidence, it grants the assembly certain permissions to access resources and perform operations. Figure 15-4 illustrates the key elements in this process and introduces the terms that you must know in order to administer security. Figure 15-4. An assembly is matched with code groups whose evidence it satisfies
When an assembly is loaded, the CLR gathers its evidence and attempts to match it with code groups whose evidence it satisfies. A code group is a binding between a set of permissions and a single type of evidence. For example, a code group may be defined so that only assemblies from a particular application directory are allowed to have Web access. If an assembly's site evidence indicates it is from that directory, it is part of the code group and has Web access. An assembly can be a member of multiple code groups, and, consequently, can have multiple permissions. .NET provides predefined evidence, permissions, code groups, and security policies梐 collection of code groups. Although code can be used to hook into and modify some aspects of security, an administrator performs the bulk of security configuration and management using .NET tools. In most cases, the predefined elements are all that an administrator needs. However, the security model is flexible, and permits an administrator to create security policies from custom evidence, permissions, and code groups. This abstract representation of .NET security shown in Figure 15-4 is implemented in concrete types: The Evidence class is a collection that holds evidence objects; permission classes grant access to a resource or the right to perform some action; and a PermissionSet is a collection class that groups permissions and contains methods to manipulate them. The following sections take a close look at evidence, permissions, and how they are related. You'll then see how to implement a security policy, both as an administrator and by accessing the permission classes through code. Permissions and Permission SetsA permission is the right to access a resource or perform some action. An assembly is assigned a permission when its evidence matches the evidence requirements for a permission set. Figure 15-5 illustrates how permissions come into play when an assembly attempts to access a resource. In this case, assembly A calls assembly B, which creates a FileStream object and attempts to use its Write method. The code in the .NET Framework Class Library that implements this method demands that the calling assembly have permission to perform file I/O. Moreover, it requires that all assemblies further up the call stack also have this permission. This check梜nown as walking the call stack梕nsures that an assembly that does not have a required permission cannot use one that does to illegally perform an operation. Figure 15-5. An assembly must have permission to perform file I/O
Because both Assembly B and Assembly A possess the FileIO permission, the write operation is permitted. An exception of type System.Security.SecurityException is thrown if either assembly does not have the requisite permission. Permissions are often interrelated: for example, the permission to write to a file requires an accompanying permission to access the directory containing the file. To avoid having to grant and deny all permissions on an individual basis, .NET includes a PermissionSet class that allows a collection of permissions to be treated as a single entity for the purpose of denying or granting permissions. As we shall see, permission sets can be created and applied programmatically by creating and adding individual permission objects to a PermissionSet collection. An alternate approach is to use the .NET Configuration tool to create permission sets and assign them to code groups. To encourage this approach, .NET includes predefined permission sets. Named Permission Sets.NET provides seven built-in or named permission sets. They range from the most restrictive Nothing, which prevents an assembly from loading, to the least restrictive Full-Trust, which permits unrestricted access to all of the permissions listed in Table 15-1. Here they are in ascending order of trust:
Figure 15-6 lists the most interesting permission sets along with the individual permissions they contain. These sets cannot be modified; however, they can be copied and used as a base set for creating a custom permission set. Figure 15-6. Permissions associated with selected named permission sets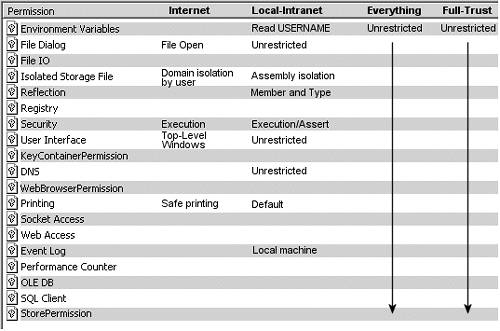 Permission Set AttributesThe built-in permission sets provide a convenient way to request permission for more than one permission type at a time. This code segment shows the syntax to request permission for the LocalIntranet permission set. It attaches a PermissionSetAttribute with a Name value set to the name of the desired permission set:
[PermissionSet(SecurityAction.Demand,Name="LocalIntranet")]

public string GetTitle()  // Requires LocalIntranet

{}
Note that all named permission sets except Everything can be applied as an attribute. .NET Built-in Security PermissionsThe individual permissions shown in Figure 15-5 are implemented in .NET as built-in permission classes. In addition to being accessed by the security configuration tools, they can also be accessed by code to implement a finer-grained security than can be configured using administrative tools. Table 15-1 summarizes the more important built-in permission classes. All permission classes inherit and implement the interfaces shown in Figure 15-7. Of these, IPermission and IStackWalk are the most useful. IPermission defines a Demand method that triggers the stack walk mentioned earlier; IStackWalk contains methods that permit a program to modify how the stack walk is performed. This proves to be a handy way to ensure that a called component does not perform an action outside of those that are requested. We'll look at these interfaces in more detail in the discussion of programmatic security. Figure 15-7. Interfaces inherited by permission classes
Identity PermissionsRecall that when the CLR loads an assembly, it matches the assembly's evidence against that required by code groups and grants permissions from the code groups whose criteria it meets. These code group derived permissions are either custom permissions or built-in permissions as described in Table 15-1. The CLR also grants another set of permissions that correspond directly to the identity evidence provided by the assembly. For example, there are ZoneIdentityPermission and StrongNamedIdentityPermission classes that demand an assembly originate from a specific zone or have a specific strong name identity. Table 15-2 lists the origin-based identity classes.
Unlike the built-in permissions described earlier, these classes cannot be administered using configuration tools. Instead, a program creates an instance of an identity permission class and uses its methods to demand that an assembly provide a specified identity to perform some action. This programmatic use of permission classes is referred to as imperative security. Permission AttributesAll security permission classes have a corresponding attribute class that can be applied as an attribute to an assembly, class, and method to specify security equivalent to that provided by the permission class. This is referred to as declarative security, and serves two useful purposes: When applied at the assembly level, a permission attribute informs the runtime which permissions the assembly requires, and enables the runtime to throw an exception if it cannot grant these permissions; when applied to classes and methods within the code, the attribute specifies which permissions any calling assemblies must have to use this assembly. Examples using declarative security are provided later in the chapter. EvidenceTo qualify as a member of a code group and assume its privileges, an assembly must provide evidence that matches the evidence membership requirements of the code group. This evidence is based on either the assembly's origin or its signature. The origin identification includes Site, Url, and Zone evidence; the signature refers to an assembly's strong name, its digitally signed certificate (such as X.509), or a hash of the assembly's content. The Common Language Runtime provides seven predefined types of evidence. They are referred to by names used in the security administrative tools:
In addition to these, there is also a blank evidence known as All Code evidence that is used by an administrator to create a code group that matches all assemblies. The CLR maintains evidence in an instance of the Evidence collection class. This object contains two evidence collections: one for the built-in host evidence and another for user-defined evidence. This evidence is made available to security policy, which then determines the permissions available to the assembly. You can use reflection to view evidence programmatically. In this example, we view the evidence for an assembly, movieclient.exe, which is located on the local machine (the assembly's source code is presented later in this section):
using System;

using System.Reflection;

using System.Security.Policy;

class ClassEvidence

{

   public static void Main()

   {

      Assembly ClientAssembly;

      // (1)Load object to reference movieclient assembly

      ClientAssembly = Assembly.Load("movieclient");

      // (2) Evidence is available through Evidence property

      Evidence ev = ClientAssembly.Evidence;

      // (3) Display each evidence object

      foreach (object ob in ev)

      {

         Console.WriteLine(ob.ToString());

      }

   }

}
Output from the program reveals the Zone, Url, Strong Name, and Hash evidence associated with the assembly. No Site evidence is present because the assembly's Url origin is defined by a file:// rather than an http:// format. Application Directory evidence is also missing because it comes from the host application, not the assembly's metadata. <System.Security.Policy.Zone version="1"> <Zone>MyComputer</Zone> </System.Security.Policy.Zone> <System.Security.Policy.Url version="1"> <Url>file://C:/movieclient.EXE</Url> </System.Security.Policy.Url> <StrongName version="1" Key="002400... 8D2" Name="movieclient" Version="0.0.0.0"/> <System.Security.Policy.Hash version="1"> <RawData>4D5A90000300000004000000FFFF0000B80 </RawData> </System.Security.Policy.Hash> Security PoliciesA .NET security policy defines how assembly evidence is evaluated to determine the permissions that are granted to the assembly. .NET recognizes four policy levels: Enterprise, Machine, User, and Application Domain. The policy-level names describe their recommended usage. Enterprise is intended to define security policy across all machines in the enterprise; Machine defines security for a single machine; User defines security policy for individual users; and Application Domain security is applied to code running in a specific AppDomain. Enterprise, Machine, and User policies are configured by an administrator. AppDomain policy, which is implemented only programmatically and used for special cases, is not discussed. Despite their names, policies can be configured in any way an administrator chooses. The User policy could be set up to define enterprise security and the Machine policy to define user security. However, an administrator should take advantage of the names and use them to apply security to their intended target. As you will see in the discussion of the .NET Framework Configuration Tool (see "The .NET Framework Configuration Tool" on page 704), the security policy is granular enough to allow custom security policies on individual machines and users. How .NET Applies Security PoliciesEach security policy level is made up of one or more code sets. Each code set, in turn, contains a set of permissions that are mapped to a specific evidence type. Figure 15-8 illustrates how code sets and policy levels are combined to yield a permission set for an assembly. Figure 15-8. A permission set is created from the intersection of policy level permissions
The .NET security manager is responsible for evaluating evidence and policy to determine the permissions granted. It begins at the enterprise level and determines the permissions in it that can be granted to the assembly. In this example, enterprise contains three code groups梩wo of which the assembly's evidence satisfies. The logical union of these permissions produces the permission set at this level. The other two policy levels are evaluated in the same way, yielding their associated permission set. The logical intersection of the three permission sets produces the permission set that is assigned to the assembly. In this case, the final set consists of permissions 2 and 5梩he only permissions present on each level. Configuring Security PolicyPhysically, each policy level is stored as a configurable XML file that defines a hierarchy of code groups for the policy. The Enterprise policy file, enterprisec.config , and the Machine policy file, security.config[3], are stored in the same folder on a Microsoft Windows system:
<Windows Directory>\Microsoft.NET\Framework\<Version>\config\ The User policy file is named security.config and is located on the path
<Documents and Settings>\<User Name>\Application Data\Microsoft\

      CLR Security Config\<Version>\
Listing 15-2 contains an extract from the Machine policy file that illustrates the file layout. It comprises four major sections:
The code group section is structured as a multi-level hierarchy, with the conditions for granting permissions becoming more restrictive at each lower level. Listing 15-2. Extracts from the Machine Policy File Security.Config
<SecurityClasses>

   <SecurityClass Name="WebPermission"

         Description="System.Net.WebPermission, System,

         Version=2.0.3600.0, Culture=neutral,

         PublicKeyToken=b77a5c561934e089"/>

   <SecurityClass Name="EventLogPermission"

         Description="System.Diagnostics.EventLogPermission,

         System, Version=2.0.3600.0, Culture=neutral,

         PublicKeyToken=b77a5c561934e089"/>

   ...

</SecurityClasses>

<NamedPermissionSets>

   <PermissionSet class="NamedPermissionSet"

         version="1"

         Name="LocalIntranet"

         Description="Default rights given to applications on

         the local intranet">

      <IPermission class="EnvironmentPermission"

         version="1" Read="USERNAME"/>

      <IPermission class="FileDialogPermission"

         version="1" Unrestricted="true"/>

   ...

</PermissionSet>

...

</NamedPermissionSets>

<CodeGroup class="UnionCodeGroup"

         version="1"

         PermissionSetName="Nothing"

         Name="All_Code"

         Description="Code group grants no ...">

       <IMembershipCondition class="AllMembershipCondition"

         version="1"/>

   <CodeGroup class="UnionCodeGroup"

         version="1"

         PermissionSetName="FullTrust"

         Name="My_Computer_Zone"

         Description="Code group grants ...">

         ...

   </CodeGroup>

   ... additional code groups here

</CodeGroup>

<FullTrustAssemblies>

   <IMembershipCondition class="StrongNameMembershipCondition"

         version="1"

         PublicKeyBlob="00000000000000000400000000000000"

         Name="mscorlib.resources"

         AssemblyVersion="Version=2.0.3600.0"/>

   <IMembershipCondition class="StrongNameMembershipCondition"

         version="1"

         PublicKeyBlob="00000000000000000400000000000000"

         Name="System"

         AssemblyVersion="Version=2.0.3600.0"/>

   ...

</FullTrustAssemblies>
.NET provides two ways to work with these policy files: a command-line Code Access Security Policy (caspol) and a graphical Configuration tool (MSCorCfg.msc). Both can be used to modify the default configuration, create custom code groups, create custom permission sets, and export policies to be deployed with an application. We'll look at both tools in this section, with an emphasis on the Configuration tool because its visual interface makes it more popular and easier to learn than the command-line approach. The .NET Framework Configuration ToolOn a Microsoft Windows system, you start the Configuration tool by selecting Microsoft .NET Framework Configuration from the Administrative Tools folder or by selecting Run and typing MSCORCFG.MSC. The program interface consists of a window divided into two panes. As shown in Figure 15-9, the left side contains a tree structure comprising multiple folders. Of these, the Runtime Security Policy folder expands to display a hierarchy of security information. Figure 15-9. Interface for the .NET Framework Configuration tool At the top level of the hierarchy are the three folders representing the Enterprise, Machine, and User policies. Beneath each of these are folders that contain code groups, permission sets, and policy assemblies. This hierarchy is, of course, simply a visual representation of the underlying XML policy files. You can observe this by comparing the raw XML tags in Listing 15-2 with the items displayed under the Machine policy. The Default Configuration PoliciesThe Enterprise and User policies contain a single default code group named All_Code. If you click it, you'll see this description in the right panel: "Code group grants all code full trust and forms the root of the code group tree." Specifically, this code group binds All Code evidence with the FullTrust permission set. Recall that all assemblies qualify as members of code groups that use All Code evidence and that the FullTrust permission set offers unrestricted permissions. The net effect of binding these two is to create Enterprise and User policies that offer unlimited permissions to all assemblies. In other words, these two policies offer no security at all by default. Core Note
The Machine security policy is far more interesting and instructive. At its root is the All_Code code group. Unlike the other two policies, it binds All Code evidence to the Nothing permission set, which means the code group grants no permissions. To find the permissions, you must look to the code groups nested beneath this root. The first level contains six groups: My_Computer_Zone, LocalIntranet_ Zone, Internet_Zone, Restricted_Zone, TRusted_Zone, and Application_ Security_Manager. All except Restricted_Zone have one or more child code groups. Let's look at how default permissions are granted for two of these: My_Computer_Zone and LocalIntranet_Zone. To view details about the other code groups, simply right-click their name to bring up a properties window. My_Computer_Zone Code GroupThis code group grants the FullTrust permission set to assemblies that satisfy the My Computer zone evidence. Its two child code groups grant FullTrust to assemblies that have Strong Name evidence containing either the Microsoft public key or the ECMA public key, also known as the Standard Public Key.[4] It is important to understand that an assembly can satisfy the Strong Name evidence without satisfying the My Computer zone evidence. This is because .NET evaluates child code groups even if the conditions for the parent group are not satisfied. Conversely, a code group's properties can be set to instruct .NET not to evaluate child groups if the conditions of the parent code group are satisfied.
LocalIntranet_Zone Code GroupThis code group grants the LocalIntranet permission set to assemblies that satisfy the Local Intranet zone evidence梐ny computers on the same local area network as the machine on which the host code runs. This code group has two child code groups: Intranet_Same_Site_Access and Intranet_Same_Directory_Access. The former permits code to access the site of its origin; the latter permits code to access its original install directory. The practical effect of these permissions is to permit code to perform I/O on its local storage. Configuring Code Access Security with the Configuration Tool桝n ExampleTo illustrate how to use the Configuration tool, we'll create a new permission set and assign it the Reflection and Execution permissions. Next, we'll create a code group that maps the new permission set to Url evidence that specifies a directory on the local machine. The effect is to grant the Reflection permission to any assembly that runs from this directory. For testing, we'll create a simple application that uses reflection to access a private field in this assembly's class:
// (movieclass.dll) Will use reflection to access this class

using System;

public class Movies

{

   private int ID;

   private string Director;

   public string title;

   public string year;

}
Listing 15-3 contains the code that accesses the private Director field. This is done by calling the Type.GetField method and passing as arguments the field name and flags that request access to a private field in a class instance. Listing 15-3. Assembly Requiring Reflection Permission
// configtest.cs

using System;

using System.Reflection;

class ClassEvidence

{

   public static void Main()

   {

      Assembly ClientAssembly;

      ClientAssembly = Assembly.Load("movieclass");

      // Get the desired Type in the Assembly

      Type myType = ClientAssembly.GetType("Movies");

      // Get the FieldInfo for private field "Director".

      // Specify nonpublic field and instance class.

      // Accessing private members requires Reflection

      // Permission.

      FieldInfo myFieldInfo = myType.GetField("Director",

            BindingFlags.NonPublic | BindingFlags.Instance);

      if (myFieldInfo !=null)

         Console.WriteLine("Field: {0} Type: {1}",

                           myFieldInfo.Name,

                           myFieldInfo.FieldType);

      {

         // output: Field: Director  Type: System.String

      } else {

         Console.WriteLine("Could not access field.");

      }

   }

}
Creating a Permission SetFollow these steps to create the permission set:
You now have a permission set that allows an assembly the rights associated with the Reflection permission. Creating a Code GroupFollow these steps to create the code group:
The final step is necessary to make this example work. Setting this Exclusive option tells .NET to assign only the permissions of the new code group to any code found in the specified directory path. If this option is not set, the code is evaluated against all Machine level code groups and receives permissions from all whose evidence it matches. Also, note that code not located in the specified subdirectory is unaffected by the new code group and receives the default Machine policy permissions. Testing the New Code GroupTo demonstrate the effects of this new code group, compile the program and store a copy of configtest.exe in C:\ and C:\CAS\. Run both copies from the command line, and they should succeed. Now, use the Configuration tool to change the permission set for the My_Computer_Url code group from Reflection to Internet. When you now run the program from the CAS subdirectory, it fails because the Internet permission set does not include the Reflection permission. The program still runs fine from C:\, because its permissions come from the other code groups in the Machine policy. This is a simple example, but it illustrates the core principle behind Code Access Security of assigning permissions to an assembly based on an analysis of its evidence. In this case, identical assemblies receive different permissions based on the directory in which the code resides. The evidence is a Url specified directory, but could just as easily be an Internet site, the assembly's Strong Name, or its security zone. Determining the Permissions Granted to an AssemblyIt is not easy to empirically determine the permissions that are granted to a given assembly. You must gather the evidence for the assembly, determine the security policies in effect from the XML policy files, and evaluate the evidence in light of the policies. Fortunately, the .NET Configuration tool and Caspol utility can perform this evaluation for you. To use the Configuration tool, right-click the Runtime Security Policy folder and select Evaluate Assembly from the context menu. Use the Browse button to locate the assembly in the file directory. Select View Permissions Granted to Assembly, and click the Next button to display the individual permissions. For c:\cas\configtest.exe from the preceding example, Security and Reflection are listed. For c:\configtest.exe, Unrestricted is listed. Caspol is run from the command line. Among its numerous options is 杛sp, which resolves permissions for an assembly. To determine permissions for the configtest assembly, enter this command:
C:\>caspol 杛sp c:\cas\configtest.exe
Output is in an XML format and correctly includes Security and Reflection, as well as two identity permissions: UrlIdentity and ZoneIdentity (MyComputer). The identity permissions can be ignored because specific permissions are provided. You can also use caspol to understand why an assembly qualifies for its permissions by identifying the code groups that the assembly belongs to. Enter the previous command, except replace the 杛sp option with the 杛sg (resolve code group) option:
C:\>caspol 杛sg c:\cas\configtest.exe
This output shows that a code group uses Url evidence to grant its permission set (Reflection) exclusively to any assembly in the specified directory. Because our assembly is in that directory, the Security and Reflection permissions must come from this code group:
Level = Enterprise

Code Groups:

1.  All code: FullTrust


Level = Machine

Code Groups:

1.  All code: Nothing

   1.1.  Zone - MyComputer: FullTrust

   1.6.  Url - file://C:/cas/*: Reflection (Exclusive)


Level = User

Code Groups:

1.  All code: FullTrust
Note that you can view the contents of the Reflection permission set by executing
C:\>caspol 杕 -lp
The serialized XML output lists the permissions associated with all permission sets at the machine policy level梚ncluding the Reflection permission set. Determining the Permissions Required by an AssemblyOne of the objectives of designing an effective security policy is to grant an assembly only those permissions it requires, and no more. The ease of using predefined permission sets should be resisted when it allows an assembly to access resources that it does not require. In the preceding example, the configtest assembly required only the capability to execute and access members of the Reflection namespace. To satisfy these narrow requirements, we created a custom permission set containing the Security and Reflection permissions. This custom permission set was clearly a better choice than the unrestricted permissions offered by Everything and FullTrust梩he only predefined permission sets granting the Reflection permission. Given the obvious advantage of using customized permission sets, the question becomes how an administrator identifies the minimum permissions required by an assembly. .NET offers two utilities for this purpose: PermView and PermCalc. PermView, which is discussed in the next section, displays the permissions explicitly requested梪sing attributes梑y an application; PermCalc evaluates an assembly and produces serialized XML output of the required permission classes. It is run from the command line, as shown here: C:\>permcalc c:\cas\configtest.exe Evaluating an assembly to determine its required permissions is a difficult task and not always guaranteed to provide accurate results. In fact, when the utility is run against configtest, it displays FileIOPermission梑ut not Reflection梐s a required permission. However, if we add an attribute (described next) to the code requesting the Reflection permission, the utility correctly displays this as a required permission. As a rule, the only way to be certain which permissions an assembly requires is to declare them in the code梠ur next topic. Requesting Permissions for an AssemblyIncluding permission attributes in code is referred to as declarative security, and it serves two primary purposes: When applied at the assembly level, the attribute serves to inform the runtime which permissions the assembly requires梠r does not require梩o function; when applied at the class or method levels, it protects resources by demanding that callers possess specific permissions to access a resource through the current assembly. Attributes used for this latter purpose trigger or modify a stack walk that verifies all assemblies in the call chain can access the called assembly. We'll examine this in "Programmatic Security" on page 715. For now, the focus is on how to use assembly-level attributes to adjust security within a program. Although the term request is broadly used to describe the use of permission attributes, it's better described as a way for an assembly to publish (in metadata) its permission requirements. The effectiveness of including permission attributes in code is governed by three rules:
Despite the fact that you do not have to include permission requests in your code, there are important reasons for doing so:
For a full trust environment where code has unrestricted permissions梩ypically in-house applications梥ecurity is not a significant factor, and it may not be necessary to apply security attributes. However, if you operate in a security-conscious environment or are creating components for use by other software, you should include security attributes as a means of providing self-documenting security. How to Apply a Permission AttributeBecause the permission attribute is to have assembly scope, it is declared in the first line of code following the using statement(s): [assembly : PermissionAttribute( SecurityAction.membername, PermissionAttribute property) ] Let's examine its construction:
The final argument to the constructor sets a property of the permission attribute class to a value that describes the specific permission requested. The following example should clarify this. Testing a Permission AttributeTo demonstrate the effects of applying a permission attribute, let's add this statement to the source for configtest, shown in Listing 15-3:
//place on line preceding: class ClassEvidence

 [assembly : ReflectionPermission(

              SecurityAction.RequestMinimum,

              Flags=ReflectionPermissionFlag.TypeInformation)

]
The ReflectionPermission attribute class is used to request the minimum permissions required to run. The second parameter, TypeInformation, is an enumeration property of the class that permits reflection on nonvisible members of a class. (Recall that the sole purpose of this code is to use reflection in order to access a private field on a class.) Compile and run the code from the C:\ root directory. Because applications run on the local machine have unrestricted permissions, the program runs successfully. Let's see what happens if the second parameter does not specify a permission that enables access to a private field. To test this, change the enumeration value to ReflectionEmit梐n arbitrary property that only permits the assembly to emit metacode. When run with this parameter, the assembly again succeeds because it continues to receive unrestricted permissions on the local machine. As a final test, change the first parameter to SecurityAction.RequestOptional. This causes the assembly to fail, because only the requested ReflectionEmit permission is granted to it. Table 15-3 summarizes how content of the permission attribute affects the assembly's operation.
Programmatic SecurityThe .NET Configuration tool provides a broad stroke approach to defining security for a computing environment. In most cases, this is satisfactory. If two assemblies come from the same security zone, it usually makes sense to grant them the same permissions. However, suppose you are developing components for clients with an unknown security policy, or you are using third-party components whose trustworthiness is unknown. In both cases, programmatic security offers a way to enforce security specifically for these components. Programmatic security is implemented by using .NET permission classes to control and enforce security on a calling assembly or a called assembly. This is an important point: The calling assembly can override permissions granted by the CAS and prevent the assembly from accessing a resource; conversely, a called assembly can refuse to perform an operation unless the calling assembly梠r assemblies梙as permissions it requires. The key to implementing programmatic security is a mechanism known as a stack walk. Stack WalkAs mentioned earlier in the chapter, a stack walk refers to steps the CLR follows to verify that all methods in a call stack have permission to perform an operation or access a system resource. This ensures that an immediate client with the proper permissions is not called by malicious code further up the stack that does not have permission. As shown in Figure 15-10, a stack walk is triggered when code invokes a permission's Demand method. This method is inherited from the IPermission interface (refer to Figure 15-7), which includes other methods such as Intersect and Union that allow permission objects to be logically combined. Figure 15-10. Invoking the Permission.Demand method triggers a stack walk
The Demand method is used extensively throughout the .NET Framework to ensure that applications requesting operations such as file I/O or database access have the proper permissions. Although most calls to the Framework Class Library (FCL) are protected in this way, it can still be useful to demand a stack walk within your code. You may want to apply even stricter permission requirements than the FCL demands, or you may want to ensure that a lengthy operation has all the required permissions before it is launched. To provide a simple illustration, let's create a component that returns information about a requested movie from our Films database (see Chapter 11). Listings 15-4 and 15-5 contain the component and client code, respectively. For brevity, the ADO.NET code is excluded, but is available as downloadable code. Because the SqlClient permission is required to access a SQL Server database, the component includes the following code to ensure that the calling assembly has this permission:
SqlClientPermission sqlPerm=

      new SqlClientPermission(PermissionState.Unrestricted);

sqlPerm.Demand();  // Trigger stack walk
The code simply creates an instance of the desired permission class and calls its Demand method. There is no limit on the number of permission objects that can be created and used to demand a stack walk. However, it is an expensive process and should be used judiciously. Listing 15-4. Component to Illustrate Code Access Security
// filmcomponent.cs  (.dll)

using System.Data.SqlClient;

using System;

namespace moviecomponents

{

   public class MovieData

   {

      // Return MovieProfile object

      public static MovieProfile GetMovie(string movietitle)

      {

         // Return null if movie not found

         MovieProfile mp = null;

         // Demand SqlClient permission from methods on call stack

         SqlClientPermission sqlPerm= new

               SqlClientPermission(PermissionState.Unrestricted);

         sqlPerm.Demand();

         //*** Code here to query database for movie information

         //*** Requires SqlClient permission

         return mp;

      }

   }

   public  class MovieProfile

   {

      private string pTitle;

      private int pYear;

      private int pRank;

      private string pOscar;

      public MovieProfile(string title, int year,

                          int afiRank, string bestFilm)

      {

         pTitle= title;

         pYear = year;

         pRank = afiRank;

         pOscar = bestFilm;

      }

      // Readonly properties

      public string Title

      {

         get{return pTitle;}

      }

      public int Year

      {

         get{return pYear;}

      }

      public int Ranking

      {

         get{return pRank;}

      }

      public string BestPicture

      {

         get{return pOscar;}

      }

   }     // class

}       // namespace
Listing 15-5. Assembly to Access Film Component
// movieclient.cs  (.exe)

using System;

using moviecomponents;

namespace MovieClient

{

   class MovieMgr

   {

      static void Main(string[] args)

      {

         string myMovie;

         if(args.Length>0)

         {

            myMovie= args[0];

            // Call component to fetch movie data

            MovieProfile mp = MovieData.GetMovie(myMovie);

            if(mp==null)

            {

               Console.WriteLine("Movie not found");

            }

            else

            {

               Console.WriteLine("Year:{0} AFI Rank: {1}",

                                 mp.Year, mp.Ranking);

            }

         }

      }

   }    // class

 }     // namespace
This code can be tested from the command line. Compile both the component and client. Then, run the client by passing it the movie name as a parameter: C:\>csc /t:library filmcomponent.cs C:\>csc /r:filmcomponent.dll movieclient.cs C:\>movieclient casablanca Year: 1942 AFI Rank:2 Because code running on a local machine has unrestricted permissions (by default), the stack walk verifies that movieclient has the necessary permission. To make the example more interesting, let's run the client when it does not have the SqlClient permission. The easiest way to remove this permission is by adding an assembly-level permission attribute that explicitly refuses the permission. You do this by passing the SecurityAction.RequestRefuse enumeration to the constructor of the permission attribute you do not want granted to the assembly. To refuse the SqlClient permission, place this statement before the namespace statement in the client code:
[assembly : SqlClientPermission(SecurityAction.RequestRefuse)]
Building and running the modified SqlClient results in a security exception being thrown. Stack Walk ModifiersJust as a called assembly has the rights to initiate a stack walk, the objects on the call stack have the right to modify the behavior of the stack walk. For example, they can cause the walk to fail, or stop the walk at the current object so that it does not check objects further up the stack. These capabilities have significant security implications: inducing a stack walk failure is a way for a client to restrict what actions a called assembly may perform; and terminating a stack early can improve performance by eliminating unnecessary steps in a repeated stack walk. The ability to modify a stack walk is provided by methods in the IStackWalk interface (refer to Figure 15-7) that all permissions must implement. This interface defines the Demand method that initiates a stack walk, and three other methods, Assert, Deny, and PermitOnly, that modify a stack walk's normal operation. Assert stops the stack walk at the current stack frame; Deny causes the walk to fail; and PermitOnly specifies the only permission that an object will allow a stack walk to verify. To demonstrate these methods, let's modify the code in Listing 15-5 to implement each method. First, we add namespaces so that we can access IStackWalk and the permission: using System.Security; using System.Data.SqlClient; using System.Security.Permissions; Then, the code is changed to create an IStackWalk object that is set to the permission being checked by the stack walk梚n this case, SqlClientPermission:
myMovie= args[0];

//

IStackWalk stackWalker;

stackWalker = new

      SqlClientPermission(PermissionState.Unrestricted);

stackWalker.Deny();      // Deny use of SqlClient by GetMovie

// Call component to fetch movie data

try{

   MovieProfile mp = MovieData.GetMovie(myMovie);
In our first example, we call the permission's Deny() method that causes the stack walk's verification of the SqlClient permission to fail. Filmcomponent cannot access the database and throws an exception. Now, replace the call to Deny with a call to Assert. Assert prevents the stack walk from continuing further up the code stack梪nnecessary in this case because there is no other object on the stack. The stack walk succeeds because movieclient has the required permission, and database access is permitted. Core Note
The final way to modify the stack walk is by using the PermitOnly method to indicate specific permissions that the code is willing to let the called assembly use. In the current example, the calling assembly has unrestricted permissions; the component filmcomponent has need for only the SqlClient permission. By using PermitOnly to specify this permission, movieclient thwarts any stack walks that attempt to verify other permissions. An assembly may be required to call multiple components, each with its own permission requirements. You may need to permit SQL access for one and file I/O for another. If you call PermitOnly a second time to override the first call, an exception is thrown. Instead, you must clear the effects of the first call by calling CodeAccessPermission's static RevertPeritOnly method; then, you call PermitOnly with a new permission. The following segment could be added to our code to remove SqlClient as the only allowed permission, and replace it with the Reflection permission.
// Remove effects of previous PermitOnly call

CodeAccessPermission.RevertPermitOnly();

stackWalker = new ReflectionPermission(

      ReflectionPermissionFlag.TypeInformation);

// Allow stack walk to verify Reflection permission only

stackWalker.PermitOnly();

// Now call a method that requires Reflection
Declarative Security Using Permission AttributesThe security technique just described that explicitly calls a permission's Demand method to invoke a stack walk is referred to as imperative security. An alternative form of security that uses attributes to achieve the same effect is known as declarative security. We looked at one version of this in the earlier discussion of how to use permission attributes to request permissions. In this section, we'll see how the other form of declarative security is used to attach attributes to classes or methods to verify that clients have the necessary permissions to use current code. The easiest way to explain declarative security is to compare it with its imperative counterpart. Here are the statements from Listing 15-4 that trigger a stack walk. Below it is an equivalent attribute declaration that results in the same stack walk.
// Imperative Security

SqlClientPermission sqlPerm= new

      SqlClientPermission(PermissionState.Unrestricted);

sqlPerm.Demand();


// Declarative Security

[SqlClientPermission(SecurityAction.Demand)]

public static MovieProfile GetMovie(string movietitle){
The syntax for the attribute constructor is straightforward. It consists of the permission attribute class name with a parameter specifying a SecurityAction enumeration member. Depending on the permission type, there may also be a second parameter that specifies a property value for the permission class. The most interesting feature of the attribute declaration is its SecurityAction parameter that specifies the action caused by the attribute. Its three most important members and their uses are the following:
The final two enumeration members result in checks that occur during loading and have no comparable statements that can be executed at runtime. However, the use of demand security to trigger a stack walk is common to both and leaves the developer with the decision of which to use. In where the component knows which permissions it needs at compile time, declarative security is recommended. Its syntax is simpler, and it provides a form of self-documentation. Also, declarative security information is placed in an assembly's manifest where it is available to the CLR during loading. As a rule, the sooner the CLR has information about code, the more efficiently it can operate. Imperative security is recommended when variables that affect security are unknown at compile time. It's also easier to use when more granular security is required: attributes usually apply to a class or method, whereas demand statements can be placed anywhere in code. |
|
|
< Day Day Up > |
|