OK, so now you know how to use some controls for data input in a Windows program. This section explores some other UI issues such as screen size, manipulation of controls, and so on.
You can do several things in your program to make for a better user experience. These things are not specific to data entry programs; they are useful for any Windows program that you make using .NET.
Most good software these days takes into consideration the limitations of the computer it is running on. This is especially true for the video monitor, as I describe in the next section.
I am currently writing this text using a 21-inch monitor at a resolution of 1280×1024 pixels. This is a big monitor with a high resolution. I can fit all kinds of stuff on the screen. However, I also write and program on a laptop with a resolution of only 1024×768 pixels. Consequently, some things get more cramped and the software I use that is common to both machines needs to take this into consideration.
When you write your software, you will also need to take into consideration the resolution of the user's screen. It could be as low as 800×600 or as high as 1600×1200 (or even higher). Video Graphics Adapter (VGA) started out at 640×480, but for the most part you can discount that these days.
If you write your program on your 1600×1200 work monitor, and you design the form so it's maximized and designed to show all the information on the screen at once, you'll be unpleasantly surprised when you test it on a 800×600 screen. (Um … you will test it, won't you?)
How do you make your program work on any screen from 800×600 on up? The best way to accomplish this is by using features of .NET Windows forms that allow for automatic resizing of controls.
As you can probably guess, I have been writing extensively in VB 6.0. When I need to program a form in VB 6.0 I use a third-party control that I bought that allows me to resize the controls. Although it is possible to do control resizing using VB code, it is not pretty. In fact, if I wanted to write my own resizing code for VB 6.0, I would really need to use a subclasser to accomplish anything effective.
Anyway, back to .NET. You can do two things to make sure that your form works well on just about any computer:
Size the form to be 800×600 fixed size.
Size the form to be 800×600 and use the resizing capability of the controls.
The first option is easy. Create a new project and make the default form 800×600. Now alter the following properties in the Properties page:
Set the FormBorderStyle to FixedSingle.
Set the StartPosition to CenterScreen. (This or CenterParent is what I use most of the time.)
Set the MaximizeBox to false.
Set the MinimizeBox to false.
Now run your program. You will not be able to change the size of the form or even minimize it. If you like, you can put back the minimize button and now you can have the form either minimized on the task bar or normal size on the screen.
If you want to be really nasty, you can set the Locked property, which prevents the user from even moving the form. I once worked with a programmer who overlaid one form from one executable on top of another from a different executable and prevented the forms from being moved. This was his way of simulating multithreading in VB 5.0. Not good.
This type of form setup is very effective but also totally inelegant. It may be OK for quick-and-dirty projects and dialog box–style forms, but not for a nice program. What you need is to provide the user with the ability to size the form to any size he or she wants and still have all the controls look nice and in proportion. You will do this next.
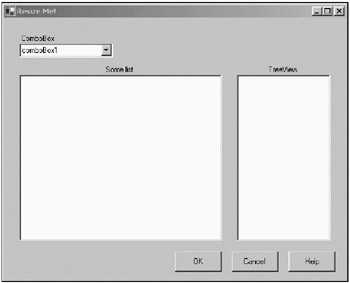
Start a new VB or C# project. Mine is called "Resizable." Make the form size 536×432 and add the following controls:
Add a Label whose text reads ComboBox. Center the text within the Label.
Add a ComboBox below the Label.
Add a Label below the ComboBox whose text reads Some List. Center the text within the Label.
Add a ListView below the Label.
Add a Label whose text reads TreeView. Center the text within the Label.
Add a TreeView below the Label.
Add three buttons at the bottom of the form labeled OK, Cancel, and Help.
Figure 2-12 shows how the form should look.
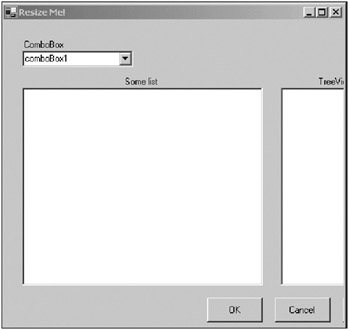
Now run the program. Resize the form and you can see that the controls do not move; instead, they disappear. You can see this happen in Figure 2-13.
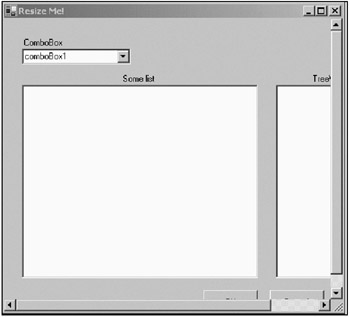
I guess the fastest way to fix this is to add scroll bars to the form itself. Try it. Change the form's AutoScroll property to true. Now run the form again. Instead of the controls totally disappearing, you will be able to scroll to them. This is shown in Figure 2-14.
I suppose this is better than before, but still I would not like to work with a form that looks like this when maximized on my low-resolution screen. The best thing you can do here is to use the Anchor property of each control. You should also make sure that the user can't make the form smaller than a minimum size. Anchoring the controls without a minimum size can make for tiny controls, which makes your form look silly.
Change the following properties on the form and the controls:
Change the MinimumSize property on the form to be the current size, 536×432.
Change the Anchor property of the three buttons to be Bottom, Right.
Change the Anchor property of the TreeView control to be Top, Bottom, Right.
Change the Anchor property of the TreeView Label to be Top, Right.
Change the Anchor property of the ComboBox Label and the ComboBox to be Top, Left, Right.
Change the Anchor property of the Some List Label to be Top, Left, Right.
Change the Anchor property of the ListView control to be anchored at all sides.
Now compile and run the program. As you resize the control, you will see that you cannot make it smaller than the original size. Also, note that I am keeping the width of the TreeView control static while enlarging the ListView control to take up the space. You may want to do something like this when one control holds all the information you need in its default size. If there were a list with long strings in the ListView, expanding the form would let me see them better.
I also like to keep the standard buttons in the same place all the time. There is no need to alter the size or placement of these buttons.
So, after playing around with the Anchor property, I bet you are wondering what the Docking property is all about. Docking allows a control to be "pinned" to another control. If you dock one of the major controls on this form, such as the TreeView, to the bottom of the form, you will see it takes up all the room at the bottom of the form. Now any control that is docked to the bottom of the form after the TreeView will sit on top of the TreeView. Try this out and see what uses you can come up with for the Docking property.