Sounds the name of a store at the mall, doesn't it? "Anchoring and Docking Scandinavian Furniture." (Just kidding.)
In order to present the best form to your user, you will need to take into consideration the size and resolution of the host computer screen. The best way to do this is to make your form presentable at a resolution of 800×600 and then allow the user to size the form to the dimensions he or she wants. You do this via the anchoring capability of the .NET controls. I choose 800×600 because this is the minimum reasonable resolution you should expect the user to have.
Normally in VB 6.0, you resized controls on your form through the Resize event with lots of code, or you bought a resizer control. In my VB 6.0 days I went the latter route. I tried the resize code route, but it was very problematic and the code changed whenever I added or deleted a control. I just could not get the finetuning I wanted. Well, I am glad to see that Microsoft has included anchoring capability as well as docking capability with .NET.
Although these two properties of any .NET control are really nice, they really come into play when used with the Splitter control. You should be familiar with the Splitter, as you use it whenever you split a screen in Word, Excel, or even Outlook. The Splitter allows you to manually resize controls within a form. You can even use the Splitter to resize controls within other controls.
Open up a new project in .NET. Mine is called "AnchorDock." In this example I want to show you how to make a multipanel form whose contents are resized according to the size of the form and also according to a couple of Splitters inside the form. Because the form is intended to be resized, you should set a minimum size to the form. I set mine to 200×200. This keeps the user from making the form so small that the controls look funny.
Quite often you want to create a form that has multiple sections. This example has three sections. The first is at the bottom of the form. The second is the top-left part of the form, and the third is the top-right part of the form. Add the following controls in the following order:
Add a RichTextBox called rcT to the form. Set its docking style to Bottom.
Add a Splitter control above the RichTextBox. Set the Cursor property to Hsplit and set the docking style to Bottom. Change the color of the Splitter to something like Fuchsia.
Add a TreeView control above the Splitter and call it T1. Set the docking style to Left and the border style to FixedSingle.
Add a Splitter control to the right of the TreeView. Set the Cursor property to Vsplit and set the docking style to Left. Change the color of the Splitter to something like Fuchsia.
Add a Panel on the remaining part of the form. Set its docking style to Fill. Set the AutoScroll property to true.
Add a PictureBox called Pic to the top-left part of the panel. Its anchor properties should be Top and Left. Color the background something like Teal.
You should see something that looks like Figure 5-14.

Add the following delegate to the code.
C#
    private void DisplaySize(object sender, EventArgs e)
    {
      rcT.AppendText("Picture Size = " + Pic.Size.ToString() + "\n");
      rcT.AppendText("Panel size = " + panel1.Size.ToString() + "\n\n");
    }
VB
  Private Sub DisplaySize(ByVal sender As Object, ByVal e As EventArgs)
    rcT.AppendText("Picture Size = " + Pic.Size.ToString() + "\n")
    rcT.AppendText("Panel size = " + panel1.Size.ToString() + "\n\n")
  End Sub
This displays the size of the PictureBox and the Panel whenever a Resize event occurs. Which Resize event? Add the following code to the constructor.
    public Form1()
    {
      InitializeComponent();

      //Fill the tree view
      TreeNode node = new TreeNode("Base Inventory");
      node.Nodes.Add("Laptop 234");
      node.Nodes.Add("Desktop 831");
      node.Nodes.Add("68030 Emulator");
      node.Expand();
      T1.Nodes.Add(node);

      // uncomment this next line to make the aspect ratio of bitmap real
      //Pic.SizeMode = PictureBoxSizeMode.AutoSize;
      Pic.Size = panel1.Size;
      //Comment this next line of code out for correct aspect ratio
      Pic.SizeMode = PictureBoxSizeMode.StretchImage;
      Pic.Image = Image.FromFile("floorplan.bmp");

      this.Resize += new EventHandler(this.DisplaySize);
      foreach(Control c in this.Controls)
      c.Resize += new EventHandler(this.DisplaySize);
    }
VB
  Public Sub New()
    MyBase.New()

    InitializeComponent()

    'Fill the tree view
    Dim node As TreeNode = New TreeNode("Base Inventory")
    node.Nodes.Add("Laptop 234")
    node.Nodes.Add("Desktop 831")
    node.Nodes.Add("68030 Emulator")
    node.Expand()
    T1.Nodes.Add(node)
    ' uncomment this next line to make the aspect ratio of bitmap real
    'Pic.SizeMode = PictureBoxSizeMode.AutoSize;
    Pic.Size = panel1.Size
    'Comment this next line of code out for correct aspect ratio
    Pic.SizeMode = PictureBoxSizeMode.StretchImage
    Pic.Image = Image.FromFile("floorplan.bmp")

    '      me.Resize += new EventHandler(this.DisplaySize);
    Dim c As Control
    For Each c In Me.Controls
      AddHandler c.Resize, New EventHandler(AddressOf DisplaySize)
    Next
  End Sub
This code adds some nodes to the tree, sets up the PictureBox with a bitmap, and hooks the delegate you just added into the Resize event of all controls on the form.
Figure 5-15 shows the form running.
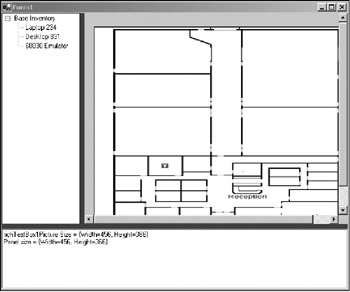
This form represents a snapshot of an inventory control system. The inventory is shown in the TreeView, and the map showing the placement of each piece of the inventory is shown in the bitmap. The bottom text box serves as a running location of inventory as it is being moved about.
Normally, you would place other PictureBoxes with icons on the bitmap to show the placement. I leave that to you. Also, right now the bottom text box shows only the size of a few controls as you resize the form and move the Splitters.
This example demonstrates that it is not too hard to create a form that is flexible enough to comply with most screen resolutions and user preferences. This is very important in data entry programs and in most other Windows programs.