You can do two things about making your own validation controls in .NET. One of them is to make a completely new control by building on an existing control. This is what you did in the last example. The other thing you can do is add a few new properties to a control without making a new one altogether. This is called extending the control.
The neat thing about this extension is that it can work with any control you like. Want a for-instance? How about the ToolTip control? I have not discussed this control in any detail, so how about the ErrorProvider control?
As you know from previous chapters, the ErrorProvider control is something that you plop down on your form and it appears in the tray below the form. It does not appear on the form itself. In case you have not been paying attention, as soon as you put the ErrorProvider control on the form, every visible control on the form has several new properties that are related to the ErrorProvider control. Try a new project with several controls on it and look at the Properties page. Now add an ErrorProvider to your form. Your several controls now have a few extra properties related to the ErrorProvider.
The ErrorProvider is a class that inherits from Component and also implements the IExtenderProvider interface. It is set up to extend the properties of any control on the current form. The ToolTip control does the same thing.
Extending the properties of a control offers you a big advantage over making your own control. The code works the same (within limits) for any control. It also allows you to turn any control on your form into … SuperControl!
This next example contains two classes that extend a TextBox control. The first class provides properties that make the control accept only numbers or only numbers within a certain range. The second class provides a regular expression property for validation before focus leaves the control.
By the way, both of these classes allow the TextBox to work as normal by using a Required property. This allows you to have 50 TextBoxes on the screen and use the extensions on only a few of them.
I start the next section by introducing you to my buddy Vlad the validator.
Start a new project in either C# or VB. Make sure it is a class library that you are starting. You want to end up with a DLL that you can put in your Toolbox as a new control. The name of my project is "Vlad."
This class has no user interface (obviously), so I will get right down to the code. The first thing to do is add a reference to the System.Windows.Forms DLL. You do this in the project window. Figure 8-13 shows the project after the reference has been added.

You will notice that my solution has two projects. You will add the test project later.
The next thing to add is some namespace references to your code.
C#
using System;
using System.Collections;
using System.Windows.Forms;
using System.ComponentModel;
using System.Text.RegularExpressions;
VB
Option Strict On

Imports System
Imports System.Collections
Imports System.Windows.Forms
Imports System.ComponentModel
Imports System.Text.RegularExpressions
As you can see, you will be using regular expressions again.
| Tip |
The first part of this chapter covers regular expressions. Reading the first part of this chapter makes this part so much more understandable. |
Next is the class definition. I use some specialized attributes for these classes. I also use some for the properties within. I suggest you read up on attributes before you go any further. (At least read up a little so you know what attributes are.) Here is the class definition.
C#
  [ProvideProperty("Required",            typeof(Control))]
  [ProvideProperty("RangeValueRequired",  typeof(Control))]
  [ProvideProperty("MinValue",            typeof(Control))]
  [ProvideProperty("MaxValue",            typeof(Control))]
  public class NumberValidate : Component, IExtenderProvider
  {
...
 }
VB
<ProvideProperty("Required", GetType(Control)), _
 ProvideProperty("RangeValueRequired", GetType(Control)), _
 ProvideProperty("MinValue", GetType(Control)), _
 ProvideProperty("MaxValue", GetType(Control))> _
 Public Class NumberValidate
   Inherits Component
   Implements IExtenderProvider
...
End Class
I am telling any control that looks in here (using reflection) that I am providing four properties:
Required: This tells that control to accept only numbers.
RangeValueRequired: This tells the control to accept numbers in the supplied range.
MinValue: This is the minimum value for the range.
MaxValue: This is the maximum value for the range.
Whenever you implement the IExtenderProvider interface, you need to override the CanExtend property. Add the following code inside the class block.
C#
    bool IExtenderProvider.CanExtend(object target)
    {
      if (target is TextBox)
      {
        TextBox t = (TextBox)target;
        tp.Active = true;
        return true;
      }
      else
        return false;
    }
VB
  Function CanExtend(ByVal target As Object) As Boolean _
                     Implements IExtenderProvider.CanExtend
    If TypeOf target Is TextBox Then
      Dim t As TextBox = CType(target, TextBox)
      tp.Active = True
      Return True
    Else
      Return False
    End If
  End Function
I have set the control type I will be extending to a TextBox. If you like, you can extend any control you want. How about extending the RichTextBox with a class that does spell checking on the fly? You can do a lot with extenders.
OK, you have the properties defined that appear in the Properties page of the extended control. You also have narrowed the set of extended control to all TextBoxes. It is time to add the guts to this class. Be sure to add the following locals region.
C#
    #region locals

    // holds Key - value pair for efficient retrieval
    //Holds all properties of all controls that use this extender.
    private System.Collections.Hashtable CustomProps =
                        new System.Collections.Hashtable();

    ErrorProvider er = new ErrorProvider();
    ToolTip       tp = new ToolTip();

    //Holds all the custom properties of a control
    private class Props
    {
      public bool Required      = false;
      public bool RangeRequired = false;
      public Decimal MinVal     = 0;
      public Decimal MaxVal     = 999;
    }
    #endregion
VB
#Region "locals"

  ' holds Key - value pair for efficient retrieval
  'Holds all properties of all controls that use this extender.
  Private CustomProps As System.Collections.Hashtable = _
                        New System.Collections.Hashtable()

  Private er As ErrorProvider = New ErrorProvider()
  Private tp As ToolTip = New ToolTip()

  'Holds all the custom properties of a control
  Private Class Props
    Public Required As Boolean = False
    Public RangeRequired As Boolean = False
    Public MinVal As Decimal = 0
    Public MaxVal As Decimal = 999
  End Class

#End Region
Next, I add the delegates for the events I will use. Vlad will hook into the KeyPress event and the Validating event. Here is the delegate region of code.
   #region events

   private void KeyPress(object sender, KeyPressEventArgs e)
   {
     //Allow backspace
     if(e.KeyChar == (char)8)
       return;

     //Allow 0-9
     if(!Regex.IsMatch(e.KeyChar.ToString(), "[0-9]"))
       e.Handled = true;
   }

   private void ValidateProp(object sender, CancelEventArgs e)
   {
     Control ctl = (Control)sender;

     //Reset the error
     er.SetError(ctl, "");

     if(GetRequired(ctl))
     {
       if(ctl.Text == string.Empty)
       {
         er.SetError(ctl, "No value was entered when one was required");
         return;
       }

       if(GetRangeValueRequired(ctl))
       {
         Props p = (Props)CustomProps[ctl];
         try
         {
           if(Decimal.Parse(ctl.Text) < p.MinVal)
             er.SetError(ctl, "Value entered is less than minimum value");
         }
         catch
         {
           er.SetError(ctl, "Value is non-numeric");
         }
         try
         {
           if(Decimal.Parse(ctl.Text) > p.MaxVal)
             er.SetError(ctl, "Value entered is greater than minimum value");
         }
         catch
         {
           er.SetError(ctl, "Value is non-numeric");
         }
       }
     }
   }

   #endregion
VB
#Region "events"

  Private Sub KeyPress(ByVal sender As Object, ByVal e As KeyPressEventArgs)
    'Allow backspace
    If e.KeyChar = Chr(8) Then
      Return
    End If

    'Allow 0-9
    If Not Regex.IsMatch(e.KeyChar.ToString(), "[0-9]") Then
      e.Handled = True
    End If
  End Sub

  Private Sub ValidateProp(ByVal sender As Object, ByVal e As CancelEventArgs)
    Dim ctl As Control = CType(sender, Control)

    'Reset the error
    er.SetError(ctl, "")

    If GetRequired(ctl) Then
      If ctl.Text = String.Empty Then
        er.SetError(ctl, "No value was entered when one was required")
        Return
      End If

      If GetRangeValueRequired(ctl) Then
        Dim p As Props = CType(CustomProps(ctl), Props)
      If GetRangeValueRequired(ctl) Then
        Dim p As Props = CType(CustomProps(ctl), Props)
        If IsNumeric(ctl.Text) Then
          If Decimal.Parse(ctl.Text) < p.MinVal Then
            er.SetError(ctl, "Value entered is less than minimum value")
          End If
          If Decimal.Parse(ctl.Text) > p.MaxVal Then
            er.SetError(ctl, "Value entered is greater than minimum value")
          End If
        Else
          er.SetError(ctl, "Value is non-numeric")
        End If
      End If
      End If
    End If
  End Sub

#End Region
The KeyPress delegate uses the regular expression engine to validate only numbers. I allow a backspace in here as well. The Validating delegate checks to see if validating is required and if the validation should be range sensitive.
Notice here that I choose to instantiate a new ErrorProvider within my extender. If something is wrong, I set the ErrorProvider text and flash the icon next to the offending control.
If you want, you can prevent the control from losing focus in the case of an error. This is problematic, though, because if you try to exit the program while the control is invalid, you will not be able to. One solution I have seen to this "exit" problem is to walk the stack and find the WM_CLOSE message as the reason you are leaving the control. I think that setting an error is just fine.
The error text says nothing about how the control should be used. In fact, how is the user supposed to know that this control needs only numbers within a certain range? The answer is to use the ToolTip control. You saw in the locals region that I included a ToolTip control. Enter the following code, which fills the text.
    private void SetToolTip(Control ctl)
    {
      string tip = string.Empty;
      Props p = (Props)CustomProps[ctl];
      if(p.Required)
        tip = "Validation of numbers required";
      if(p.RangeRequired)
      {
        tip += " / Number range required";
        tip += " / Min value = " + p.MinVal.ToString();
        tip += " / Max value = " + p.MaxVal.ToString();
      }
      tp.SetToolTip(ctl, tip);
    }
VB
  Private Sub SetToolTip(ByVal ctl As Control)
    Dim tip As String = String.Empty
    Dim p As Props = CType(CustomProps(ctl), Props)
    If p.Required Then
      tip = "Validation of numbers required"
    End If
    If p.RangeRequired Then
      tip += " / Number range required"
      tip += " / Min value = " + p.MinVal.ToString()
      tip += " / Max value = " + p.MaxVal.ToString()
    End If
    tp.SetToolTip(ctl, tip)
  End Sub
As you can see, I change the text to reflect the properties set for this control. Anytime one of the properties is changed, I call this method.
When you define a property using attributes, you need a property get and set function to go with it. The name of the function must be the name of the property preceded by the word "Get" or "Set." Here is the code region for the Required property.
    #region Required property

    public bool GetRequired(Control ctl)
    {
      if(CustomProps.Contains(ctl))
      {
        Props p = (Props)CustomProps[ctl];
        SetToolTip(ctl);
        return p.Required;
      }
      else
        return false;
    }

    public void SetRequired(Control ctl, bool val)
    {
      if(CustomProps.Contains(ctl))
      {
        Props p = (Props)CustomProps[ctl];
        if(val == p.Required)
          return;

        p.Required = val;
        CustomProps[ctl] = p;
        SetToolTip(ctl);
        if(val)
        {
          ctl.KeyPress   += new KeyPressEventHandler(KeyPress);
          ctl.Validating += new CancelEventHandler(ValidateProp);
        }
        else
        {
          ctl.KeyPress   -= new KeyPressEventHandler(KeyPress);
          ctl.Validating -= new CancelEventHandler(ValidateProp);
        }
      }
      else
    {
      Props p = new Props();
      p.Required = val;
        CustomProps.Add(ctl, p);
        SetToolTip(ctl);
        ctl.Validating += new CancelEventHandler(ValidateProp);
      }
    }

    #endregion
VB
#Region "Required property"

  Public Function GetRequired(ByVal ctl As Control) As Boolean
    If CustomProps.Contains(ctl) Then
      Dim p As Props = CType(CustomProps(ctl), Props)
      SetToolTip(ctl)
      Return p.Required
    End If
    Return False
  End Function

  Public Sub SetRequired(ByVal ctl As Control, ByVal val As Boolean)
    If CustomProps.Contains(ctl) Then
      Dim p As Props = CType(CustomProps(ctl), Props)
      If val = p.Required Then
        Return
      End If

      p.Required = val
      CustomProps(ctl) = p
      SetToolTip(ctl)
      If val Then
        AddHandler ctl.KeyPress, _
                  New KeyPressEventHandler(AddressOf KeyPress)
        AddHandler ctl.Validating, _
                  New CancelEventHandler(AddressOf ValidateProp)
      Else
        RemoveHandler ctl.KeyPress, _
                  New KeyPressEventHandler(AddressOf KeyPress)
        RemoveHandler ctl.Validating, _
                  New CancelEventHandler(AddressOf ValidateProp)
      End If

    Else
      Dim p As Props = New Props()
      p.Required = val

      CustomProps.Add(ctl, p)
      SetToolTip(ctl)
      AddHandler ctl.Validating, New CancelEventHandler(AddressOf ValidateProp)
    End If
  End Sub

#End Region
Interesting code, this is. Note that I instantiated a hash table in the locals region. I also made a small class that holds the properties. I use the hash table because it accepts a key/value pair. The key in this case is the Control object and the value is the property object instated from the Props class. Hash tables are also extremely fast data structures.
The Get function looks to see if the hash table contains a set of properties for this control. If not, I return a default value of false.[4] The Set function again looks to see if this control already contains a set of properties. If so, I get these properties, make the change, and then store this property back in the hash table. If this Set function does not find the Set properties in the hash table, I instantiate a new set of properties, change the individual property I need, and store it in the hash table. Note that I set the ToolTip property in each of these functions.
If the user sets the Required property to true, I wire up the delegates to the correct events. If not, I unwire them. Doing this obviates the need for my delegates to test whether or not they should be validating. This is the preferred method.
Next on the list are the RangeValueRequired properties.
C#
    #region RangeValue required

    //Get method for range required
    public bool GetRangeValueRequired(Control ctl)
    {

      //This makes best use of a hashtable for quick retrieval
      if(CustomProps.Contains(ctl))
      {
        Props p = (Props)CustomProps[ctl];
        SetToolTip(ctl);
        return p.RangeRequired;
      }
      else
        return false;
    }

    //Set method for Range required
    public void SetRangeValueRequired(Control ctl, bool val)
    {
      if(CustomProps.Contains(ctl))
      {
        //See if this property is already correctly set
        Props p = (Props)CustomProps[ctl];
        if(val == p.RangeRequired)
          return;

        //Set this property and add it back to the list
        p.RangeRequired = val;
        CustomProps[ctl] = p;
        if(val)
        {
          ctl.KeyPress += new KeyPressEventHandler(KeyPress);
          ctl.Validating += new CancelEventHandler(ValidateProp);
        }
        else
        {
          ctl.KeyPress -= new KeyPressEventHandler(KeyPress);
          ctl.Validating -= new CancelEventHandler(ValidateProp);
        }
        SetToolTip(ctl);
      }
      else
      {
        //Set this property and add it to the list
        Props p = new Props();
        p.RangeRequired = val;
        CustomProps.Add(ctl, p);
        if(val)
          ctl.KeyPress += new KeyPressEventHandler(KeyPress);
        SetToolTip(ctl);
      }
    }

    #endregion
VB
#Region "RangeValue required"

  'Get method for range required
  Public Function GetRangeValueRequired(ByVal ctl As Control) As Boolean
    'This makes best use of a hashtable for quick retrieval
    If CustomProps.Contains(ctl) Then
      Dim p As Props = CType(CustomProps(ctl), Props)
      SetToolTip(ctl)
      Return p.RangeRequired
    End If
    Return False
  End Function

  'Set method for Range required
  Public Sub SetRangeValueRequired(ByVal ctl As Control, ByVal val As Boolean)
    If CustomProps.Contains(ctl) Then
      'See if this property is already correctly set
      Dim p As Props = CType(CustomProps(ctl), Props)
      If val = p.RangeRequired Then
        Return
      End If

      'Set this property and add it back to the list
      p.RangeRequired = val
      CustomProps(ctl) = p
      If val Then
        AddHandler ctl.KeyPress, _
                  New KeyPressEventHandler(AddressOf KeyPress)
        AddHandler ctl.Validating, _
                  New CancelEventHandler(AddressOf ValidateProp)
      Else
        RemoveHandler ctl.KeyPress, _
                  New KeyPressEventHandler(AddressOf KeyPress)
        RemoveHandler ctl.Validating, _
                  New CancelEventHandler(AddressOf ValidateProp)
      End If
      SetToolTip(ctl)
    Else
      'Set this property and add it to the list
      Dim p As Props = New Props()
      p.RangeRequired = val
      CustomProps.Add(ctl, p)
      If val Then
        AddHandler ctl.KeyPress, New KeyPressEventHandler(AddressOf KeyPress)
      End If
      SetToolTip(ctl)
    End If
  End Sub

#End Region
This code is much the same as the code for the Required property. One last piece of code is needed here. The following is the code for the minimum and maximum value properties.
C#
    #region Min and Max Values

    public Decimal GetMinValue(Control ctl)
    {
      if(CustomProps.Contains(ctl))
      {
        Props p = (Props)CustomProps[ctl];
        SetToolTip(ctl);
        return p.MinVal;
      }
      else
        return 0;
    }

    [DefaultValue(0)]
    public void SetMinValue(Control ctl, Decimal val)
    {
      if(val < 0)
        val = 0;

      if(CustomProps.Contains(ctl))
      {
        Props p = (Props)CustomProps[ctl];
        p.MinVal = val;
        CustomProps[ctl] = p;
        SetToolTip(ctl);
      }
      else
      {
        Props p = new Props();
        p.MinVal = val;
        CustomProps.Add(ctl, p);
        SetToolTip(ctl);
      }
    }

    public Decimal GetMaxValue(Control ctl)
    {
      if(CustomProps.Contains(ctl))
      {
        Props p = (Props)CustomProps[ctl];
        SetToolTip(ctl);
        return p.MaxVal;
      }
      else
        return 999;
    }

    [DefaultValue(999)]
    public void SetMaxValue(Control ctl, Decimal val)
    {
      if(val > 999)
        val = 999;

      if(CustomProps.Contains(ctl))
      {
        Props p = (Props)CustomProps[ctl];
        p.MaxVal = val;
        CustomProps[ctl] = p;
        SetToolTip(ctl);
      }
      else
      {
        Props p = new Props();
        p.MaxVal = val;
        CustomProps.Add(ctl, p);
        SetToolTip(ctl);
      }
    }

    #endregion
VB
#Region "Min and Max Values"

  Public Function GetMinValue(ByVal ctl As Control) As Decimal
    If CustomProps.Contains(ctl) Then
      Dim p As Props = CType(CustomProps(ctl), Props)
      SetToolTip(ctl)
      Return p.MinVal
    End If
    Return 0
  End Function

  ' <DefaultValue(0)>_
  Public Sub SetMinValue(ByVal ctl As Control, ByVal val As Decimal)
    If val < 0 Then val = 0

    If CustomProps.Contains(ctl) Then
      Dim p As Props = CType(CustomProps(ctl), Props)
      p.MinVal = val
      CustomProps(ctl) = p
      SetToolTip(ctl)
    Else
      Dim p As Props = New Props()
      p.MinVal = val
      CustomProps.Add(ctl, p)
      SetToolTip(ctl)
    End If
  End Sub

  Public Function GetMaxValue(ByVal ctl As Control) As Decimal
    If (CustomProps.Contains(ctl)) Then
      Dim p As Props = CType(CustomProps(ctl), Props)
      SetToolTip(ctl)
      Return p.MaxVal
    End If
    Return 999
  End Function

  ' [DefaultValue(999)]
  Public Sub SetMaxValue(ByVal ctl As Control, ByVal val As Decimal)
    If val > 999 Then val = 999

    If CustomProps.Contains(ctl) Then
      Dim p As Props = CType(CustomProps(ctl), Props)
      p.MaxVal = val
      CustomProps(ctl) = p
      SetToolTip(ctl)
    Else
      Dim p As Props = New Props()
      p.MaxVal = val
      CustomProps.Add(ctl, p)
      SetToolTip(ctl)
    End If
  End Sub

#End Region
Note that in this region I use attributes on the Set properties to define a default value.
OK, that's it for this extender. What you have is a control that you can load into your Toolbox and drag onto a form. If this control sees a TextBox on the form, the TextBox will get these four new properties.
If the new properties are set correctly, you will not be able to enter any letters into the TextBox. You can also set the range of numbers allowed. This control provides a custom ToolTip for the TextBox and also provides a custom ErrorProvider control. You have everything you need to get going.
Now for the testing part. Actually, do you want to test this before adding the next extender class? Yes? OK.
Add another project to your Vlad solution space. Make this project a Windows Forms project. Also make this the start-up project. Then add two controls to this form. Make sure that one of the controls is a TextBox. If you look at the properties of the TextBox, you will see this is your normal, everyday TextBox.
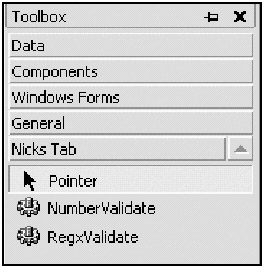
Now for the magic. While you are in the form, open up the Toolbox. Right-click the Toolbox and choose the .NET Framework Components tab, as shown in Figure 8-14. This is just like choosing the custom TextBox you made in the last example.
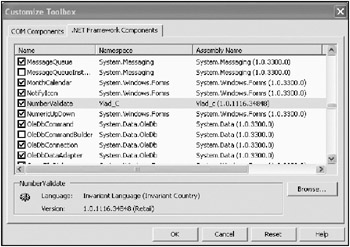
Browse to the BIN directory under the VB project (BIN\Debug under the C# project) and double-click Vlad.dll, as shown in Figure 8-14.[5]
Click OK and you should have this control in your Toolbox. Now drag this control over to your form. Make sure that you clear the default text from this control. Figure 8-15 shows the Properties screen for the TextBox after adding the control to the form.
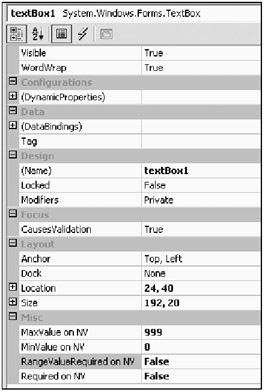
See that the default properties came up correctly?
Enable the two required properties and change the MinValue to 50 and the MaxValue to 55. Now run the program. Figure 8-16 shows my form after I exited the TextBox with an invalid entry.
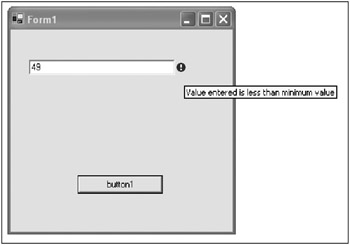
Notice that the ErrorProvider has appeared next to the offending TextBox. I moused over the ErrorProvider icon and I got the message you see here.
How is the user supposed to know what is required in the TextBox? This is where the ToolTip text comes in. Hover your mouse over the TextBox and your screen should look like Figure 8-17.
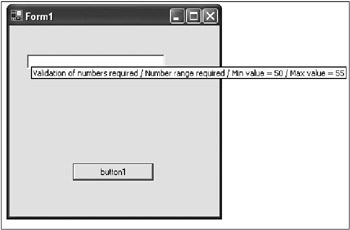
This text changes based on what the values were for validating this control. Pretty cool, isn't it? Well, I think so anyway.
Now back to the second validation control.
Here is a cool control that I decided to make separate from the NumberValidator. Add a new class to the Vlad project called RegxValidate. This class also extends the TextBox control, but with two properties this time. The first property is a Required property and the second is a Mask property. The code for this is much the same as for the NumberValidator. There are a few enhancements, though, that I explain shortly. First, enter the code in Listings 8-2a and 8-2b.
using System;
using System.Collections;
using System.Windows.Forms;
using System.ComponentModel;
using System.Text.RegularExpressions;
using System.Diagnostics;

namespace Vlad_c
{
  /// <summary>
  /// Allow user to enter a regular expression for validation purposes
  /// </summary>

  [ProvideProperty("Required", typeof(Control))]
  [ProvideProperty("RegularExpression", typeof(Control))]
  public class RegxValidate: Component, IExtenderProvider
  {

    #region locals

    // holds Key - value pair for efficient retrieval
    //Holds all properties of all controls that use this extender.
    private System.Collections.Hashtable CustomProps =
                            new System.Collections.Hashtable();

    ErrorProvider er = new ErrorProvider();
    ToolTip       tp = new ToolTip();

    //Holds all the custom properties of a control
    private class Props
    {
      public bool Required = false;
      public string Regx = ".*";
    }

    #endregion

    public RegxValidate()
    {
    }
    bool IExtenderProvider.CanExtend(object target)
    {
      //Target can be anything; like a ComboBox if needed
      //Target can be multiple things also
      if (target is TextBox)
      {
        return true;
      }
      else
        return false;
    }

    #region Required property

    public bool GetRequired(Control ctl)
    {
      if(CustomProps.Contains(ctl))
      {
        Props p = (Props)CustomProps[ctl];
        SetToolTip(ctl);
        return p.Required;
      }
      else
        return false;
    }

    public void SetRequired(Control ctl, bool val)
    {
      if(CustomProps.Contains(ctl))
      {
        Props p = (Props)CustomProps[ctl];
        if(val == p.Required)
          return;

        p.Required = val;
        CustomProps[ctl] = p;
        SetToolTip(ctl);
        if(val)
          ctl.Validating += new CancelEventHandler(ValidateProp);
        else
          ctl.Validating -= new CancelEventHandler(ValidateProp);
      }
      else
      {
        Props p = new Props();
        p.Required = val;

        CustomProps.Add(ctl, p);
        SetToolTip(ctl);
        ctl.Validating += new CancelEventHandler(ValidateProp);
      }
    }

    #endregion

    #region Regular Expression property

    public string GetRegularExpression(Control ctl)
    {
      if(CustomProps.Contains(ctl))
      {
        Props p = (Props)CustomProps[ctl];
        SetToolTip(ctl);
        return p.Regx;
      }
      else
        return ".*";
    }

    [DefaultValue("")]
    public void SetRegularExpression(Control ctl, string val)
    {
      //Put something here to verify that regular expression is valid
      try
      {
        Regex.IsMatch("abcdefg", val);
      }
      catch(Exception e)
      {
        string err = "Invalid Regular Expression on:\n";
        err += ctl.Name + "\n\n" + e.Message;
        MessageBox.Show(err);
        er.SetError(ctl, "Invalid Regular Expression!!");
        return;
      }
      if(CustomProps.Contains(ctl))
      {
        Props p = (Props)CustomProps[ctl];
        p.Regx = val;
        CustomProps[ctl] = p;
      }
      else
      {
        Props p = new Props();
        p.Regx = val;
        CustomProps.Add(ctl, p);
      }
      SetToolTip(ctl);
    }

    #endregion

    #region events

    private void ValidateProp(object sender, CancelEventArgs e)
    {
      Control ctl = (Control)sender;

      //Reset the error
      er.SetError(ctl, "");

      if(GetRequired(ctl))
      {
        Props p = (Props)CustomProps[ctl];
        if(!Regex.IsMatch(ctl.Text, p.Regx))
          er.SetError(ctl, "Value did not match input restrictions");
        return;
      }
    }

    #endregion

    #region other stuff

    private void SetToolTip(Control ctl)
    {
      string tip = string.Empty;
      tp.Active = false;
      SetTooltipActive();
      Props p = (Props)CustomProps[ctl];
      if(p.Required)
        tip = "Regular Expression validation: " + p.Regx ;
      tp.SetToolTip(ctl, tip);
    }

    [Conditional("DEBUG")]
    private void SetTooltipActive()
    {
      tp.Active = true;
    }

    #endregion
  }
}
Option Strict On

Imports System
Imports System.Collections
Imports System.Windows.Forms
Imports System.ComponentModel
Imports System.Text.RegularExpressions

<ProvideProperty("Required", GetType(Control)), _
 ProvideProperty("RegularExpression", GetType(Control))> _
Public Class RegxValidate
  Inherits Component
  Implements IExtenderProvider

#Region "locals"

  ' holds Key - value pair for efficient retrieval
  'Holds all properties of all controls that use this extender.
  Private CustomProps As System.Collections.Hashtable = _
                                 New System.Collections.Hashtable()
  Private er As ErrorProvider = New ErrorProvider()
  Private tp As ToolTip = New ToolTip()

  'Holds all the custom properties of a control
  Private Class Props
    Public Required As Boolean = False
    Public Regx As String = ".*"
  End Class

#End Region

  Public Sub New()

  End Sub

  Function CanExtend(ByVal target As Object) As _
                     Boolean Implements IExtenderProvider.CanExtend
    'Target can be anything; like a ComboBox if needed
    'Target can be multiple things also
    If TypeOf target Is TextBox Then
      Return True
    Else
      Return False
    End If
  End Function

#Region "Required property"

  Public Function GetRequired(ByVal ctl As Control) As Boolean
    If CustomProps.Contains(ctl) Then
      Dim p As Props = CType(CustomProps(ctl), Props)
      SetToolTip(ctl)
      Return p.Required
    End If
    Return False
  End Function

  Public Sub SetRequired(ByVal ctl As Control, ByVal val As Boolean)
    If CustomProps.Contains(ctl) Then
      Dim p As Props = CType(CustomProps(ctl), Props)
      If val = p.Required Then
        Return
      End If
      p.Required = val
      CustomProps(ctl) = p
      SetToolTip(ctl)
      If val Then
        AddHandler ctl.Validating, _
                  New CancelEventHandler(AddressOf ValidateProp)
      Else
        RemoveHandler ctl.Validating, _
                  New CancelEventHandler(AddressOf ValidateProp)
      End If
    Else
      Dim p As Props = New Props()
      p.Required = val

      CustomProps.Add(ctl, p)
      SetToolTip(ctl)
      AddHandler ctl.Validating, New CancelEventHandler(AddressOf ValidateProp)
    End If
  End Sub

#End Region

#Region "Regular Expression property"

  Public Function GetRegularExpression(ByVal ctl As Control) As String
    If CustomProps.Contains(ctl) Then
      Dim p As Props = CType(CustomProps(ctl), Props)
      SetToolTip(ctl)
      Return p.Regx
    Else
      Return ".*"
    End If
  End Function

  <DefaultValue("")> _
  Public Sub SetRegularExpression(ByVal ctl As Control, ByVal val As String)
    'Put something here to verify that regular expression is valid
    Try
      Regex.IsMatch("abcdefg", val)
    Catch e As Exception
      Dim err As String = "Invalid Regular Expression on:" + vbCrLf
      err += ctl.Name + vbCrLf + vbCrLf + e.Message
      MessageBox.Show(err)
      er.SetError(ctl, "Invalid Regular Expression!!")
      Return
    End Try

    If CustomProps.Contains(ctl) Then
      Dim p As Props = CType(CustomProps(ctl), Props)
      p.Regx = val
      CustomProps(ctl) = p
    Else
      Dim p As Props = New Props()
      p.Regx = val
      CustomProps.Add(ctl, p)
    End If
    SetToolTip(ctl)
  End Sub

#End Region

#Region "events"

  Private Sub ValidateProp(ByVal sender As Object, ByVal e As CancelEventArgs)
    Dim ctl As Control = CType(sender, Control)

    'Reset the error
    er.SetError(ctl, "")

    If GetRequired(ctl) Then
      Dim p As Props = CType(CustomProps(ctl), Props)
      If Not Regex.IsMatch(ctl.Text, p.Regx) Then
        er.SetError(ctl, "Value did not match input restrictions")
      End If
      Return
    End If
  End Sub

#End Region

#Region "other stuff"

  Private Sub SetToolTip(ByVal ctl As Control)
    Dim tip As String = String.Empty
    tp.Active = False
    SetTooltipActive()
    Dim p As Props = CType(CustomProps(ctl), Props)
    If p.Required Then
      tip = "Regular Expression validation: " + p.Regx
    End If
    tp.SetToolTip(ctl, tip)
  End Sub

  <Conditional("DEBUG")> _
  Private Sub SetTooltipActive()
    tp.Active = True
  End Sub

#End Region
End Class
Let's look at some interesting code. I decided that I do not want the designer of the form that this component goes on to have a problem with regular expressions. After all, not everyone has read the first part of this chapter and is now an expert.
It is all too easy to enter in a regular expression that cannot be parsed. What do you do then? I have code in the SetRegularExpression method to trap this error. Here is the C# code.
C#
...
    //Put something here to verify that regular expression is valid
    try
    {
      Regex.IsMatch("abcdefg", val);
    }
    catch(Exception e)
    {
      string err = "Invalid Regular Expression on:\n";
      err += ctl.Name + "\n\n" + e.Message;
      MessageBox.Show(err);
      er.SetError(ctl, "Invalid Regular Expression!!");
      return;
    }
...
Because I have no way of parsing a regular expression, I figured I would let the regular expression engine take a look at it. As you can see, I wrap a simple call to the parser in a Try-Catch block. If this call fails, the regular expression passed in was in error. I then pop up a message box with a descriptive error and at the same time I add an error icon next to the control.
Now test this new control. Compile this code and make sure you get no errors. Go into the tester project you have in this solution and remove the number validation control from the form. Also go into the Toolbox and delete this control from the Toolbox. Exit out of the IDE as a whole.
| Note |
I tested this on a few different machines. On some I needed to reload the IDE and on some I did not. Just to be safe, reload the IDE before you reload the control. |
Customize the Toolbox with the same Vlad class you did before. You should now have two new controls. Figure 8-18 shows this.
Drag the RegxValidate control over to your form and you are ready to go.
The neat thing about all this new error code is that it happens at design time. Figure 8-19 shows my form at design time when I enter in the following regular expression: [0-9+. Enter this in and click another property or on the form itself.
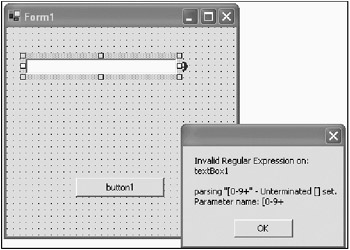
See the nice error box? If the expression was good, I would not get this problem. Now just in case you click OK and then get an important phone call and forget what you were doing, I added the error icon to this control. See it in the back there? Figure 8-20 shows the text for this error during design time.
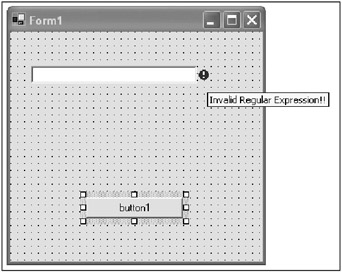
Now there is no way you cannot tell me that this is really cool. It is quite helpful as well. When you come back from your Mountain Dew break, you have a visual cue that you may have forgotten to correct a regular expression problem.
Look at the code for this class carefully and you will see that I have added some special debug code in the form of a ToolTip.
When most users use this control, they will have no clue about regular expressions. The designer of the form will (hopefully) have included some training and a help file. This help file will tell the user what data is valid for this control. As you know, you can enter some pretty hairy regular expressions that may require some weird data pattern to be entered. Showing the user the regular expression that his or her data will be checked against is at best useless. It is also rather unfriendly.
Wouldn't it be nice to offer some ToolTip text for the test engineers? They should, after all, know something about regular expressions. They can at least call you over to see what could be wrong.
Here is the C# code that allows this to happen. The VB code is much the same.
C#
    #region other stuff

    private void SetToolTip(Control ctl)
    {
      string tip = string.Empty;
      tp.Active = false;
      SetTooltipActive();
      Props p = (Props)CustomProps[ctl];
      if(p.Required)
        tip = "Regular Expression validation: " + p.Regx ;
      tp.SetToolTip(ctl, tip);
    }

    [Conditional("DEBUG")]
    private void SetTooltipActive()
    {
      tp.Active = true;
    }

    #endregion
I used the Conditional attribute, which tests for the DEBUG compiler directive. If the debug version of this code is run, the SetToolTipActive method will get called. Otherwise, the line of code that calls this function never gets compiled. Now I think this is a neat feature.
Notice that in the SetToolTip method I set the ToolTip to be inactive. The next line of code is the call to the method that sets it to be active. If you made a release version of this code, you would never see this ToolTip. Figure 8-21 shows this ToolTip in action.

Both you and your test engineers will love this feature.
Before you leave this section, you will need to test the functionality of this control. I leave it up to you to enter in any regular expression you like and prove to yourself that it works. Try the regular expression shown in Figure 8-21. Remember that this control does not do on-the-fly validation. It validates only when you leave the control.