This is the last chapter in this book. All the previous chapters dealt with individual aspects of data entry and validation. Although I have tried to provide some good examples, sometimes it really hits home when you see a complete data entry project. That is what this chapter is all about.
Before you start the chapter, I need to tell you that the code for this project is extensive. In fact, it is too extensive to include all the code in the chapter. I strongly suggest that you download the code for this project from the Downloads section of the Apress Web site (http://www.apress.com) before you continue.
I have been looking around for some time for a good golf score tracker program.[1] There are a few good ones out there, but being cheap I wanted the best one to be free. Failing to find a free one, I decided I would program one myself.
I really like this program. In fact, I like it so much I am not going to complete it for you. You will get about 70% of it, though, which is certainly enough for you to complete your own version if you so desire.
This project is an MDI application. As it stands, it includes two child windows and several modal dialog boxes. I really like MDI applications because the interface is self-contained and easy to work with.
The data structure of this program is collection based. Now, I have talked about and used collections throughout this book. All the collections I have used to this point have come with .NET. Some have little or no type safety, such as the generic SortedList collection. Some of them are strongly typed, such as the Controls collection contained in every control. The Controls collection can only have objects that derive from System.Windows.Forms.Control. If you try to add an integer to the Controls collection, you will get an error. Strongly typed collections make for robust code.
This project uses several collections that you create yourself. These collections are strongly typed. Rolling your own collections has several advantages, which I explain later. These data collections are gathered from a database layer. This database layer abstracts the data persistence from the rest of the program, which allows you the most flexibility when it comes to working with databases.
Although I have included a database abstraction class in this example, I have not filled it in. You can use any data storage medium you like. Whether you use SQL Server or a plain CSV text file for storage makes no difference to the rest of the program.
I use exception handling where appropriate, and I also use assertions to make sure that I am not making any bonehead mistakes.
I use a menu, which has standard appropriate choices. I also use the ErrorProvider object to call attention to any validation problems.
I use a DataGrid to provide a view into the data structures. The DataGrid I use is set up differently than ones you may have seen before. This is further proof of the flexibility of the DataGrid control. I, of course, use the TreeView as another way of looking at data.
So, where to start? As I already mentioned, this project is far too large for me to provide complete creation instructions. For those of you reading this in a bookstore or on an airplane, I describe the screens here.
If you are looking at the project now, you see the Solution Explorer window shown in Figure 11-1.

You can see that I have five forms and two classes. The Database class contains the data abstraction code. The Collections class contains all the data structures for this project.
Figure 11-2 shows the initial MDI main screen. There is nothing special about making an MDI form. In fact, all you need to do is set the IsMdiContainer property to true.
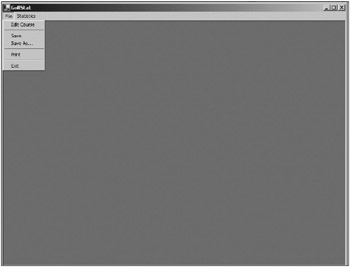
The menu is fairly intuitive. I did not fill out the Save or Print choices. Printing is beyond the scope of this book.[2]
Now, if you thought that making a form an MDI container was difficult, then you will think that making a form an MDI child is twice as hard. All you need to do to make a form an MDI child is set the MdiParent property to the parent MDI container form. This is not a design-time property; it is a runtime property.
Now that you know you make a form an MDI child at runtime, what does this tell you? You could easily add a menu option to your main form to change all MDI child forms into normal forms. Voila! You now have an instant SDI application. There is no way to do that in VB 6.0.[3] I started the size of the main form to fit an 800×600 screen.
The next form is the course editor form. It is a child MDI form that pops up when you choose Edit Course. Figure 11-3 shows this form.
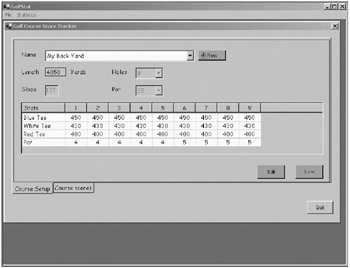
I use a ListView control to show the tee distances. The course ComboBox allows you to choose which course to edit. If the user clicks the Edit button, the controls become enabled for changing. As you see it now, the course cannot be edited. This avoids any error handling when the user is trying to edit course values when he or she is not in edit mode. Instead of telling the user he or she cannot change any values, just don't allow it. If the user wants to edit the values of the tee distances, the user just clicks the first column of the row he or she wants to edit.
If you navigate to the second tab, Course scores, you see the tab shown in Figure 11-4.
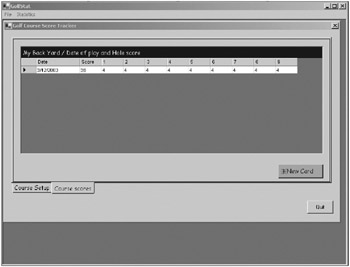
What you see here is a DataGrid. What you do not, see here is the new row for the DataGrid. When I first started playing with the DataGrid, it took me a long time to figure out how to prevent the new row from automatically being added. Once I got that, it was child's play.
Clicking the New Card button will automatically add a new row to the DataGrid. It is not just a new row, though. Behind the scenes I create a new ScoreCard object, populate it with the requisite number of Hole objects, and then display it as a new row. You will see the code for this soon.
The next screen in this set is the HoleDetail screen. This program would not be much good if I was not able to use it to track more than just the individual hole scores. I am able to type a number into an individual cell or double-click the cell to bring up the screen shown in Figure 11-5.
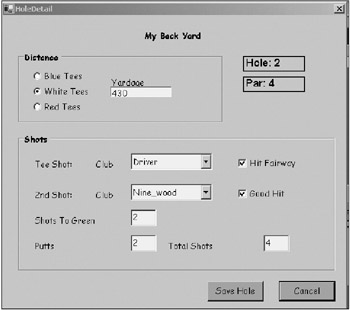
Some of the statistics I keep are standard and some are ones I feel will help me with my game. In any case, when the user saves the hole, I put the Total Shots score in the cell that he or she clicked to get here. Allowing the user to keep his or her scores both ways gives the most flexibility.
The last screen I have is a Statistics screen, as shown in Figure 11-6.

As you can see, I use a TreeView control to look at courses as top-level nodes and individual scorecards as subnodes. This is a slightly different view from using a ListView or DataGrid.
As the user clicks individual scorecards, the appropriate statistics are calculated and displayed. If the user clicks a course, the aggregate statistics for all rounds played on that course are calculated and displayed.
This kind of display allows me to look at things from a holistic point of view or drill down and get the gritty details.
[1]I recently got hooked … and sliced, and so on.
[2]Printing is, however, within the scope of my previous book, GDI+ Programming in C# and VB .NET (Apress, 2002).
[3]Not without some serious side trips to the API.