So far you have used Visual Studio 2005 to create and run a basic Console application. The Visual Studio 2005 programming environment also contains everything you'll need to create graphical Windows applications. You can design the form-based user interface of a Windows application interactively by using the Visual Designer. Visual Studio 2005 then generates the program statements to implement the user interface you've designed.
From this explanation, it follows that Visual Studio 2005 allows you to maintain two views of the application: the Design View and the Code View. The Code and Text Editor window (showing the program statements) doubles as the Design View window (allowing you to lay out your user interface), and you can switch between the two views whenever you want.
In the following set of exercises, you'll learn how to create a Windows program in Visual Studio 2005. This program will display a simple form containing a text box where you can enter your name and a button that, when clicked, displays a personalized greeting in a message box. You will use the Visual Designer to create your user interface by placing controls on a form; inspect the code generated by Visual Studio 2005; use the Visual Designer to change the control properties; use the Visual Designer to resize the form; write the code to respond to a button click; and run your first Windows program.
On the File menu, point to New, and then click Project. The New Project dialog box opens.
In the Project Types pane, click Visual C#.
In the Templates pane, click the Windows Application icon.
Ensure that the Location field refers to your \My Documents\Visual CSharp Step by Step\Chapter 1 folder.
In the Name field, type WinFormHello.
In the Solutions field, ensure that Create new Solution is selected. This action creates a new solution for holding the Windows application. The alternative, Add to Solution, will add the project to the TextHello solution.
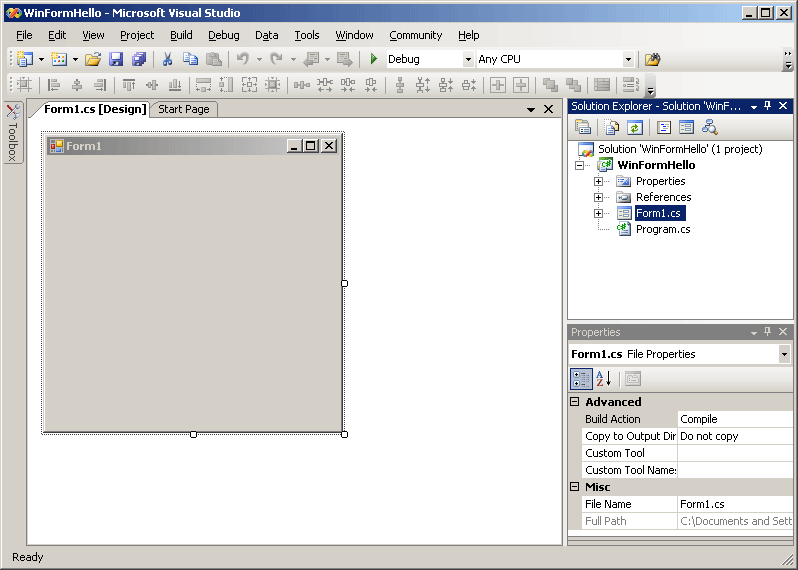
Click OK. Visual Studio 2005 closes your current application (prompting you to save it first of necessary) and creates and displays an empty Windows form in the Design View window.
In the following exercise, you'll use the Visual Designer to add three controls to the Windows form and examine some of the C# code automatically generated by Visual Studio 2005 to implement these controls.
Click the Toolbox tab that appears to the left of the form in the Design View. The Toolbox appears, partially obscuring the form and displaying the various components and controls that you can place on a Windows form.
In the Toolbox, click the + sign by Common Controls to display a list of controls that are used by most Windows Forms applications.
Click Label, and then click the visible part of the form. A Label control is added to the form, and the Toolbox disappears from view.
The Label control on the form is probably not exactly where you want it. You can click and drag the controls you have added to a form to reposition them. Using this technique, move the Label control so that it is positioned towards the upper-left corner of the form. (The exact placement is not critical for this application.)
On the View menu, click Properties Window. The Properties window appears on the right side of the screen. The Properties window allows you to set the properties for items in a project. It is context sensitive, in that it displays the properties for the currently selected item. If you click anywhere on the form displayed in the Design View, you will see that the Properties windows displays the properties for the form itself. If you click the Label control, the window displays the properties for the label instead.
Click the Label control on the form. In the Properties window, locate the Text property, change it from label1 to Enter your name, and then press Enter. On the form, the label's text changes to Enter Your Name.
Display the Toolbox again. Click TextBox, and then click the form. A TextBox control is added to the form. Move the TextBox control so that it is directly underneath the Label control.
While the TextBox control is selected, locate the Text property in the Properties window, type here, and then press Enter. On the form, the word here appears in the text box.
In the Properties window, find the (Name) property. Visual Studio 2005 gives controls and forms default names, which, although they are a good starting point, are not always very meaningful. Change the name of the TextBox control to userName.
Display the Toolbox again, click Button, and then click the form. Drag the Button control to the right of the TextBox control on the form so that it is aligned horizontally with the text box.
Using the Properties window, change the Text property of the Button control to OK. Change its (Name) property to ok. The caption on the button changes.
Click the Form1 form in the Design View window. Notice that resize handles (small squares) appear on the lower edge, the right-hand edge, and the right-hand bottom corner of the form.
Move the mouse pointer over the resize handle. The pointer changes to a diagonal double-headed arrow.
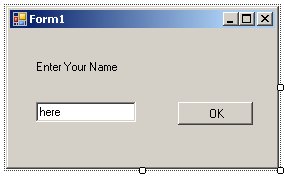
Hold down the left mouse button, and drag the pointer to resize the form. Stop dragging and release the mouse button when the spacing around the controls is roughly equal.
The form should now look similar to the one in the following graphic.
In the Solution Explorer, right-click the file Form1.cs, and then click View Code. The Form1.cs source file appears in the Code and Text Editor window.
There are now two tabs named Form1.cs above the Code and Text Editor/Design View window. You can click the one suffixed with [Design] to return to Design View window at any time.
Form1.cs contains some of the code automatically generated by Visual Studio 2005. You should note the following elements:
Visual Studio 2005 has written a number of using directives at the top of the source file (more than for the previous example). For example:
using System.Windows.Forms;
The additional namespaces contain the classes and controls used when building graphical applications—for example, the TextBox, Label, and Button classes.
Visual Studio 2005 has used the name of the project as the name of the top-level namespace:
namespace WinFormHello
{
    ...
}Visual Studio 2005 has written a class called Form1 inside the WinForm Hello namespace:
namespace WinFormHello
{
    partial class Form1 ...
    {
        ...
    }
}This class implements the form you created in the Design View. (Classes are discussed in Chapter 7.)
There does not appear to be much else in this class—there is a little bit of code known as a constructor that calls a method called InitializeComponent, but nothing else. (A constructor is a special method with the same name as the class. It is executed when the form is created and can contain code to initialize the form. Constructors are also discussed in Chapter 7.) However, Visual Studio 2005 is performing a sleight of hand and is hiding a few things from you, as I will now demonstrate.
In a Windows Forms application, Visual Studio 2005 actually generates a potentially large amount of code. This code performs operations such as creating and displaying the form when the application starts, and creating and positioning the various controls on the form. However, this code can change as you add controls to a form and change their properties. You are not expected to change this code (indeed, any changes you make are likely to be overwritten the next time you edit the form in the Design View), so Visual Studio 2005 hides it from you.
To display the hidden code, return to the Solution Explorer, and click the Show All Files button. The bin and obj folders appear, much as they did with the Console application you developed in the first part of this chapter. However, notice that Form1.cs now has a + sign next to it. If you click this + sign, you see a file called Form1.Designer.cs, and a file called Form1.resx.
Double-click the file Form1.Designer.cs to display its contents in the Code and Text Editor window. You will see the remaining code for the Form1 class in this file. C# allows you to split the code for a class across multiple source files, as long as each part of the class is marked with the partial keyword. This file includes a region labelled Windows Form Designer generated code. Expanding this region by clicking the + sign reveals the code created and maintained by Visual Studio 2005 when you edit a form using the Design View window. The actual contents of this file include:
This method is mentioned in the file Form1.cs. The statements inside this method set the properties of the controls you added to the form in the Design View. (Methods are discussed in Chapter 3.) Some of the statements in this method that correspond to the actions you performed using the Properties window are shown below:
...
private void InitializeComponent()
{
   this.label1 = new System.Windows.Forms.Label();
   this.userName = new System.Windows.Forms.TextBox();
   this.ok = new System.Windows.Forms.Button();
   ...
   this.label1.Text = "Enter your name";
   ...
   this.userName.Text = "here";
   ...
   this.ok.Text = "OK";
   ...
}
...Visual Studio 2005 has created three fields inside the Form1 class. These fields appear near the end of the file:
private System.Windows.Forms.Label label1;
private System.Windows.Forms.TextBox userName;
private System.Windows.Forms.Button ok;
...
These fields implement the three controls you added to the form in Design View. (Fields are discussed in Chapter 7.)
It is worth restating that although this file is interesting to look at, you should never edit its contents yourself. Visual Studio 2005 automatically updates this file when you make changes in the Design View. Any code that you need to write yourself should be placed in the Form1.cs file.
At this point you might well be wondering where the Main method is and how the form gets displayed when the application runs; remember that Main defines the point at which the program starts. In the Solution Explorer, you should notice another source file called Program.cs. If you double-click this file the following code appears in the Code and Text Editor window:
namespace WinFormHello
{
    static class Program
    {
        /// <summary>
        /// The main entry point for the application.
        /// </summary>
        [STAThread]
        static void Main()
        {
            Application.EnableVisualStyles();
            Application.Run(new Form1());
        }
    }
}
You can ignore most of this code. However, the key statement is:
Application.Run(new Form1());
This statement creates the form and displays it, whereupon the form takes over.
In the following exercise, you'll learn how to add code that runs when the OK button on the form is clicked.
Click the Form1.cs[Design] tab above the Code and Text Editor window to display Form1 in the Design View.
Move the mouse pointer over the OK button on the form, and then double-click the button. The Form1.cs source file appears in the Code and Text Editor window. Visual Studio 2005 has added a method called ok_Click to the Form1 class. (It has also added a statement to the InitializeComponent method in the Form1.Designer.cs file to automatically call ok_Click when the OK button is clicked. It does this by using a delegate type; delegates are discussed in Chapter 16, “Delegates and Events.”)
Type the MessageBox statement shown below inside the ok_Click method. The complete method should look like this:
private void ok_Click(object sender, System.EventArgs e)
{
    MessageBox.Show("Hello " + userName.Text);
}
Make sure you have typed this code exactly as shown, including the trailing semicolon.
You're now ready to run your first Windows program.
On the Debug menu, click Start Without Debugging. Visual Studio 2005 saves your work, compiles your program, and runs it. The Windows form appears:
Enter your name, and then click OK. A message box appears welcoming you by name.

Click OK in the message box. The message box closes.
In the Form1 window, click the Close button (the X in the upper-right corner of the form). The Form1 window closes.
If you want to continue to the next chapter
Keep Visual Studio 2005 running, and turn to Chapter 2.
If you want to exit Visual Studio 2005 now
On the File menu, click Exit. If you see a Save dialog box, click Yes to save your work.