Consider the EmployeeForm.aspx page of the Honest John Web site again. The user is expected to enter the details of an employee: name, employee ID, position, and role. All the text boxes should be mandatory. The employee ID should be a positive integer.
In a Windows Forms application, you would use the Validating event to ensure the user typed something into the First Name and Last Name text boxes and that the employee ID value was numeric. Web forms do not have a Validating event, which means that you cannot use the same approach.
If you examine the TextBox class, you will notice that it publishes the TextChanged event. This event runs the next time the form is posted back to the server after the user changes the text typed in the text box. Like all Web Server control events, the TextChanged event runs at the Web server. This action involves transmitting data from the Web browser to the server, processing the event at the server to validate the data, and then packaging up any validation errors as part of the HTML response sent back to the client. If the validation being performed is complex, or requires processing that can only be performed at the Web server (such as ensuring that an Employee ID the user types in exists in a database) , this might be an acceptable technique. But if you are simply inspecting the data in a single text box in isolation (such as making sure that the user types a positive integer into an Employee ID text box), performing this type of validation of the Web server could impose an unacceptable overhead; why not perform this check in the browser on the client computer and save a network round-trip?
The Web Forms model provides for client-side validation through the use of validation controls. If the user is running a browser such as Microsoft Internet Explorer 4 or later, which supports dynamic HTML, these controls generate JavaScript code that runs in the browser and avoids the need to perform a network round-trip to the server. If the user is running an older browser, the validation controls generate server-side code instead. The key point is that the developer creating the Web form does not have to worry about this; all the browser detection and code generation features are built into the validation controls. The developer simply drops a validation control onto the Web form, sets its properties (by using either the Properties window or code), and specifies the validation rules to be performed and any error messages to be displayed.
There are five types of validation controls supplied with ASP.NET:
RequiredFieldValidator Use this control to ensure that the user has entered data into a control.
CompareValidator Use this control to compare the data entered against a constant value, the value of a property of another control, or a value retrieved from a database.
RangeValidator Use this control to check the data entered by a user against a range of values, checking that the data falls either inside or outside a given range.
RegularExpressionValidator Use this control to check that the data input by the user matches a specified regular expression, pattern, or format (such as a telephone number, for example).
CustomValidator Use this control to define your own custom validation logic and attach it to a control to be validated.
Although each control performs a single well-defined type of validation, you can use several of them in combination. For example, if you want to ensure that the user enters a value into a text box and that this value falls within a particular range, you can attach a RequiredField Validator control and a RangeValidator control to the text box.
These controls can work in conjunction with a ValidationSummary control to display error messages. You will use some of these controls in the following exercises.
Returning to the EmployeeForm.aspx Web form, you can probably see that RequiredField Validator controls will be required for the First Name, Last Name, and Employee Id text boxes. The employee ID must also be numeric and should be a positive integer. In this application, you will specify that the employee ID must be between 1 and 5000. This is where a Range Validator control is useful.
In the Microsoft Visual Studio 2005 programming environment, on the File menu, point to Open, and then click Web Site. In the Open Web Site dialog box,ensure the File System option is selected, and browse to Microsoft Press\Visual CSharp Step by Step\Chapter 26\HonestJohn in your My Documents folder. Click Open.
In the Solution Explorer, right-click EmployeeForm.aspx, and then click Set As Start Page.
Right-click EmployeeForm.aspx again, and then click View Designer to display the Web form in the Design View window.
In the Toolbox, expand the Validation category.
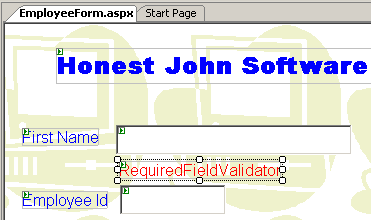
Add a RequiredFieldValidator control to the form.
The control appears in the upper left-hand part of the form, displaying the text “RequiredFieldValidator”. Drag it and position it just below the First Name text box so it looks like the following graphic. You might need to enable absolute positioning on the form before you can move the RequiredFieldValidator control by using the Position item on the Layout menu.
With RequiredFieldValidator1 selected, click the Properties window. Set the ControlTo Validate property to firstName. Type You must type a first name for the employee in the ErrorMessage property.
This is the message that will be displayed if the control to be validated (the First Name text box) is left blank. Notice that this message replaces the red text on the form.
Add two more RequiredFieldValidator controls to the form. Place the first control under the Last Name text box, set its ControlToValidate property to lastName, and type You must type a last name for the employee in its ErrorMessage property. Resize the control so that the error message appears on a single line if necessary.
Place the second RequiredFieldValidator control under the Employee Id text box; set its ControlToValidate property to employeeID, and type You must specify an employee ID in its ErrorMessage property.
On the Debug menu, click Start Without Debugging to run the form and test it.
When the form first appears in Microsoft Internet Explorer, all the required text boxes will be empty. Click Save.
The error messages belonging to all three RequiredFieldValidator controls are displayed.
Notice that the Click event for the Save button did not run; and the label at the bottom of the form did not display the data summary (and the screen did not even flicker). This behavior is because the validation controls prevented the post-back to the server; they generate code that can be executed by the browser and they will continue to block posts back to the server until all the errors have been corrected.
Type a name in the First Name text box.
As soon as you move away from the text box, the error message disappears. If you return to the First Name text box, erase the contents, and then move to the next text box, the error message is displayed again. All this functionality is being performed in the browser with no data is being sent to the server over the network.
Enter values in the First Name, Last Name, and Employee Id text boxes, and then click Save.
This time the Click event runs and the summary is displayed in the InfoLabel control at the bottom of the form.
Close the form and return to the Visual Studio 2005 programming environment.
Currently, you can type anything into the Employee Id text box. In the following exercise, you will use a RangeValidator control to restrict the values entered to integers in the range of 1 through 5000.
In the Toolbox, add a RangeValidator control to the form and drag it under the RequiredFieldValidator control below the Employee Id text box. (You might need to move the Position label and radio buttons down to make space).
With the RangeValidator control selected, click the Properties window. Change the ControlToValidate property to employeeID. Type ID must be between 1 and 5000 in the ErrorMessage property. Set the MaximumValue property to 5000, the MinimumValue property to 1, and the Type property to Integer.
Run the form again. Enter a first name and a last name, but leave the employee ID blank. Click Save.
An error message telling you that you must supply an employee ID is displayed.
Type –1 in the Employee Id text box, and then click Save.
An error message telling you that the employee ID must be between 1 and 5000 is displayed.
Type 101 in the Employee Id text box, and then click Save.
This time the data is valid. The form is posted back to the server, the Click event of the Save button runs, and a summary of the information entered in the InfoLabel label appears at the bottom of the form.
Experiment with other values that are out of range or the wrong type. Try 5001 and the text “AAA” to check that the RangeValidator control works as expected.
On the Internet Explorer View menu, click Source.
The HTML source code for the Web form appears in Notepad. Scroll through the file and examine its contents. Near the end you will find a block of JavaScript code that performs the validations. This code was generated by using the properties of the validation controls. Close Notepad when you have finished browsing the HTML source code.
Close the form and return to the Visual Studio 2005 programming environment.
You have seen how validation controls can validate the data that the user enters, but the error message display is not very pretty. In the following exercise, you will use a ValidationSummary control to change the way that the error information is presented to the user.
In the EmployeeForm.aspx Web form, select the RequiredFieldValidator1 control under the First Name text box. In the Properties window, set the Text property to *.
The message, You Must Enter A First Name For The Employee, changes to an asterisk (*) because the validation controls display the Text property on the form. If no value is specified for the Text property, it takes the value of the ErrorMessage property.
Move the RequiredFieldValidator1 control, placing it to the right of the First Name text box.
Now, if a validation error occurs, you will see a red asterisk appear next to the text box with the error.
Select the RequiredFieldValidator2 control, set its Text property to *, and then move it to the right of the Last Name text box.
Select the RequiredFieldValidator3 control, set its Text property to *, and then move it to the right of the Employee Id text box. Do the same for the RangeValidator1 control.
In the Toolbox, add a ValidationSummary control to the form and place it in the space above the button controls and to the right of the radio buttons.
A ValidationSummary control displays the ErrorMessage values for all of the validation controls on the Web form.
Leave the ValidationSummary control set to its default size. Verify that the ShowSummary property is set to True.
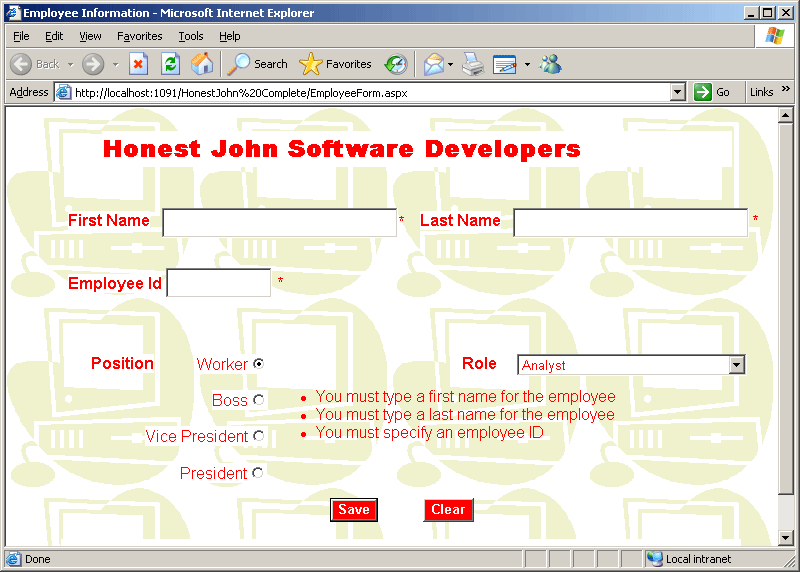
Run the Web form. When the form appears, leave the First Name, Last Name, and Employee Id text boxes blank, and then click Save.
Red asterisks appear next to each of the text boxes, and the corresponding error messages are displayed in the ValidationSummary control at the bottom of the form.
Enter a first name, a last name, and then type AAA in the Employee Id text box.
As you move from text box to text box, the asterisks disappear from the First Name and Last Name text boxes, but another asterisk appears next to the Employee Id text box.
Click Save.
The error message displayed by the ValidationSummary control changes.
Type 101 in the Employee Id text box, and then click Save.
All error messages and asterisks disappear and a summary of the data you entered appears in the InfoLabel control as before.
Close the form and return to the Visual Studio 2005 programming environment.
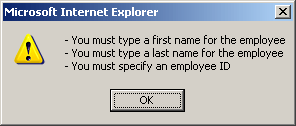
If you have a browser that supports dynamic HTML, you can display the validation summary data in a message box rather than on the Web form. To do this, set the Show MessageBox property of the ValidationSummary control to True. At run time, if any validation errors occur, the error messages will be displayed in a message box.
If you want to continue to the next chapter
Keep Visual Studio 2005 running and turn to Chapter 27.
If you want to exit Visual Studio 2005 for now
On the File menu, click Exit. If you see a Save dialog box, click Yes.