Applications built by using the Microsoft .NET Framework have a range of mechanisms available for ensuring that the users who run those applications have the appropriate privileges. Some of the techniques available rely on authenticating users based on some form of identifier and password, whereas others are based on the integrated security features of Microsoft Windows. If you are creating a Web application that will be accessed over the Internet, using Windows security is probably not an option—users are unlikely to be members of any Windows domain recognized by the Web application and might be running an operating system other than Windows, such as UNIX. Therefore, the best option to use in this environment is Forms-based security.
Forms-based security allows you to verify the identity of a user by displaying a login form that prompts the user for an ID and a password. After the user has been authenticated, the various Web Forms that comprise the application can be accessed, and the user's security credentials can be examined by code on any page if additional authorization is needed (a user might be able to log in to the system but might not have access to every part of the application).
To use ASP.NET Forms-based security, you must configure the Web application by making some changes to the Web.config file, and you must also supply a form to validate the user. The security form will be displayed whenever the user tries to gain access to any page in the application if the user has not already been validated. The user will be able to proceed to the requested page only if the logic in the login form verifies the user's identity.
In the first set of exercises in this chapter, you will create and configure a Web application. The application will ultimately enable a user to view and modify customer information in the Northwind database.
In the Microsoft Visual Studio 2005 programming environment, create a new ASP.NET Web site called Northwind by using the Development Web server (specify File System for the location). Create the Web site in the \Microsoft Press\Visual CSharp Step by Step\Chapter 27\Northwind folder in your My Documents folder. Make sure you specify Visual C# for the language to use.
In Solution Explorer, rename the Default.aspx Web form to CustomerData.aspx.
Right-click CustomerData.aspx and click Set As Start Page.
In the Source View window displaying the HTML source for the Web form, click the Design tab.
In the Layout menu, point to Position and click Auto-position Options. In the Options dialog box, check “Change positioning to the following for controls added using the Toolbox, paste, or drag and drop,” and ensure “Absolutely positioned” is selected in the drop-down list box. Click OK.
From the Toolbox, add a Label control. Drag it to the middle of the CustomerData form. Type This form will be implemented later in the Text property of the label.
In the next exercises, you will build a login form to authenticate the user and configure Forms-based security for the Web application. The login form will be displayed whenever a user who has not been authenticated attempts to gain access to the application. When configured to use Forms-based security, the ASP.NET run time will redirect attempts made by an unauthenticated user to access the application to the login form instead.
Implementing a login form for Forms-based security is such a common task that Microsoft has implemented a set of Login controls to simplify matters. You will use one of these controls now.
On the Website menu, click Add New Item. The Add New Item dialog box opens. Ensure the Web Form template is selected and type LoginForm.aspx for the name. Verify that the language is set to Visual C#, the “Place code in separate file” box is checked, the “Select master page” box is cleared, and then click Add to create the form.
The new Web form is created and the HTML code for the form is displayed in the Source View window.
Click the Design tab to display LoginForm.aspx in the Design View window.
In the Toolbox, expand the Login category. Add a Login control to the Web form. Click anywhere in the form to hide the Login Tasks menu that appears.
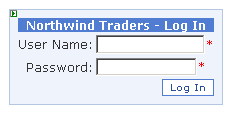
The Login control is a composite control that comprises several labels, two text boxes for the user to type a name and a password, a “remember me” check box, and a button to click to log in. You can configure most of these items by using the Properties window for this control, and you can also modify the style of the control.
Drag the Login control to the middle of the Web form. Click the Smart Tag icon on the top edge of the control, near the right-hand corner. Click Auto Format on the Login Tasks menu that appears.
The Auto Format dialog box is displayed. You can use this dialog to change the look and feel of the Login control by selecting a predefined scheme. (You can also define your own layout by creating a template using the Edit Templates option on the Login Tasks menu displayed when you click the Smart Tag for the Login control.)
In the Auto Format dialog box, click the Classic scheme and then click OK. Click the Smart Tag icon on the Login control to hide the Login Tasks menu.
In the Properties window, change the properties of the Login control by using the values in the following table.
Property |
Value |
DisplayRememberMe |
False |
FailureText |
Invalid User Name or Password. Please enter a valid User Name and Password. |
TitleText |
Northwind Traders – Log In |
DestinationPageUrl |
~/CustomerData.aspx |
The DestinationPageUrl property specifies the page the user will go to if the login attempt is successful. The “~/” prefix indicates that the page is in the top-level folder of the Web site, rather than in a sub-folder. If the login fails, the FailureText message will be displayed instead, and the user will have to try to log in again.
The Login control should look like this:
When the user clicks the Log In button, the user must be authenticated. If the user name and password are valid, the user should be allowed to proceed to the CustomerData Web form; otherwise, the error message stored in the FailureText property of the Login control should be displayed. How do you perform these tasks? You have at least two options:
Write code that handles the Authenticate event for the Login control. This event is raised whenever the Log In button is clicked. You can examine the values in the UserName and Password properties, and if they are valid, allow the user to proceed to the page identified by the DestinationPageUrl property. This strategy is highly customizable, but requires that you maintain your own secure list of user names and passwords to validate against.
Use the built-in features of Visual Studio 2005 with the ASP.NET Web Site Administration Tool to manage user names and passwords, and let the Login control perform its default processing to validate users when the Log In button is pressed. The ASP.NET Web Site Administration Tool maintains its own database of user names and passwords, and provides a wizard enabling you to add users to your Web site.
You will use the second option in the following exercise (you can investigate the first option in your own time).
On the Website menu, click ASP.NET Configuration.
The ASP.NET Development Server starts and displays a balloon displaying its URL—the ASP.NET Configuration command starts a Web application called the ASP.NET Web Site Administration Tool which uses its own instance of the ASP.NET Development Server, independent from your Web application. Internet Explorer starts and displays the ASP.NET Web Site Administration Tool.
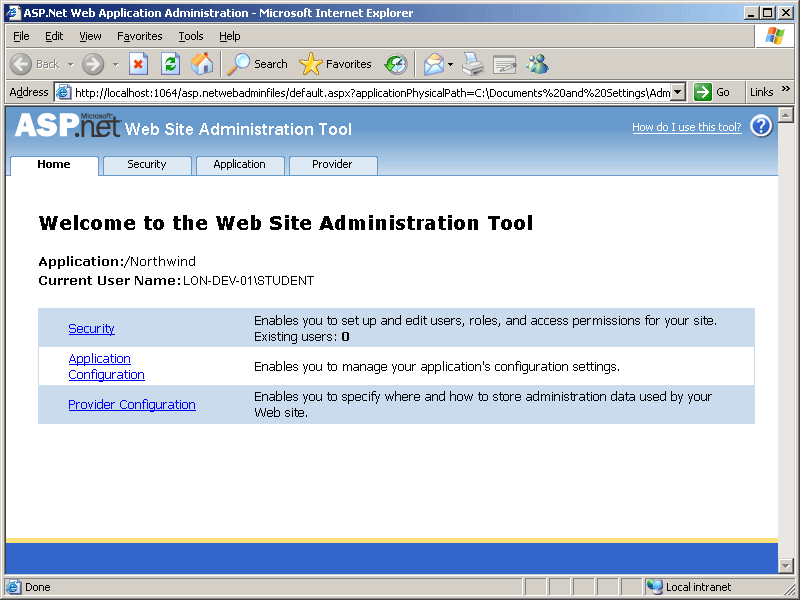
This tool provides different pages allowing you to add and manage users for your Web site, specify application settings that you want to be stored in the application configuration file, and specify how security information such as user names and passwords are stored. By default, the ASP.NET Web Site Administration Tool stores security information in a local SQL Server database called ASPNETDB.MDF that it creates in the App_Data folder of your Web site, using a database provider called AspNetSqlProvider. You can configure other database providers and store security information elsewhere, but that is beyond the scope of this book.
Click the Security tab.
The Security page appears. You can use this page to manager users, specify the authentication mechanism that the Web site uses, define roles for users (roles are a convenient mechanism for assigning privileges to groups of users), and specify access rules for controlling access to the Web site.
In the Users section, click the “Select authentication type” link.
A new page appears asking how users will access your Web site. You have two options available: “From the internet,” and “From a local network.” The “From a local network” option is selected by default. This option configures the Web site to use Windows authentication; all users must be members of a Windows domain that your Web site can access. The Northwind Website will be available over the Internet, so this option is probably not very useful.
Click “From the internet.” This option configures the application to use Forms-based security. You will make use of the login form you created in the previous exercise to prompt the user for their name and password. Click Done.
You return to the Security page.
In the Users section, notice that the number of existing users that can access your Web site is currently zero. Click the Create User link.
The Create User page appears.
In the Create User page, add a new user with the values shown in the following table.
Prompt |
Response |
User Name |
John |
Password |
Pa$$w9rd |
Confirm Password |
Pa$$w9rd |
john@northwindtraders.com |
|
Security Question |
What was the name of your first pet |
Security Answer |
Thomas |
Ensure that the Active User box is checked and then click Create User.
The message “Complete. Your account has been successfully created.” appears in a new page.
Click Continue. The Create User page reappears enabling you to add further users. Click Back to return to the Security page. The number of existing users is now set to 1.
In the Access Rules section, click “Create access rules.”
The Add New Access Rule page appears. You use this page to specify which users can access which folders in the Web site.
Under “Select a directory for this rule,” ensure that the Northwind folder is selected by clicking it. Under “Rule applies to,” ensure “user” is selected and type John. Under “Permission,” click Allow. Click OK.
This rule grants John access to the Web site. The Security screen reappears.
In the Access Rules section, click “Create access rules” again. In the Add New Access Rule page, under “Select a directory for this rule,” ensure that the Northwind folder is selected. Under “Rule applies to,” click Anonymous users. Under “Permission,” ensure Deny is selected. Click OK.
This rule ensures that users who have not logged in will not be able to access the Web site. The Security screen reappears.
Close Internet Explorer displaying the ASP.NET Web Site Administration Tool and return to Visual Studio 2005.
Click the Refresh button in the Solution Explorer toolbar. The database file ASPNETDB.MDF appears in the App_Data folder, and the file Web.config appears in the project folder. Double-click Web.config to display it in the Code and Text Editor window.
This file was created by the ASP.NET Web Site Administration Tool and should look like this:
<?xml version="1.0" encoding="utf-8"?>
<configuration xmlns="http://schemas.microsoft.com/.NetConfiguration/v2.0">
    <system.web>
        <authorization>
            <allow users="John" />
            <deny users="?" />
        </authorization>
        <authentication mode="Forms" />
    </system.web>
</configuration>
The <authorization> element specifies the users that are granted and denied access to the Web site (“?” indicates anonymous users). The mode attribute of the <authentication> element indicates that the Web site uses Forms-based authentication.
Modify the <authentication> element and add a <forms> child element, as follows. Make sure you add a </authentication> element:
<authentication mode="Forms">
    <forms loginUrl="LoginForm.aspx" timeout="5"
           cookieless="AutoDetect" protection="All" />
</authentication>
The <forms> element configures the parameters for Forms-based authentication. The attributes shown here specify that if an unauthenticated user attempts to gain access to any page in the Web site, the user will be redirected to the login page, LoginForm.aspx. If the user is inactive for 5 minutes, she will have to login again when next accessing a page in the Web site. In many Web sites that use Forms-based authentication, information about the user is stored in a cookie on the user's computer. However, most browsers allow the user to specify that they don't want to use cookies (cookies can be abused by malicious Web sites and are frequently considered a security risk). Specifying cookieless="AutoDetect" enables the Web site to use cookies if the user's browser has not disabled them; otherwise, the user information is passed back and forth between the Web site and the user's computer as part of each request. The user information includes the user name and the password. Obviously, you don't want this to be clearly visible to everyone. You can use the protection attribute to encrypt this information, which is what this example does.
On the Debug menu, click Start Without Debugging.
Internet Explorer opens. The start page for the application is CustomerData.asps, but as you have not yet logged in, you are directed to the LoginForm.
Type in a random user name and password and then click Log In.
The Login page reappears displaying the error message “Invalid User Name or Password. Please enter a valid User Name and Password.”
In the User Name field type John. In the Password field type Pa$$w9rd. Click Log In.
The CustomerData page appears displaying the message “This form will be implemented later.”
Close Internet Explorer and return to Visual Studio 2005.