You have seen how to use a GridView control to fetch and browse data. The following set of exercises concentrate on deleting and modifying data using a GridView control.
The GridView control allows you to add buttons to the grid to indicate that a command should be performed. You can add your own custom buttons and commands, but Visual Studio 2005 supplies some predefined buttons for deleting and editing data. In the following exercise, you will add a Delete button to the GridView control.
Ensure that CustomerData.aspx is displayed in the Design View window. Click the Smart Tag icon to display the GridView Tasks menu.
On the GridView Tasks menu, check the Enable Deleting box.
A hyperlink labeled Delete is added to the start of each row in the GridView control.
On the GridView Tasks menu, click Edit Columns.
The Fields dialog box is displayed. You can use this dialog box to set the properties of the fields (columns) displayed in the GridView control.
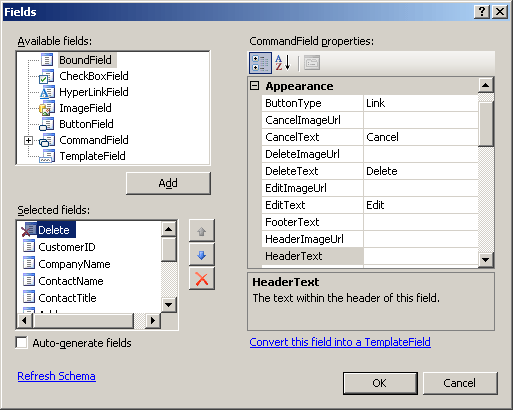
In the Selected fields list, select the Delete field. In the CommandField properties list, change the ButtonType property to Button. Click OK.
The Delete link in the GridView control changes to a button.
Run the application. Log in, and then go to page 3 of the data. Delete the customer with the ID of FISSA. This should be successful. Try to delete customer FAMIA. This will fail with an error because this customer has outstanding orders; the referential integrity rules of the Northwind Traders database forbid you from deleting a customer that has outstanding orders.
<%@ Page … ErrorPage="ErrorPage.aspx" %>
You can display a more comforting message to the user on this page.Close Internet Explorer and return to the Visual Studio 2005 programming environment.
You can also add an Edit button to a GridView to allow a user to change the data in a selected row in the GridView. The row changes into a set of TextBox controls when the user clicks the Edit button. The user can save the changes or discard them. This is achieved using two additional buttons: Update and Cancel. In the following set of exercises, you will add these buttons to the CustomerData form.
Display the CustomerData.aspx form in Design View. Click the Smart Tag for the GridView control to display the GridView Tasks menu, and then click Enable Editing.
An Edit button is added to each row in the GridView control.
Run the application. Log in, and then click the Edit button on the first row displayed on the CustomerData form.
The first row changes into a collection of TextBox controls, and the Edit and Delete buttons are replaced with an Update button and a Cancel button.
Modify the data in the ContactName and ContactTitle columns, and then click Update.
The database is updated, the row reverts back to a set of labels, the Edit and Delete buttons reappear, and the new data is displayed in the row.
Close Internet Explorer and return to Visual Studio 2005.
If you want to continue to the next chapter
Keep Visual Studio 2005 running and turn to Chapter 28.
If you want to exit Visual Studio 2005 for now
On the File menu, click Exit. If you see a Save dialog box, click Yes.