Nearly all programming texts start by using the technology at hand to present the classic string “Hello World” to the end user. This time, our job is to send the statement “Hello World” to the awaiting browser.
To see how ASP works, we'll take the simplest Web page and develop it as an ASP.NET Web application. All the files for this example are loaded into a specific virtual directory. We'll examine each iteration along the way to see what ASP.NET is doing.
Using either a command shell or Windows Explorer, create a new folder to hold the Web application files. While the name of the directory is unimportant to IIS, call it something meaningful. I used c:\aspnetstepbystepexamples.
To start, we need a virtual directory in which to hold the source code. As we saw earlier when examining the Web Application architecture imposed by the Windows platform, IIS divides the applications on your server using virtual directories. There's nothing really magic about this scheme—it's mostly simply a mapping between requests coming in over port 80 and some real directory on your machine. Virtual directories show IIS where to find the code you want to execute in your application.
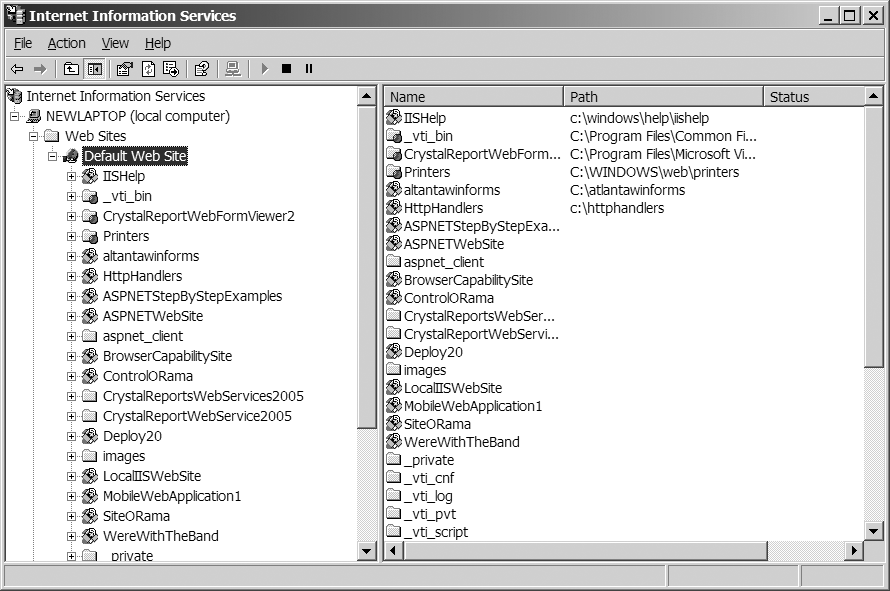
Run the Control Panel, and then go to Administrative Tools and start Information Services. Expand the nodes in the tree on the left-hand side to expose the Default Web Site node under the Web Sites node, as shown in the following illustration:
Then right-click on the Default Web Site node and select New Virtual directory from the context menu. IIS will run the Virtual Directory Creation Wizard. The second page asks you to provide a name for the virtual directory:
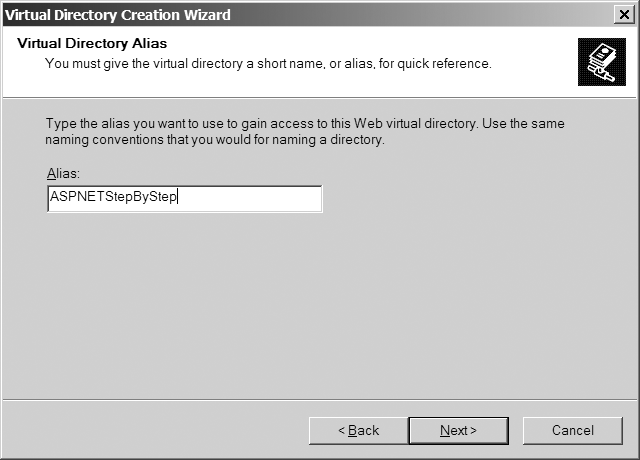
Call the Web site ASPNETStepByStep. This is the name by which your Web application will be known to the world. For example, when someone surfs to your Web site, they'll use the following URL:
http://www.mysite.com/ASPNETStepByStep
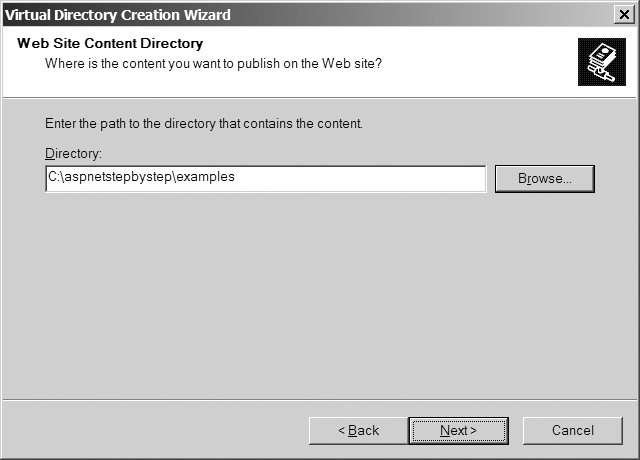
The name “mysite.com” is a fictitious site, only here for illustration. The wizard will ask you to provide a physical path for the virtual directory. Either browse to the physical directory you just created, or type the name of the directory.
Finish paging through the Wizard, accepting the defaults.
The easiest way to implement HelloWorld as a Web application is to store some text in an HTML file and browse to it.
Start Visual Studio and select File | New | File. Select HTML as the file type.
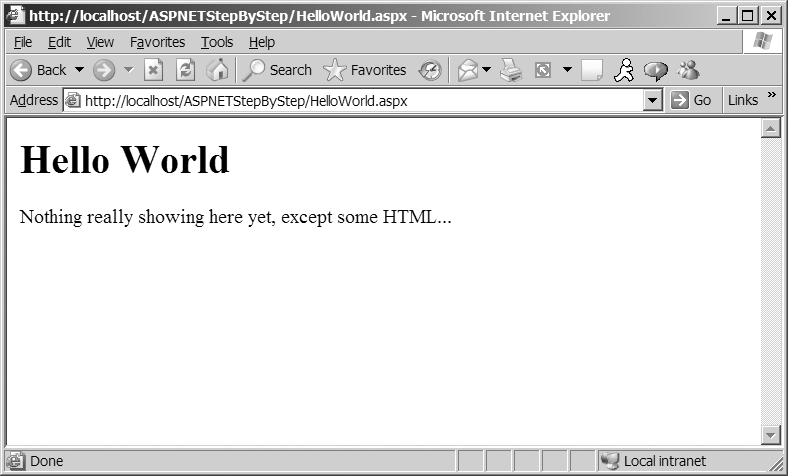
Type the following text and save it in a file named HelloWorld.htm within your new physical directory (that's been mapped to a virtual directory).
<html>
<body>
<h1> Hello World </h1>
Nothing really showing here yet, except some HTML...
</body>
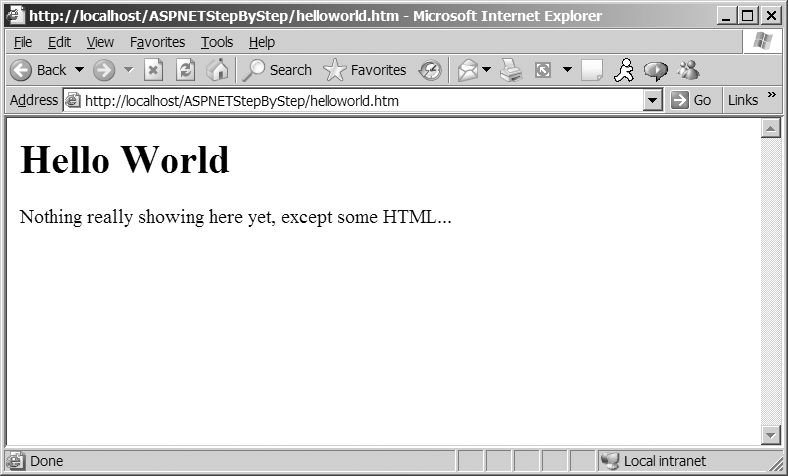
</html>Browse to the page. Browse to the page by selecting the file from within IIS. The browser will send an HTTP request to the server. On the Microsoft platform, IIS will see the HTM file extension and simply return the contents of the file to the browser. Because the text is marked using standard HTML tags, the browser understands it and displays it correctly.
Here's how the file appears to the end browser:
Turning this file into an ASP.NET application involves two small steps: adding a single line to the top of the file (the Page directive), and renaming the file to HelloWorld.aspx. This text represents an implementation of HelloWorld that works within the ASP.NET framework (be sure to save the file as HelloWorld.aspx):
<%@ Page Language="C#" %>
<html>
   <body>
      <h1> Hello World </h1>
      Nothing really showing here yet, except some HTML...
   </body>
</html>
When you fire up your browser and surf to this file within the virtual directory on your computer, you'll see the following in your browser. Be sure to browse the file—don't just open it. Browsing using the full URL activates HTTP whereas simply opening the file will show the literal text within Hello.aspx.
Admittedly, this is a small feat. However, if you get this far, it means you have IIS installed correctly on your machine, and the ASP.NET file types are registered correctly with IIS.
While this content is showing in your browser, use the View | Source menu to show the text being processed by the browser. It should look like this:
<html>
   <body>
      <h1> Hello World </h1>
      Nothing really showing here yet, except some HTML...
   </body>
</html>
Notice this text is almost identical to the text in Hello.aspx (without the Page directive: <%@ Page Language="C#" Debug="true" %>). In this case you can see the page-processing logic is fairly simple. That is, the ASP.NET runtime is simply spitting out the text within the file
The Page directive appearing at the top of the code is used by the ASP.NET runtime as it compiles the code. The Page directive shown above is fairly simple—it tells the runtime to compile this code and base it on the Page class and to treat any code syntax it encounters as C# code. ASP.NET supports integrating ASPX files with assemblies, which we'll see shortly. In subsequent examples, we'll see how ASP.NET compiles code on the fly and stores the assemblies in a temporary directory. There's no C# code in HelloWorld.aspx, so let's add some.
Classic ASP had an interesting way of marking code segments within a page. ASP always supported the classic script tag (<script> </script>) where anything found between the script tags was treated as executable code. However, in classic ASP, the script blocks were sent to the browser and it became the browser's job to run the script. In addition to client-side script blocks, a classic ASP Web page could define script blocks to be interpreted on the server. These methods often performed tasks such as database lookups. Causing code to execute on the server involved marking executable segments with angle braces and percent signs like this:
<% ExecuteMe() %>
ASP.NET also supports server-side code execution. To write code that executes inline, simply mark it with the <% %> tags. When ASP.NET parses the file to manufacture the runtime class representing the page (more on that shortly), it will insert whatever code it finds between the execution tags as executable code. The only requirement is that the code between the execution tags is valid C# (because that's the language specified in the Page directive).
Create a new blank text file from within Visual Studio. Type the following code into the text file and save it as HelloWorld2.aspx.
<%@ Page Language="C#" Debug="true" %>
<html>
   <body>
       <h1>Hello World!!!</h1>
       <%
          // This block will execute in the Render_Control method
          Response.Write("Check out the family tree: <br> <br>");
          Response.Write(this.GetType().ToString());
          Response.Write(" which derives from: <br> ");
          Response.Write(this.GetType().BaseType.ToString());
          Response.Write(" which derives from: <br> ");
          Response.Write(this.GetType().BaseType.BaseType.ToString());
          Response.Write(" which derives from: <br> ");
          Response.Write(
            this.GetType().BaseType.BaseType.BaseType.ToString());
          Response.Write(" which derives from: <br> ");
          Response.Write(
            this.GetType().BaseType.BaseType.BaseType.BaseType.ToString());
       %>
   </body>
</html>
This code is almost exactly identical to code you'd see in a classic ASP application—including references to the Response object. In classic ASP, the Response object was one of those intrinsic objects, perennially available to the page's execution block. The Response object in classic ASP was a COM object that hung off the thread managed by the ASP ISAPI DLL. Notice that ASP.NET also has a Response object. However, this one is part of the HttpContext managed by the ASP.NET pipeline.
The page should look like this in the browser:

The output produced by HelloWorld2.aspx shows a very important aspect of ASP.NET's execution model. Before moving on, take a look at the inline code listed in the previous exercise and compare it to the output appearing in the browser. Notice the code includes statements like:
Response.Write(this.GetType().BaseType.ToString());
Of course, the C# this keyword specifies an instance of a class. The code that's executing is clearly part of a member function of a class instance. The output shown by the browser indicates the class rendering the HTML to the browser is named ASP.HelloWorld2_aspx, and it derives from a class named System.Web.UI.Page. We'll learn more about this later in the chapter.
ASP.NET also supports server-side code blocks (not just inline execution tags). ASP.NET adds a new runat attribute to the script tag that tells ASP.NET to execute the code block at the server end.
Create a new text file in Visual Studio. Type the following code into some code that separates rendering from the rest of the page using a script block that runs at the server. Save the file as HelloWorld3.aspx in your virtual directory.
<%@ Page Language="C#" Debug="true" %>
<script runat="server">
    void ShowLineage()
    {
        Response.Write("Check out the family tree: <br> <br>");
        Response.Write(this.GetType().ToString());
        Response.Write(" which derives from: <br> ");
        Response.Write(this.GetType().BaseType.ToString());
        Response.Write(" which derives from: <br> ");
        Response.Write(this.GetType().BaseType.BaseType.ToString());
        Response.Write(" which derives from: <br> ");
        Response.Write(
          this.GetType().BaseType.BaseType.BaseType.ToString());
        Response.Write(" which derives from: <br> ");
        Response.Write(
          this.GetType().BaseType.BaseType.BaseType.BaseType.ToString());
    }
</script>
<html>
   <body>
       <h1>Hello World!!!</h1>
       <%
          // This block will execute in the Render_Control
method
          ShowLineage();
       %>
   </body>
</html>
As with the inline execution blocks, the most important criteria for the contents of the script block is that its syntax matches that of the language specified in the Page directive. The example above specifies a single method named ShowLineage(), which is called from within the page.
Notice the output of HelloWorld2.aspx and HelloWorld3.aspx is identical.
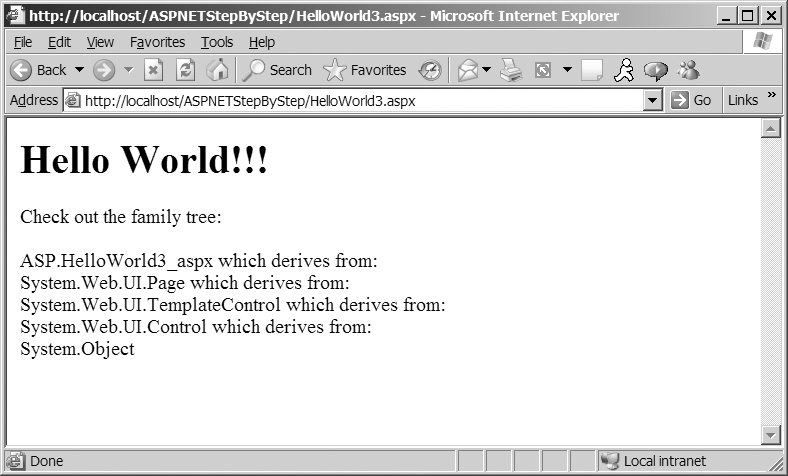
Marking the ShowLineage() method using the runat=server attribute causes ASP.NET to execute the code at the server. But while classic ASP interprets the script block using the designated script language, ASP.NET has an entirely different execution model—the whole page is actually compiled into a class that runs under the Common Language Runtime (CLR). Here's how the ASP.NET compilation model works.
The trip an HTTP request takes from the browser to the server and back is routed through myriad paths. Once a request ends up at the server, it winds its way through the ASP.NET pipeline. The best way to understand the path of an HTTP request through ASP.NET is to follow the entire path of a request as it originates in the browser and is intercepted by Internet Information Services and your Web application.
After an end user hits the Return key after typing in a URL, the browser sends an HTTP GET request to the target site. The request travels through a series of routers until it finally hits your Web server and is picked up on port 80. If your system has software listening to port 80, then the software can handle the request. On the Microsoft platform, the software most often listening to port 80 is Internet Information Services (IIS). For the time being, ASP.NET works with two flavors of IIS: version 5.0 and version 6.0.
If you're using IIS 5.0 to run your Web site, IIS watches your server's port 80 for incoming Web requests. IIS maintains a mapping between file extensions and Internet Services API (ISAPI) DLLs capable of interpreting the request. When a request comes in, IIS reads the file name named in the request and routes the request to the appropriate ISAPI DLL. If you're using IIS 6.0 to run your Web site, then a kernel-level driver named HTTP.SYS watches port 80 and picks up requests, routing the request to the appropriate ISAPI DLL.
You can see the list of file mappings between file extensions and ISAPI DLLs by running the IIS Console. Run IIS from the Control Panel Administrative Tools node. Open the Web Sites node, select Default Web Site, and right-click on one of the Web sites you see. Select Properties on the Directory tab, and select Configuration. The Mappings tab will show the relationship between file name extensions (as they come in through the HTTP request) and ISAPI DLLs.
All ISAPI DLLs include three well-defined entry points, the most important of which is named HttpExtensionProc. When a request comes into IIS and IIS understands the file extension appearing in the request, IIS wraps all the context information about the request into a structure named EXTENSION_CONTROL_BLOCK (that is, things like the originating URL, the content of the request, and so forth). IIS blindly calls the associated DLL's HttpExtensionProc method, passing in a pointer to the EXTENSION_CONTROL_BLOCK.
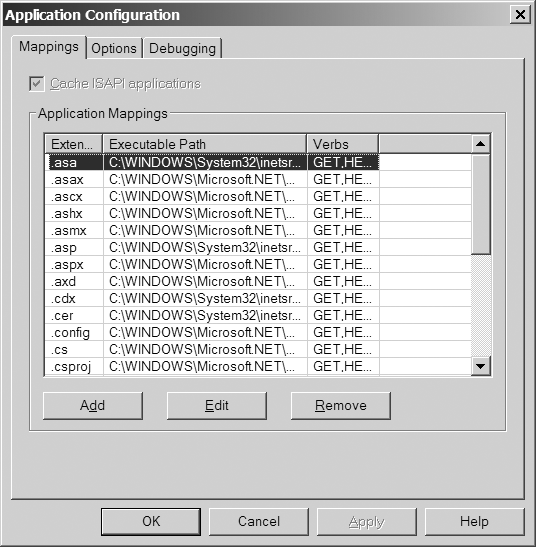
While much of ASP.NET is represented as Microsoft's managed library for handling HTTP requests, to IIS it's really just another ISAPI extension. When configured to run ASP.NET applications, IIS recognizes several distinguished file extensions and routes requests that include those extensions to ASP.NET's ISAPI DLL: aspnet_isapi.dll. If you look at the ISAPI DLL associated with ASP.NET's file extensions (for example: .aspx, .asax, .asmx, .ashx), you'll see they all point to a DLL named aspnet_isapi.dll.
The DLL named aspnet_isapi.dll is ASP.NET's ISAPI DLL. If you use a DLL spying tool such as DUMPBIN.EXE (a command line tool available along with the other Visual Studio .NET development tools) to show aspnet_isapi.dll's exported functions it shows that it contains the requisite exports (especially HttpExtensionProc). You'll also see that the DLL includes many other exports. However, right now the most important thing to realize is that it's simply another ISAPI DLL to which IIS directs requests.
If the page to which you're surfing happens to be named using one of ASP.NET's extensions (for example, .ashx, .aspx, .asax, among others), IIS directs the request to asp_isapi.dll.
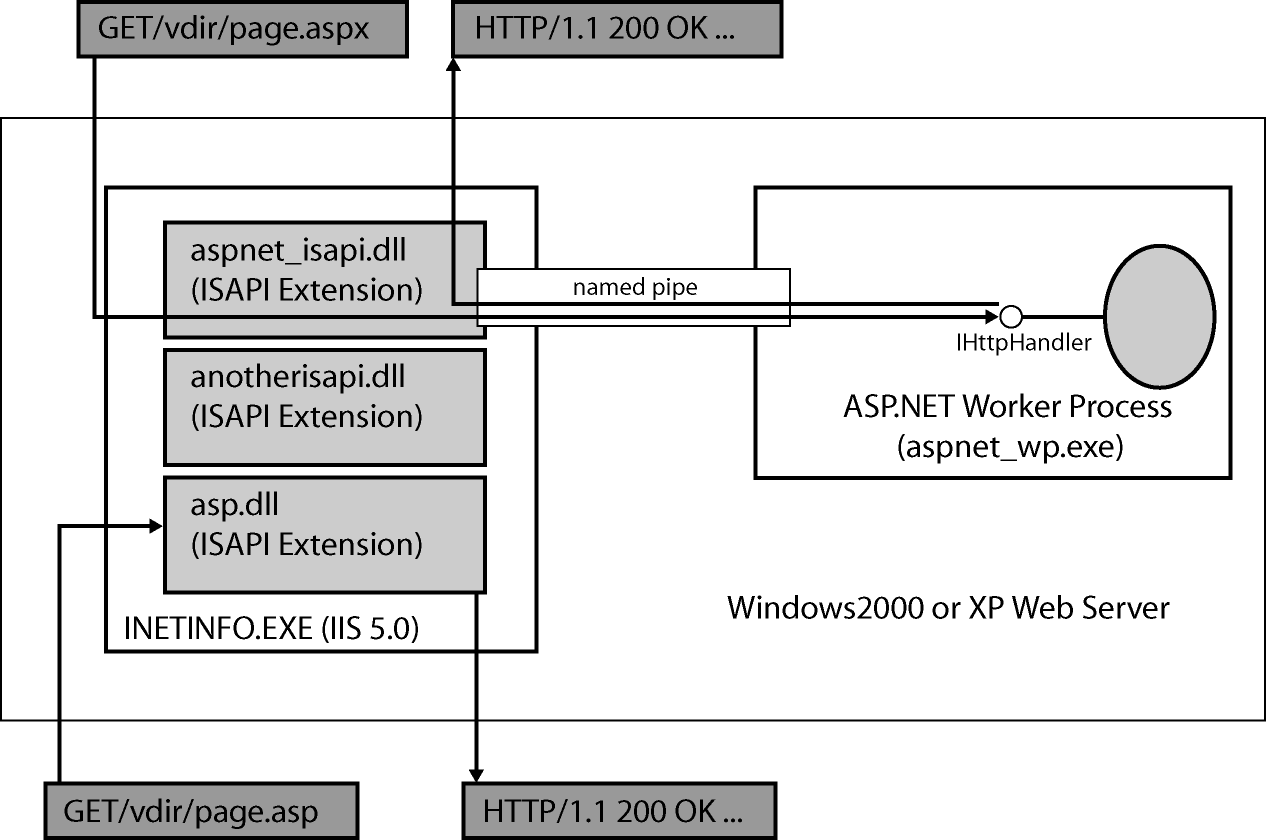
If your server is using IIS 5.0 to process Web requests, then IIS picks up the request on Port 80 and forwards the request to asp_isapi.dll. asp_isapi.dll then forwards the request through a named pipe to the ASP.NET worker process: asp_wp.exe. At that point, ASP.NET pushes the request through the pipeline. We'll look at that process in much more detail shortly.
If your application is running on IIS 6.x, then your request is picked up using the HTTP.SYS driver and is piped directly to the ASP.NET worker process (which has the aspnet_isapi.dll loaded). HTTP.SYS is a kernel-level driver, lying close to the operating system. By routing the request directly to the ASP.NET worker process, ASP.NET bypasses the overhead of an extra out-of-process call and automatically enforces application isolation.
HTTP.SYS is where all incoming HTTP requests first hit the Web server. In addition to mandating connections, the HTTP service is also responsible for bandwidth throttling and text-based logging. Within HTTP.SYS, each application pool has its own request queue. HTTP.SYS listens for all HTTP requests and redirects them to the correct queue. Because HTTP.SYS is a kernel-level driver, responding to an HTTP request requires no more transitions to user mode. In addition to improving performance, separating HTTP listening in a separate driver increases reliability. The HTTP service will continue, even if the code responding to the request crashes in user mode. HTTP.SYS will accept requests continually.
The ASP.NET worker process (w3wp.exe when using IIS 6.x and asp-net_wp.exe when using IIS 5.0) manages the ASP.NET pipeline (the route through which requests flow within ASP.NET). It acts as a surrogate process to host the goings on in ASP.NET. All ASP.NET software components—including the HttpApplication object, the HttpModules, and the HttpHandler invoked by each request—run within an instance of this surrogate process.
Once IIS intercepts the request and maps it to aspnet_isapi.dll, the request follows a very specific path through the pipeline. We'll look at each part of the pipeline in more detail in coming sections. The outline of the requests path is this:
The request lands in IIS.
IIS routes the request to aspnet_isapi.dll.
2.1. |
If IIS 5 is running, IIS asp_isapi.dll routes the request through a pipe to aspnet_wp.exe. |
2.2. |
If IIS 6 is running, the request is already in the worker process. |
ASP.NET packages the request context into an instance of HttpContext.
ASP.NET pipes the request through an instance of an HttpApplication object (or an HttpApplication-derived object).
If the application object is interested in receiving any of the request preprocessing events, HttpApplication fires the events to the application object. Any HttpModules that have subscribed to these events will receive the notifications as well.
Runtime instantiates a handler and handles the request.
Figure 2-1 shows how IIS version 5.0 and ASP.NET work together to handle HTTP requests. Figure 2-2 shows how IIS version 6.0 works with ASP.NET to handle requests.

Throughout the forthcoming chapters, we'll follow a request through the ASP.NET pipeline. You can plug into the ASP.NET pipeline at a number of distinct points to deal with various aspects of handling the requests. For example, if you'd like to do any preprocessing, you can either override event handlers in the HttpApplication class, or you may write HTTP modules and plug them into the pipeline. While the System.Web.UI.Page class provides as much functionality as you'll ever need for building Web-based user interfaces, the pipeline is flexible enough that you can easily write your own custom handlers.