Being able to assemble the UI from component parts is one of the most-cited benefits of producing components. Regular Windows programming originally employed VBXs (Visual Basic Controls) to build UIs. Of course, that was over a decade ago. Throughout the mid- and late 1990s and early 2000s, ActiveX controls represented the GUI componentization technology of the day. Windows Forms controls are the current standard for modular GUIs if you're writing a rich client application.
In the late 1990s, ActiveX controls also emerged as a way to render a Web-based GUI as components. The idea was that by using an ActiveX control in your page, the control would be downloaded as users surfed to the page. During the mid-1990s Java applets also gained some popularity as a way to package GUI components for distribution over the Web. However, both of these techniques depend on some fairly extensive infrastructure on the client machine (the Component Object Model infrastructure to support ActiveX and a Java Virtual Machine to support Java applets). When you're developing a Web site, you may not be able to count on a specific infrastructure's being available on the client machine to support your GUI. To support the greatest number of clients, represent your GUI using only HTML. That means all GUI componentization needs to happen on the server side.
As we saw earlier, ASP.NET introduces an entirely new model for managing Web pages. The infrastructure within ASP.NET includes a well-defined pipeline through which a request flows. When a request ends up at the server, ASP.NET instantiates a handler (an implementation of IHttpHandler) to deal with the request. As we'll see in a later chapter, the handling architecture is extraordinarily flexible. You may write any code you wish to handle the request. The System.Web.UI.Page class implements IHttpHandler by introducing an object-oriented approach to rendering. That is, every element you see on a Web page emitted by an ASP.NET page is somehow generated by a server-side control. Let's see how this works.
Try turning the previous Web page into an ASP.NET application.
Create a file named BunchOfControls.aspx.
Add the source code in Listing 3-3 to the file.
<%@ Page Language=C# %>

<script runat="server">
  protected void Page_Load(object sender, EventArgs ea)
  {
     ddl.Items.Add("Item 1");
     ddl.Items.Add("Item 2");
     ddl.Items.Add("Item 3");
     ddl.Items.Add("Item 4");
  }
</script >
<h2> Page in ASP.NET </h2>
<form id="Form1" runat="server" >
   <asp:Label Text="Type in me" runat="server" />
   <asp:TextBox id="textinfo" runat="server" />
   <BR>
   <asp:DropDownList id="ddl" runat="server" />
   <BR>
   <asp:Button id="pressme" Text="Press Me!"
runat="server" />
</form>
Save the file in a virtual directory (either create one or use the one from the previous chapter).
Many of the same elements seen in the classic ASP page also appear here. There's a top level Page directive. The Language directive is new for ASP.NET, stipulating that any code encountered by the ASP.NET runtime should be interpreted as C# code. There's a server-side script block that handles the Page_Load event. Following the script block is an HTML <form> tag. Notice the <form> tag has an attribute named runat, and the attribute is set to server. The runat=server attribute tells the ASP.NET runtime to generate a server-side control to handle that aspect of the page.
By including the runat=server attribute in the control tag, the ASP.NET runtime implicitly creates an instance of the control in memory. The resulting assembly includes a member variable of the same type and name as the control listed on the page. Notice the ASP.NET code specifies the DropDownList named ddl to run at the server. To access the control programmatically, the code block (expressed inline in this case) simply needs to refer to the DropDownList as ddl. The example above accesses the member variable to add items to the drop-down list.
To access the control using code behind, you'd explicitly declare the DropDownList variable as ddl. This is required because ASP.NET derives the code-beside class from System.Web.UI.Page. Visual Studio will do this for you automatically, as we'll see shortly.
Further down the ASP.NET code, you'll see each of the other elements (the label, the text box, the selection control, and the Submit button) are also represented as server-side controls. The job of each of these controls is to add a little bit of HTML to the response. Each time you add a server-side control to the page, ASPNET adds an instance of the control to a control tree the page maintains in memory. The control tree will show that every single element is encapsulated by one of these server-side controls—even the title text that seems to be floating near the top of the page.
To get a good idea as to how ASP.NET's Page model works, we'll run the page again, but we'll turn on the tracing mechanism. We'll examine tracing in more detail when we look at ASP.NET's diagnostic features. For now, you simply need to know that ASP.NET will dump the entire context of a request and a response if you set the page's Trace attribute to true. Here's the page directive with tracing turned on:
<%@ Page Language=C# trace=true %>
Figure 3-3 shows what the page looks like with tracing turned on.
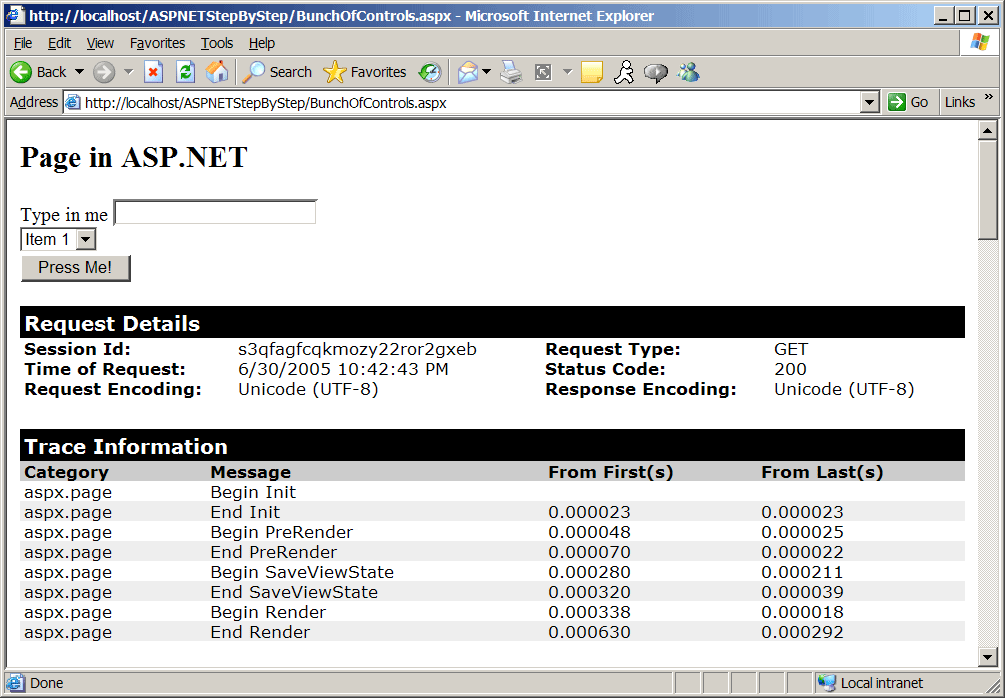
If you look at the raw text of the response (by selecting View | Source from the Internet Explorer menu), you see that ASP.NET responds with pretty straightforward run-of-the-mill HTML. There's a bit extra near the top—the hidden __VIEWSTATE field—which we'll cover a bit later. After that, the rest is familiar HTML describing a form. Listing 3-4 shows the raw HTML emitted by the ASP.NET code from Listing 3-3.
<h2> Page in ASP.NET </h2>
<form method="post" action="BunchOfControls.aspx" id="Form1">
<div>
<input type="hidden" name="__VIEWSTATE" id="__VIEWSTATE" value="/
wEPDwUJODQ1ODEzNjQ4D2QWAmYPZBYCAgUPD2QPFgRmAgECAgIDFgQQBQZJdGVtIDEFBkl0ZW0gMWcQBQZJdGVtIDIFB
kl0ZW0gMmcQBQZJdGVtIDMFBkl0ZW0gM2cQBQZJdGVtIDQFBkl0ZW0gNGdkZBIoyTUHSvKe61yeF4ReR/90QFst" />
</div>

   <span>Type in me</span>
   <input name="textinfo" type="text" id="textinfo" />
   <BR>
   <select name="ddl" id="ddl">
   <option value="Item 1">Item 1</option>
   <option value="Item 2">Item 2</option>
   <option value="Item 3">Item 3</option>
   <option value="Item 4">Item 4</option>

</select>
   <BR>
   <input type="submit" name="pressme" value="Press Me!" id="pressme" />
</form>
You don't see any of the runat=server attributes anywhere in the rendered page. That's because the runat=server attributes are there to instruct ASP.NET how to construct the page's control tree.
After turning the page's Trace property to true, the ASP.NET will spew a ton of information your way in the form of a page trace. If you scroll down just a bit, you can see that part of ASP.NET's page trace includes the page's control tree. Figure 3-4 shows what the previous page's trace looks like with the focus on the control tree.
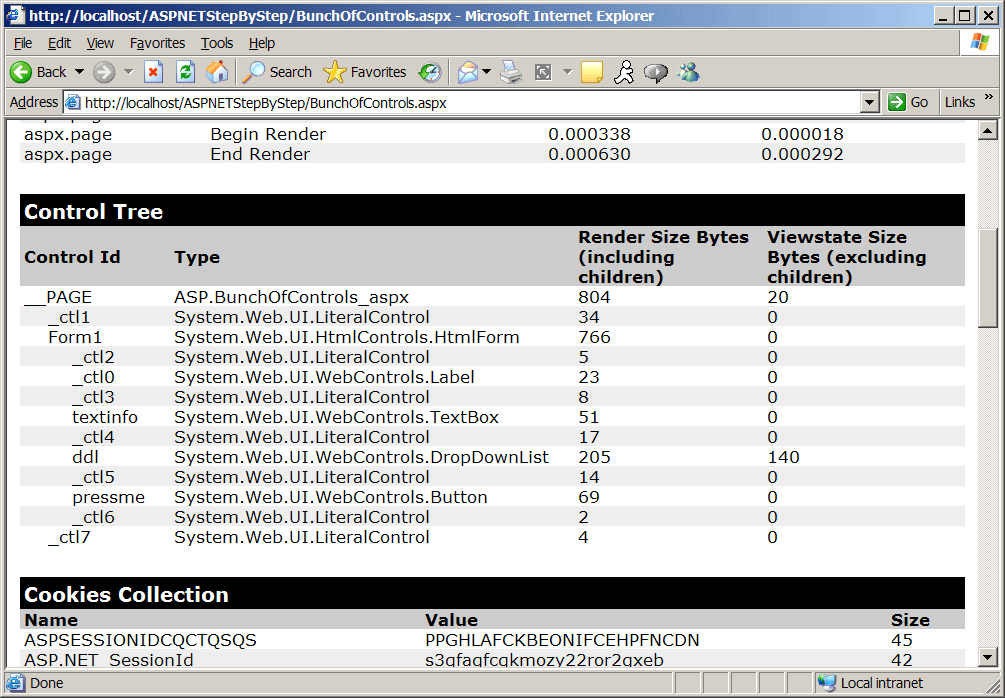
The first line in the page's control tree trace is an item named __Page. This is in fact the System.Web.UI.Page object running in memory. Beneath that are a whole host of other items. You'll recognize some of their names as they were named in the ASP.NET source code. Notice the Form1, textinfo, and pressme items. Those names came from the tags in the original ASPX file.
What's happening here is that ASP.NET is breaking down the page rendering architecture into small, easily managed pieces. Every item in the list above derives from the System.Web.UI.Control class. Every time the System.Web.UI.Page needs to render the page, it simply walks the control tree, asking each control to render itself. For example, when the ASP.NET runtime asks the TextBox server-side control to render itself, the TextBox control adds the following HTML to the output stream heading for the browser:
<input name="textinfo" type="text" id="textinfo" />
This works similarly for the other controls. For example, the DropDownList is responsible for emitting the select and option tags (the option tags represent the collection of items held by the DropDownList control).
   <select name="ddl" id="ddl">
      <option value="Item 1">Item 1</option>
      <option value="Item 2">Item 2</option>
      <option value="Item 3">Item 3</option>
      <option value="Item 4">Item 4</option>
   </select>
Now that you see how these tags work, let's see how to manage them in Visual Studio.