In the early editions of this book, the EX07B example dynamically created controls inside the standard file dialog. That technique doesn't work in Win32, but the nested dialog method described here has the same effect.
Windows provides a group of standard user interface dialogs, and these are supported by the MFC library classes. You are probably familiar with all or most of these dialogs because so many Windows-based applications, including Visual C++, already use them. All the common dialog classes are derived from a common base class, CCommonDialog. A list of the COMDLG32 classes is shown in the following table.
| Class | Purpose |
| CColorDialog | Allows the user to select or create a color |
| CFileDialog | Allows the user to open or save a file |
| CFindReplaceDialog | Allows the user to substitute one string for another |
| CPageSetupDialog | Allows the user to input page measurement parameters |
| CFontDialog | Allows the user to select a font from a list of available fonts |
| CPrintDialog | Allows the user to set up the printer and print a document |
Here's one characteristic that all common dialogs share: they gather information from the user, but they don't do anything with it. The file dialog can help the user select a file to open, but it really just provides your program with the pathname—your program must make the call that opens the file. Similarly, a font dialog fills in a structure that describes a font, but it doesn't create the font.
Using the CFileDialog Class Directly
Using the CFileDialog class to open a file is easy. The following code opens a file that the user has selected through the dialog:
CFileDialog dlg(TRUE, "bmp", "*.bmp");
if (dlg.DoModal() == IDOK) {
    CFile file;
    VERIFY(file.Open(dlg.GetPathName(), CFile::modeRead));
}
The first constructor parameter (TRUE) specifies that this object is a "File Open" dialog instead of a "File Save" dialog. The default file extension is bmp, and *.bmp appears first in the filename edit box. The CFileDialog::GetPathName function returns a CString object that contains the full pathname of the selected file.
Deriving from the Common Dialog Classes
Most of the time, you can use the common dialog classes directly. If you derive your own classes, you can add functionality without duplicating code. Each COMDLG32 dialog works a little differently, however. The next example is specific to the file dialog, but it should give you some ideas for customizing the other common dialogs.
In the early editions of this book, the EX07B example dynamically created controls inside the standard file dialog. That technique doesn't work in Win32, but the nested dialog method described here has the same effect.
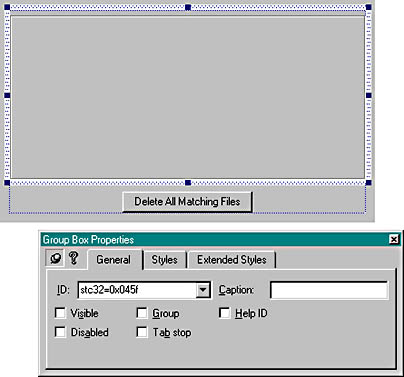
Win32 provides a way to "nest" one dialog inside another so that multiple dialogs appear as one seamless whole. You must first create a dialog resource template with a "hole" in it—typically a group box control—with the specific child window ID stc32 (=0x045f). Your program sets some parameters that tell COMDLG32 to use your template. In addition, your program must hook into the COMDLG32 message loop so that it gets first crack at selected notifications. When you're done with all of this, you'll notice that you have created a dialog window that is a child of the COMDLG32 dialog window, even though your template wraps COMDLG32's template.
This sounds difficult, and it is unless you use MFC. With MFC, you build the dialog resource template as described above, derive a class from one of the common dialog base classes, add the class-specific connection code in OnInitDialog, and then happily use ClassWizard to map the messages that originate from your template's new controls.
Windows NT 3.51 uses an earlier version of the common dialogs DLL that does not support the new Windows namespace feature. The nested dialog technique illustrated in the EX07B example won't work with the Windows NT 3.51 version of the file dialog.
In this example, you will derive a class CEx07bDialog that adds a working Delete All Matching Files button to the standard file dialog. It also changes the dialog's title and changes the Open button's caption to Delete (to delete a single file). The example illustrates how you can use nested dialogs to add new controls to standard common dialogs. The new file dialog is activated as in the previous examples—by pressing the left mouse button when the mouse cursor is in the view window. Because you should be gaining skill with Visual C++, the following steps won't be as detailed as those for the earlier examples. Figure 7-1 shows what the dialog looks like.
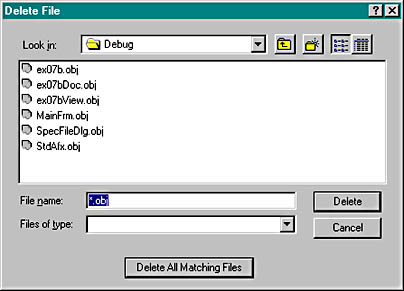
Figure 7-1. The Delete File dialog in action.
Follow these steps to build the EX07B application:

Check your work by choosing Resource Symbols from the Visual C++ View menu. You should see a symbol list like the one shown in the graphic below.
Change the names to SpecFileDlg.h and SpecFileDlg.cpp. Unfortunately, we cannot use the Base Class drop-down list to change the base class to CFileDialog, as that would decouple our class from the IDD_FILESPECIAL template. We have to change the base class by hand.
class CSpecialFileDialog : public CDialog
to
class CSpecialFileDialog : public CFileDialog
Add the following two public data members:
CString m_strFilename;
BOOL m_bDeleteAll;
Finally, edit the constructor declaration:
CSpecialFileDialog(BOOL bOpenFileDialog,
    LPCTSTR lpszDefExt = NULL,
    LPCTSTR lpszFileName = NULL,
    DWORD dwFlags = OFN_HIDEREADONLY | OFN_OVERWRITEPROMPT,
    LPCTSTR lpszFilter = NULL,
    CWnd* pParentWnd = NULL
);
CSpecialFileDialog::CSpecialFileDialog(BOOL bOpenFileDialog,
        LPCTSTR lpszDefExt, LPCTSTR lpszFileName, DWORD dwFlags,
        LPCTSTR lpszFilter, CWnd* pParentWnd)
    : CFileDialog(bOpenFileDialog, lpszDefExt, lpszFileName,
        dwFlags, lpszFilter, pParentWnd)
{
    //{{AFX_DATA_INIT(CSpecialFileDialog)
        // NOTE: the ClassWizard will add member initialization here
    //}}AFX_DATA_INIT
    m_ofn.Flags |= OFN_ENABLETEMPLATE;
    m_ofn.lpTemplateName = MAKEINTRESOURCE(IDD_FILESPECIAL);
    m_ofn.lpstrTitle = "Delete File";
    m_bDeleteAll = FALSE;
}
BOOL bRet = CFileDialog::OnInitDialog();
if (bRet == TRUE) {
    GetParent()->GetDlgItem(IDOK)->SetWindowText("Delete");
}
return bRet;
 void CSpecialFileDialog::OnDelete()
{
    m_bDeleteAll = TRUE;
    // 0x480 is the child window ID of the File Name edit control
    //  (as determined by SPYXX)
    GetParent()->GetDlgItem(0x480)->GetWindowText(m_strFilename);
    GetParent()->SendMessage(WM_COMMAND, IDCANCEL);
}
void CEx07bView::OnDraw(CDC* pDC)
{
    pDC->TextOut(0, 0, "Press the left mouse button here.");
}
void CEx07bView::OnLButtonDown(UINT nFlags, CPoint point)
{
    CSpecialFileDialog dlgFile(TRUE, NULL, "*.obj");
    CString strMessage;
    int nModal = dlgFile.DoModal();
    if ((nModal == IDCANCEL) && (dlgFile.m_bDeleteAll)) {
        strMessage.Format(
            "Are you sure you want to delete all %s files?",
            dlgFile.m_strFilename);
        if (AfxMessageBox(strMessage, MB_YESNO) == IDYES) {
            HANDLE h;
            WIN32_FIND_DATA fData;
            while((h = ::FindFirstFile(dlgFile.m_strFilename, &fData))
                    != (HANDLE) 0xFFFFFFFF) { // no MFC equivalent
                if (::DeleteFile(fData.cFileName) == FALSE) {
                    strMessage.Format("Unable to delete file %s\n",
                        fData.cFileName);
                    AfxMessageBox(strMessage);
                    break;
                }
            }
        }
    }
    else if (nModal == IDOK) {
        CString strSingleFilename = dlgFile.GetPathName();
        strMessage.Format(
            "Are you sure you want to delete %s?", strSingleFilename);
        if (AfxMessageBox(strMessage, MB_YESNO) == IDYES) {
            CFile::Remove(strSingleFilename);
        }
    }
}
Remember that common dialogs just gather data. Since the view is the client of the dialog, the view must call DoModal for the file dialog object and then figure out what to do with the information returned. In this case, the view has the return value from DoModal (either IDOK or IDCANCEL) and the value of the public m_bDeleteAll data member, and it can call various CFileDialog member functions such as GetPathName. If DoModal returns IDCANCEL and the flag is TRUE, the function makes the Win32 file system calls necessary to delete all the matching files. If DoModal returns IDOK, the function can use the MFC CFile functions to delete an individual file.
Using the global AfxMessageBox function is a convenient way to pop up a simple dialog that displays some text and then queries the user for a Yes/No answer. The Microsoft Foundation Classes And Templates section in the online help describes all of the message box variations and options.
Of course, you'll need to include the statement
#include "SpecFileDlg.h"
after the line
#include "ex07bView.h"
In the EX07B example, you added a pushbutton to the dialog. It's easy to add other controls too. Just put them in the resource template, and if they are standard Windows controls such as edit controls or list boxes, you can use ClassWizard to add data members and DDX/DDV code to your derived class. The client program can set the data members before calling DoModal, and it can retrieve the updated values after DoModal returns.
Even if you don't use nested dialogs, two windows are still associated with a CFileDialog object. Suppose you have overridden OnInitDialog in a derived class and you want to assign an icon to the file dialog. You must call CWnd::GetParent to get the top-level window, just as you did in the EX07B example. Here's the code:
HICON hIcon = AfxGetApp()->LoadIcon(ID_MYICON);
GetParent()->SetIcon(hIcon, TRUE);        // Set big icon
GetParent()->SetIcon(hIcon, FALSE);       // Set small icon