Using GDI Bitmaps
A GDI bitmap is simply another GDI object, such as a pen or a font. You must somehow create a bitmap, and then you must select it into a device context. When you're finished with the object, you must deselect it and delete it. You know the drill.
There's a catch, though, because the "bitmap" of the display or printer device is effectively the display surface or the printed page itself. Therefore, you can't select a bitmap into a display device context or a printer device context. You have to create a special memory device context for your bitmaps, using the CDC::CreateCompatibleDC function. You must then use the CDC member function StretchBlt or
BitBlt to copy the bits from the memory device context to the "real" device context. These "bit-blitting" functions are generally called in your view class's OnDraw function. Of course, you mustn't forget to clean up the memory device context when you're finished.
Loading a GDI Bitmap from a Resource
The easiest way to use a bitmap is to load it from a resource. If you look in ResourceView in the Workspace window, you'll find a list of the project's
bitmap resources. If you select a bitmap and examine its properties, you'll see a filename.
Here's an example entry in an RC (resource script) file, when viewed by a text editor:
IDB_REDBLOCKS BITMAP DISCARDABLE "res\\Red Blocks.bmp"
IDB_REDBLOCKS is the resource ID, and the file is Red Blocks.bmp in the project's \res subdirectory. (This is one of the Microsoft Windows 95
wallpaper bitmaps, normally located in the \WINDOWS directory.) The resource compiler reads the DIB from disk and stores it in the project's RES file. The linker copies the DIB into the program's EXE file. You know that the Red Blocks bitmap must be in device-independent format because the EXE can be run with any display board that Windows supports.
The CDC::LoadBitmap function converts a resource-based DIB to a GDI bitmap. Below is the simplest possible self-contained OnDraw function that displays the Red Blocks bitmap:
CMyView::OnDraw(CDC* pDC)
{
    CBitmap bitmap; // Sequence is important
    CDC dcMemory;
    bitmap.LoadBitmap(IDB_REDBLOCKS);
    dcMemory.CreateCompatibleDC(pDC);
    dcMemory.SelectObject(&bitmap);
    pDC->BitBlt(100, 100, 54, 96, &dcMemory, 0, 0, SRCCOPY);
    // CDC destructor deletes dcMemory; bitmap is deselected
    // CBitmap destructor deletes bitmap
}
The BitBlt function copies the Red Blocks pixels from the memory device context to the display (or printer) device context. The bitmap is 54 bits wide by 96 bits high, and on a VGA display it occupies a rectangle of 54-by-96 logical units, offset 100 units down and to the right of the upper-left corner of the window's client area.

The code above works fine for the display. As you'll see in Chapter 19, the application framework calls the OnDraw function for printing, in which case pDC points to a printer device context. The bitmap here, unfortunately, is configured specifically for the display and thus cannot be selected into the printer-compatible memory device context. If you want to print a bitmap, you should look at the CDib class described later in this chapter.
The Effect of the Display Mapping Mode
If the display mapping mode in the Red Blocks example is MM_TEXT, each bitmap pixel maps to a display pixel and the bitmap fits perfectly. If the mapping mode is MM_LOENGLISH, the bitmap size is 0.54-by-0.96 inch, or 52-by-92 pixels for Windows 95, and the GDI must do some bit crunching to make the bitmap fit. Consequently, the bitmap might not look as good with the MM_LOENGLISH mapping mode. Calling CDC::SetStretchBltMode with a parameter value of COLORONCOLOR will make shrunken bitmaps look nicer.
Stretching the Bits
What if we want Red Blocks to occupy a rectangle of exactly 54-by-96
pixels, even though the mapping mode is not MM_TEXT? The StretchBlt function is the solution. If we replace the BitBlt call with the following three statements, Red Blocks is displayed cleanly, whatever the mapping mode:
CSize size(54, 96);
pDC->DPtoLP(&size);
pDC->StretchBlt(0, 0, size.cx, -size.cy,
                &dcMemory, 0, 0, 54, 96, SRCCOPY);
With either BitBlt or StretchBlt, the display update is slow if the GDI has to actually stretch or compress bits. If, as in the case above, the GDI determines that no conversion is necessary, the update is fast.
The EX11A Example
The EX11A example displays a resource-based bitmap in a scrolling view with mapping mode set to MM_LOENGLISH. The program uses the StretchBlt logic described above, except that the memory device context and the bitmap are created in the view's OnInitialUpdate member function and last for the life of the program. Also, the program reads the bitmap size through a call to
the CGdiObject member function GetObject, so it's not using hard-coded values as in the preceding examples.
Here are the steps for building the example:
- Run AppWizard to produce \vcpp32\ex11a\ex11a.
Accept all the default settings but two: select Single Document, and select the CScrollView view base class, as shown in Chapter 4, for CEx11aView. The options and the default class names are shown here.
- Import the Gold Weave bitmap.
Choose Resource from Visual C++'s Insert menu. Import the bitmap Gold Weave.bmp from the \WINDOWS directory. (If your version of Windows doesn't have this bitmap, load it from this book's companion CD-ROM.) Visual C++ will copy this bitmap file into your project's \res subdirectory. Assign the ID IDB_GOLDWEAVE, and save the changes.
- Add the following private data members to the class CEx11aView.
Edit the file ex11aView.h or use ClassView. The bitmap and the memory device context last for the life of the view. The CSize objects are the source (bitmap) dimensions and the destination (display) dimensions.
CDC*     m_pdcMemory;
CBitmap* m_pBitmap;
CSize    m_sizeSource, m_sizeDest;
- Edit the following member functions in the class CEx11aView. Edit the file ex11aView.cpp. The constructor and destructor do C++ housekeeping for the embedded objects. You want to keep the constructor as simple as possible because failing constructors cause problems. The OnInitialUpdate function sets up the memory device context and the bitmap, and it computes output dimensions that map each bit to a pixel. The OnDraw function calls StretchBlt twice—once by using the
special computed dimensions and once by mapping each bit to a 0.01-by-0.01-inch square. Add the following boldface code:
CEx11aView::CEx11aView()
{
    m_pdcMemory = new CDC;
    m_pBitmap = new CBitmap;
}

CEx11aView::~CEx11aView()
{
    // cleans up the memory device context and the bitmap
    delete m_pdcMemory; // deselects bitmap
    delete m_pBitmap;
}
void CEx11aView::OnDraw(CDC* pDC)
{
    pDC->SetStretchBltMode(COLORONCOLOR);
    pDC->StretchBlt(20, -20, m_sizeDest.cx, -m_sizeDest.cy,
        m_pdcMemory, 0, 0,
        m_sizeSource.cx, m_sizeSource.cy, SRCCOPY);

    pDC->StretchBlt(350, -20, m_sizeSource.cx, -m_sizeSource.cy,
        m_pdcMemory, 0, 0,
        m_sizeSource.cx, m_sizeSource.cy, SRCCOPY);
}

void CEx11aView::OnInitialUpdate()
{
    CScrollView::OnInitialUpdate();
    CSize sizeTotal(800, 1050); // 8-by-10.5 inches
    CSize sizeLine = CSize(sizeTotal.cx / 100, sizeTotal.cy / 100);
    SetScrollSizes(MM_LOENGLISH, sizeTotal, sizeTotal, sizeLine);

    BITMAP bm; // Windows BITMAP data structure; see Win32 help
    if (m_pdcMemory->GetSafeHdc() == NULL) {
        CClientDC dc(this);
        OnPrepareDC(&dc); // necessary
        m_pBitmap->LoadBitmap(IDB_GOLDWEAVE);
        m_pdcMemory->CreateCompatibleDC(&dc);
        m_pdcMemory->SelectObject(m_pBitmap);
        m_pBitmap->GetObject(sizeof(bm), &bm);
        m_sizeSource.cx = bm.bmWidth;
        m_sizeSource.cy = bm.bmHeight;
        m_sizeDest = m_sizeSource;
        dc.DPtoLP(&m_sizeDest);
    }
}
- Build and test the EX11A application.
Your screen should look like this.
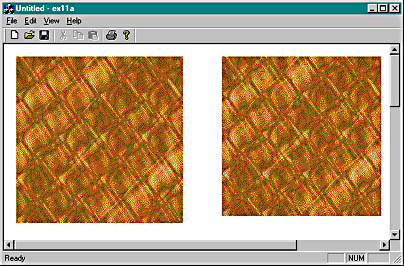
- Try the Print Preview and Print features.
The bitmap prints to scale because the application framework applies the MM_LOENGLISH mapping mode to the printer device context just as it does to the display device context. The output looks great in Print Preview mode, but (depending on your print drivers) the printed output will probably be either blank or microscopic! We'll fix that soon.