The EX14B example replaces the standard application framework status bar with a new status bar that has the following text panes.
| Pane Index | String ID | Type | Description |
| 0 | ID_SEPARATOR (0) | Message line | x cursor coordinate |
| 1 | ID_SEPARATOR (0) | Message line | y cursor coordinate |
| 2 | ID_INDICATOR_LEFT | Status indicator | Left mouse button status |
| 3 | ID_INDICATOR_RIGHT | Status indicator | Right mouse button status |
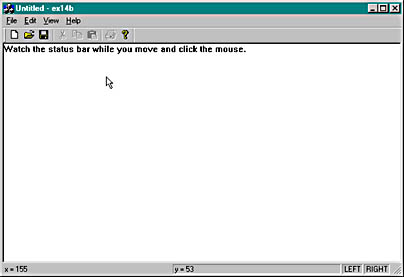
The resulting status bar is shown in Figure 14-4. Notice that the leftmost pane stretches past its normal 1/20-screen length as the displayed frame window expands.
Figure 14-4. The status bar of the EX14B example.
Follow these steps to produce the EX14B example:

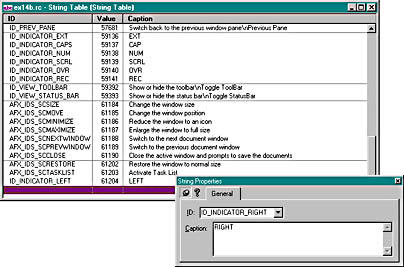
Add two strings as follows.
| String ID | String Caption |
| ID_INDICATOR_LEFT | LEFT |
| ID_INDICATOR_RIGHT | RIGHT |
| Object ID | Message | Member Function |
| ID_VIEW_STATUS_BAR | COMMAND | OnViewStatusBar |
| ID_VIEW_STATUS_BAR | UPDATE_COMMAND_UI | OnUpdateViewStatusBar |
afx_msg void OnUpdateLeft(CCmdUI* pCmdUI);
afx_msg void OnUpdateRight(CCmdUI* pCmdUI);
Add the message handler statements inside the AFX_MSG brackets so that ClassWizard will let you access and edit the code later. While MainFrm.h is open, make m_wndStatusBar public rather than protected.
static UINT indicators[] =
{
    ID_SEPARATOR,  // first message line pane
    ID_SEPARATOR,  // second message line pane
    ID_INDICATOR_LEFT,
    ID_INDICATOR_RIGHT,
};
Next edit the OnCreate member function. Replace the following statement
if (!m_wndStatusBar.Create(this) ||
    !m_wndStatusBar.SetIndicators(indicators,
      sizeof(indicators)/sizeof(UINT)))
{
    TRACE0("Failed to create status bar\n");
    return -1;      // fail to create
}
with the statement shown here:
if (!m_wndStatusBar.Create(this,
        WS_CHILD | WS_VISIBLE | CBRS_BOTTOM, ID_MY_STATUS_BAR) ||
    !m_wndStatusBar.SetIndicators(indicators,
      sizeof(indicators)/sizeof(UINT)))
{
    TRACE0("Failed to create status bar\n");
    return -1;      // fail to create
}
The modified call to Create uses our own status bar ID, ID_MY_STATUS_BAR, instead of AFX_IDW_STATUS_BAR (the application framework's status bar object).
Now add the following message map entries for the class CMainFrame. ClassWizard can't add these for you because it doesn't recognize the string table IDs as object IDs.
ON_UPDATE_COMMAND_UI(ID_INDICATOR_LEFT, OnUpdateLeft)
ON_UPDATE_COMMAND_UI(ID_INDICATOR_RIGHT, OnUpdateRight)
Next add the following CMainFrame member functions that update the two status indicators:
void CMainFrame::OnUpdateLeft(CCmdUI* pCmdUI)
{
    pCmdUI->Enable(::GetKeyState(VK_LBUTTON) < 0);
}

void CMainFrame::OnUpdateRight(CCmdUI* pCmdUI)
{
    pCmdUI->Enable(::GetKeyState(VK_RBUTTON) < 0);
}
Note that the left and right mouse buttons have virtual key codes like keys on the keyboard have. You don't have to depend on mouse-click messages to determine the button status.
Finally, edit the following View menu functions that ClassWizard originally generated in MainFrm.cpp:
void CMainFrame::OnViewStatusBar()
{
    m_wndStatusBar.ShowWindow((m_wndStatusBar.GetStyle() &
                               WS_VISIBLE) == 0);
    RecalcLayout();
}
void CMainFrame::OnUpdateViewStatusBar(CCmdUI* pCmdUI)
{
    pCmdUI-
>SetCheck((m_wndStatusBar.GetStyle() & WS_VISIBLE) != 0);
}
These functions ensure that the View menu Status Bar command is properly linked to the new status bar.
void CEx14bView::OnDraw(CDC* pDC)
{
    pDC->TextOut(0, 0,
        "Watch the status bar while you move and click the mouse.");
}
void CEx14bView::OnMouseMove(UINT nFlags, CPoint point)
{
    CString str;
    CMainFrame* pFrame = (CMainFrame*) AfxGetApp()->m_pMainWnd;
    CStatusBar* pStatus = &pFrame->m_wndStatusBar;
    if (pStatus) {
        str.Format("x = %d", point.x);
        pStatus->SetPaneText(0, str);
        str.Format("y = %d", point.y);
        pStatus->SetPaneText(1, str);
    }
}
Finally, add the statement
#include "MainFrm.h"
near the top of the file ex14bView.cpp.
If you want the first (index 0) status bar pane to have a beveled border like the other panes and you want the status bar to grow and resize to fit their contents, include the following two lines in the CMainFrame::OnCreate function, following the call to the status bar Create function.
m_wndStatusBar.SetPaneInfo(0, 0, 0, 50);
m_wndStatusBar.SetPaneInfo(1, 0, SBPS_STRETCH, 50);
These statements change the width of the first two panes (from their default of one-fourth the display size) and make the second pane (index 1) the stretchy one.