The EX14C Rebar Example

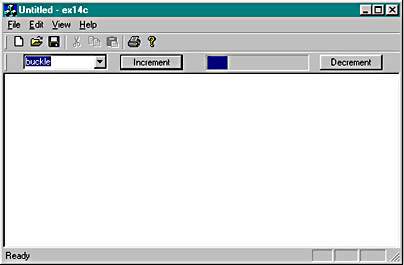
Let's get familiar with the rebar by jumping into an example. This example creates an SDI application that has a rebar with two bands: a familiar toolbar band and a dialog bar band. Figure 14-6 shows the example in action.

Click to view at full size.

Figure 14-6. EX14C rebar example.

Here are the steps required to create the EX14C example:

  1. Run AppWizard to generate \vcpp32\ex14c\ex14c. Select Single Document. In Step 4, be sure you select Internet Explorer ReBars under the How Do You Want Your Toolbars To Look option. Figure 14-7 below shows the correct settings. Accept all other default settings.

  2. Compile and run the application. When you run the application, you will see that AppWizard has automatically created a rebar with two bands. One band contains a conventional toolbar and the other contains the text "TODO: layout dialog bar" in the band. Figure 14-8 below shows the initial rebar control.

    At this point, you can open the MainFrm.h header file and see the code below, which declares the CReBar data member m_ndReBar.

    protected:  // control bar embedded members
        CStatusBar  m_wndStatusBar;
        CToolBar    m_wndToolBar;
        CReBar      m_wndReBar;
        CDialogBar  m_wndDlgBar;
    

Click to view at full size.

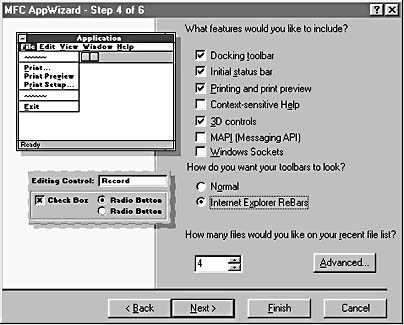
Figure 14-7. AppWizard Step 4 settings for the rebar control.

Click to view at full size.

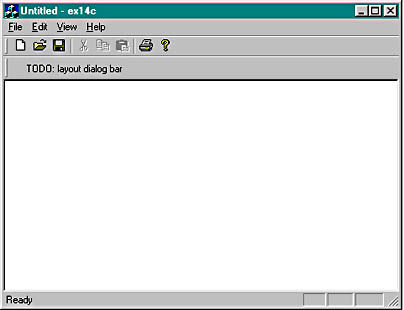
Figure 14-8. Initial windows for EX14C example with the default rebar controls.

    In the MainFrm.cpp file, you can see the code that adds the toolbar and the dialog bar to the CReBar object:

        if (!m_wndReBar.Create(this) ||
            !m_wndReBar.AddBar(&m_wndToolBar) ||
            !m_wndReBar.AddBar(&m_wndDlgBar))
        {
            TRACE0("Failed to create rebar\n");
            return -1;      // fail to create
        }
    
  1. Lay out the Dialog Bar. Open the Visual C++ resource editor. Under the Dialog heading you'll find a dialog resource for the dialog bar with the ID IDR_MAINFRAME. Open IDR_MAINFRAME and you'll see the dialog bar with the text "TODO: layout dialog bar". Let's follow AppWizard's friendly suggestion and put some real controls into the dialog bar. First delete the static control with the "TODO" text in it. Next place a combo box in the dialog bar and enter some default data items: one, two, buckle, my, shoe! Now place a button on the dialog bar and change the button's text to Increment. Next place a progress bar with the default properties on the dialog bar. Finally place another button with the text Decrement on the dialog bar. When you are done laying out the dialog bar, it should look similar to Figure 14-9.

Click to view at full size.

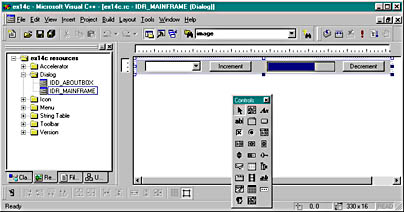
Figure 14-9. Edited IDR_MAINFRAME dialog bar.

  1. Associate the dialog bar with the CMainFrame class. Before we can program the handlers for the Increment and Decrement buttons, we need to attach the dialog bar to a class using ClassWizard. While in the resource editor, bring up ClassWizard by double-clicking on the Increment button. You will now see this dialog.

    Choose Select An Existing Class. We choose this option because we want our dialog resource to be a band in the toolbar, not a separate dialog class. Click OK and you will see these choices.

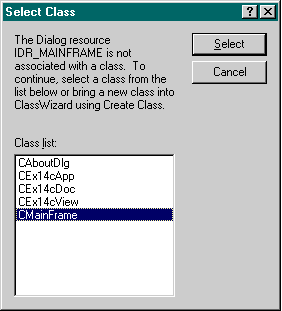
    Choose CMainFrame from the list and click Select.

    ClassWizard will prompt you with one last dialog.

Click to view at full size.

    Click Yes and then exit ClassWizard. You have successfully associated the IDR_MAINFRAME dialog bar with the CMainFrame class.

  1. Program the dialog bar. To program the dialog bar, bring up the IDR_MAINFRAME dialog resource in the resource editor again and double-click on the Increment button. ClassWizard will automatically create an ONBUTTON1 handler for you—accept the default name for this function. Enter the following boldface code in the OnButton1 function:

    void CMainFrame::OnButton1() 
    {
        CProgressCtrl * pProgress =   
            (CProgressCtrl*)m_wndDlgBar.GetDlgItem(IDC_PROGRESS1);
        pProgress->StepIt();
    }

    The OnButton1 handler first gets a pointer to the progress control and then calls StepIt to increment the progress control.

    Now we need to add similar code to the decrement handler. Double-click on the Decrement button in the resource editor and ClassWizard will automatically create an OnButton2 handler. Add the following boldface code to the OnButton2 member function:

    void CMainFrame::OnButton2() 
    {
        CProgressCtrl * pProgress =
                 (CProgressCtrl*)m_wndDlgBar.GetDlgItem(IDC_PROGRESS1);
    
        int nCurrentPos = pProgress->GetPos();
    
        pProgress->SetPos(nCurrentPos-10);
    
    }
    

  2. Compile and test. Now you can compile and run EX14C to see your custom rebar in action. The Increment button increases the progress bar and the Decrement button decreases it.

In this chapter, we learned how to use MFC's toolbar, status bar, and the new rebar control. In the next chapter, we'll look at how to extend MFC to implement a frame window that remembers its position.