The EX19A Example—A Wysiwyg Print Program

This example displays and prints a single page of text stored in a document. The printed image should match the displayed image. The MM_TWIPS mapping mode is used for both printer and display. First we'll use a fixed drawing rectangle; later we'll base the drawing rectangle on the printable area rectangle supplied by the printer driver.

Here are the steps for building the example:

  1. Run AppWizard to generate \vcpp32\ex19a\ex19a. Accept the default options, and then rename the document and view classes and files as shown here.

    Note that this is an MDI application.

  2. Add a CStringArray data member to the CPoemDoc class.Edit the PoemDoc.h header file or use ClassView.

    public:
        CStringArray m_stringArray;

    The document data is stored in a string array. The MFC library CStringArray class holds an array of CString objects, accessible by a zero-based subscript. You need not set a maximum dimension in the declaration because the array is dynamic.

  3. Add a CRect data member to the CStringView class. Edit the StringView.h header file or use ClassView:

    private:
        CRect m_rectPrint;

  4. Edit three CPoemDoc member functions in the file PoemDoc.cpp. AppWizard generated skeleton OnNewDocument and Serialize functions, but we'll have to use ClassWizard to override the DeleteContents function. We'll initialize the poem document in the overridden OnNewDocument function. DeleteContents is called in CDocument::OnNewDocument, so by calling the base class function first we're sure the poem won't be deleted. (The text, by the way, is an excerpt from the twentieth poem in Lawrence Ferlinghetti's book A Coney Island of the Mind.) Type 10 lines of your choice. You can substitute another poem or maybe your favorite Win32 function description. Add the following boldface code:

    BOOL CPoemDoc::OnNewDocument()
    {
        if (!CDocument::OnNewDocument())
            return FALSE;
    
        m_stringArray.SetSize(10);
        m_stringArray[0] = "The pennycandystore beyond the El";
        m_stringArray[1] = "is where I first";
        m_stringArray[2] = "                  fell in love";
        m_stringArray[3] = "                      with unreality";
        m_stringArray[4] = "Jellybeans glowed in the semi-gloom";
        m_stringArray[5] = "of that september afternoon";
        m_stringArray[6] = "A cat upon the counter moved among";
        m_stringArray[7] = "                     the licorice sticks";
        m_stringArray[8] = "                  and tootsie rolls";
        m_stringArray[9] = "           and Oh Boy Gum";
    
        return TRUE;
    }

    The CStringArray class supports dynamic arrays, but here we're using the m_stringArray object as though it were a static array of 10 elements.

    The application framework calls the document's virtual DeleteContents function when it closes the document; this action deletes the strings in the array. A CStringArray contains actual objects, and a CObArray contains pointers to objects. This distinction is important when it's time to delete the array elements. Here the RemoveAll function actually deletes the string objects:

    void CPoemDoc::DeleteContents()
    {
        // called before OnNewDocument and when document is closed
        m_stringArray.RemoveAll();
    }

    Serialization isn't important in this example, but the following function illustrates how easy it is to serialize strings. The application framework calls the DeleteContents function before loading from the archive, so you don't have to worry about emptying the array. Add the following boldface code:

    void CPoemDoc::Serialize(CArchive& ar)
    {
        m_stringArray.Serialize(ar);
    }

  5. Edit the OnInitialUpdate function in StringView.cpp. You must override the function for all classes derived from CScrollView. This function's job is to set the logical window size and the mapping mode. Add the following boldface code:

    void CStringView::OnInitialUpdate()
    {
        CScrollView::OnInitialUpdate();
        CSize sizeTotal(m_rectPrint.Width(), -m_rectPrint.Height());
        CSize sizePage(sizeTotal.cx / 2,
                       sizeTotal.cy / 2);   // page scroll
        CSize sizeLine(sizeTotal.cx / 100,
                       sizeTotal.cy / 100); // line scroll
        SetScrollSizes(MM_TWIPS, sizeTotal, sizePage, sizeLine);
    }

  6. Edit the OnDraw function in StringView.cpp. The OnDraw function of class CStringView draws on both the display and the printer. In addition to displaying the poem text lines in 10-point roman font, it draws a border around the printable area and a crude ruler along the top and left margins. OnDraw assumes the MM_TWIPS mapping mode, in which 1 inch = 1440 units. Add the boldface code shown below.

    void CStringView::OnDraw(CDC* pDC)
    {
        int        i, j, nHeight;
        CString    str;
        CFont      font;
        TEXTMETRIC tm;
    
        CPoemDoc* pDoc = GetDocument();
        // Draw a border — slightly smaller to avoid truncation
        pDC->Rectangle(m_rectPrint + CRect(0, 0, -20, 20));
        // Draw horizontal and vertical rulers
        j = m_rectPrint.Width() / 1440;
        for (i = 0; i <= j; i++) {
            str.Format("%02d", i);
            pDC->TextOut(i * 1440, 0, str);
        }
        j = -(m_rectPrint.Height() / 1440);
        for (i = 0; i <= j; i++) {
            str.Format("%02d", i);
            pDC->TextOut(0, -i * 1440, str);
        }
        // Print the poem 0.5 inch down and over;
        //  use 10-point roman font
        font.CreateFont(-200, 0, 0, 0, 400, FALSE, FALSE, 0, ANSI_CHARSET,
                        OUT_DEFAULT_PRECIS, CLIP_DEFAULT_PRECIS,
                        DEFAULT_QUALITY, DEFAULT_PITCH | FF_ROMAN,
                        "Times New Roman");
        CFont* pOldFont = (CFont*) pDC->SelectObject(&font);
        pDC->GetTextMetrics(&tm);
        nHeight = tm.tmHeight + tm.tmExternalLeading;
        TRACE("font height = %d, internal leading = %d\n",
              nHeight, tm.tmInternalLeading);
        j = pDoc->m_stringArray.GetSize();
        for (i = 0; i < j; i++) {
            pDC->TextOut(720, -i * nHeight - 720, pDoc->m_stringArray[i]);
        }
        pDC->SelectObject(pOldFont);
        TRACE("LOGPIXELSX = %d, LOGPIXELSY = %d\n",
              pDC->GetDeviceCaps(LOGPIXELSX),
              pDC->GetDeviceCaps(LOGPIXELSY));
        TRACE("HORZSIZE = %d, VERTSIZE = %d\n",
              pDC->GetDeviceCaps(HORZSIZE),
              pDC->GetDeviceCaps(VERTSIZE));
    }

  7. Edit the OnPreparePrinting function in StringView.cpp. This function sets the maximum number of pages in the print job. This example has only one page. It's absolutely necessary to call the base class DoPreparePrinting function in your overridden OnPreparePrinting function. Add the following boldface code:

    BOOL CStringView::OnPreparePrinting(CPrintInfo* pInfo)
    {
        pInfo->SetMaxPage(1);
        return DoPreparePrinting(pInfo);
    }

  8. Edit the constructor in StringView.cpp. The initial value of the print rectangle should be 8-by-15 inches, expressed in twips (1 inch = 1440 twips). Add the following boldface code:

    CStringView::CStringView() : m_rectPrint(0, 0, 11520, -15120)
    {
    }

  9. Build and test the application. If you run the EX19A application under Microsoft Windows NT with the lowest screen resolution, your MDI child window will look like the one shown below. (The text will be larger under higher resolutions and under Windows 95 and Windows 98.)

    Click to view at full size.

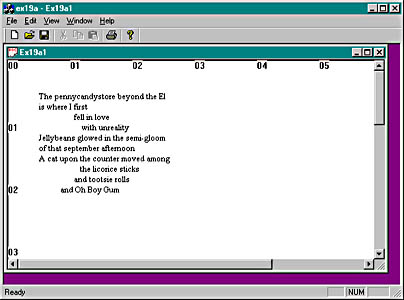
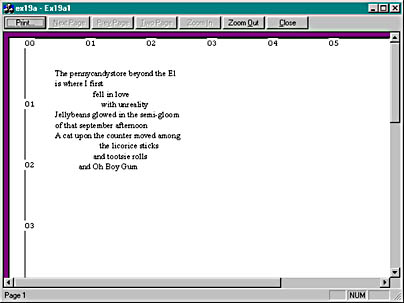
    The window text is too small, isn't it? Go ahead and choose Print Preview from the File menu, and then click twice with the magnifying glass to enlarge the image. The print preview output is illustrated here.

    Click to view at full size.

    Remember "logical twips" from Chapter 5? We're going to use logical twips now to enlarge type on the display while keeping the printed text the same size. This requires some extra work because the CScrollView class wasn't designed for nonstandard mapping modes. You will be changing the view's base class from CScrollView to CLogScrollView, which is a class that I created by copying and modifying the MFC code in ViewScrl.cpp. The files LogScrollView.h and LogScrollView.cpp are in the \vcpp32\ex19a directory on the companion CD-ROM.

  10. Insert the CScrollView class into the project. Copy the files LogScrollView.h and LogScrollView.cpp from the companion CD-ROM if you have not done so already. Choose Add To Project from the Project menu, and then choose Files from the submenu. Select the two new files and click OK to insert them into the project.

  11. Edit the StringView.h header file. Add the following line at the top of the file:

    #include "LogScrollView.h"

    Then change the line

    class CStringView : public CScrollView

    to

    class CStringView : public CLogScrollView

  12. Edit the StringView.cpp file. Globally replace all occurrences of CScrollView with CLogScrollView. Then edit the OnInitialUpdate function. Here is the edited code, which is much shorter:

    void CStringView::OnInitialUpdate()
    {
        CLogScrollView::OnInitialUpdate();
        CSize sizeTotal(m_rectPrint.Width(), -m_rectPrint.Height());
        SetLogScrollSizes(sizeTotal);
    }

  13. Build and test the application again. Now the screen should look like this.

Click to view at full size.

Reading the Printer Rectangle

The EX19A program prints in a fixed-size rectangle that's appropriate for a laser printer set to portrait mode with 8.5-by-11-inch (letter-size) paper. But what if you load European-size paper or you switch to landscape mode? The program should be able to adjust accordingly.

It's relatively easy to read the printer rectangle. Remember the CPrintInfo pointer that's passed to OnPrint? That structure has a data member m_rectDraw that contains the rectangle in logical coordinates. Your overridden OnPrint function simply stuffs the rectangle in a view data member, and OnDraw uses it. There's only one problem: you can't get the rectangle until you start printing, so the constructor still needs to set a default value for OnDraw to use before printing begins.

If you want the EX19A program to read the printer rectangle and adjust the size of the scroll view, use ClassWizard to override OnPrint and then code the function as follows:

void CStringView::OnPrint(CDC* pDC, CPrintInfo* pInfo)
{
    m_rectPrint = pInfo->
m_rectDraw;
    SetLogScrollSizes(CSize(m_rectPrint.Width(), 
                      -
m_rectPrint.Height()));
    CLogScrollView::OnPrint(pDC, pInfo);
}