The weather map server isn't interesting enough to make into a real
project. You'll probably find the EX35A example more to your taste. It's a real
Internet commerce application—a pizza-ordering program. Imagine a computer-controlled
pizza oven and a robot arm that selects frozen pizzas.
(Microsoft Internet Explorer 17.0 is supposed to be able to deliver the hot pizzas
directly from your clients' monitors, but in the meantime, you'll have to hire
some delivery drivers.)
The First Step—Getting the Order
Junior sales trainees are constantly admonished to "get the order." That's certainly necessary in any form of commerce, including the Internet. When the hungry customer hyperlinks to your site (by clicking on a picture of a pizza, of course), he or she simply downloads an HTML file that looks like this:
<html>
<head><title>Inside Visual C++ HTML Form 1</title>
</head>
<body>
<h1><center>Welcome to CyberPizza</center></h1>
<p> Enter your order.
<form action="scripts/ex35a.dll?ProcessPizzaForm" method=POST>
    <p> Your Name: <input type="text" name="name" value="">
    <p> Your Address: <input type="text" name="address" value="">
    <p> Number of Pies: <input type="text" name="quantity" value=1>
    <p>Pizza Size:
        <menu>
            <li><input type="radio" name="size" value=8>8-inch
            <li><input type="radio" name="size" value=10>10-inch
            <li><input type="radio" name="size" value=12 checked>12-inch
            <li><input type="radio" name="size" value=14>14-inch
        </menu>
    <p> Toppings:
    <p>
        <input type="checkbox" name="top1" value="Pepperoni" checked>
            Pepperoni
        <input type="checkbox" name="top2" value="Onions"> Onions
        <input type="checkbox" name="top3" value="Mushrooms"> Mushrooms
        <input type="checkbox" name="top4" value="Sausage"> Sausage
    <p>
        <em>(you can select multiple toppings)</em>
    <p><input type="submit" value="Submit Order Now"><input type="reset">
</form>
</body></html>
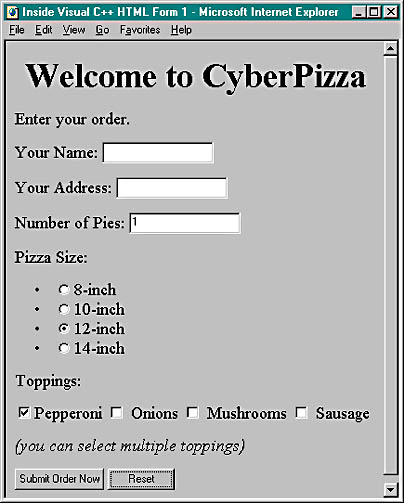
Figure 35-6 shows how the order form appears in the browser.
Figure 35-6. The CyberPizza order form.
So far, no ISAPI DLL is involved. When the customer clicks the Submit Order Now button, the action begins. Here's what the server sees:
POST scripts/ex35a.dll?ProcessPizzaForm HTTP/1.0
(request headers)
(blank line)
name=Walter+Sullivan&address=Redmond%2C+WA&quantity=2&size=12&top1=Pepperoni
    &top3=Mushrooms
Looks like Walter Sullivan has ordered two 12-inch pepperoni and mushroom pizzas. The browser inserts a + sign in place of a space, the %2C is a comma, and the & is the parameter separator. Now let's look at the parse map entries in ex35a.cpp:
ON_PARSE_COMMAND(ProcessPizzaForm, CEx35aExtension,
    ITS_PSTR ITS_PSTR ITS_I4 ITS_PSTR ITS_PSTR ITS_PSTR ITS_PSTR ITS_PSTR)
ON_PARSE_COMMAND_PARAMS("name address quantity size top1=~ top2=~ top3=~ top4=~")
Optional ParametersWhen you write your parse map statements, you must understand the browser's rules for sending parameter values from a form. In the EX35A pizza form, the browser always sends parameters for text fields, even if the user enters no data. If the user left the Name field blank, for example, the browser would send name=&. For check box fields, however, it's a different story. The browser sends the check box parameter value only if the user checks the box. The parameters associated with check boxes are thus defined as optional parameters.
If your parse macro for parameters looked like this
ON_PARSE_COMMAND_PARAMS("name address quantity size top1 top2 top3 top4")there would be trouble if the customer didn't check all the toppings. The HTTP request would simply fail, and the customer would have to search for another pizza site. The =~ symbols in the ex35a.cpp code designate the last four parameters as optional, with default values ~. If the Toppings option is checked, the form transmits the value; otherwise, it transmits a ~ character, which the DLL can test for. Optional parameters must be listed last.
The DLL's ProcessPizzaForm function reads the parameter values and produces an HTML confirmation form, which it sends to the customer. Here is part of the function's code:
        *pCtxt << "<form action=\"ex35a.dll?ConfirmOrder\" method=POST>";
        *pCtxt << "<p><input type=\"hidden\" name=\"name\" value=\"";
        *pCtxt << pstrName << "\">"; // xref to original order
        *pCtxt << "<p><input type=\"submit\" value=\"Confirm and charge my credit card\">";
        *pCtxt << "</form>";
        // Store this order in a disk file or database, referenced by name
    }
    else {
        *pCtxt << "You forgot to enter name or address. Back up and try again. ";
    }
    EndContent(pCtxt);
The resulting browser screen is shown in Figure 35-7.

Figure 35-7. The pizza confirmation browser screen.
As you can see, we took a shortcut computing the price. To accept,
the customer clicks the submit button named Confirm And Charge My Credit Card.
The Second Step—Processing the Confirmation
When the user clicks the Confirm And Charge My Credit Card button, the browser sends a second POST request to the server, specifying that the CEx35aExtension::ConfirmOrder function be called. But now you have to solve a big problem. Each HTTP connection (request/response) is independent of all others. How are you going to link the confirmation request with the original order? Although there are different ways to do this, the most common approach is to send some text back with the confirmation in a hidden input tag. When the confirmation parameter values come back, the server uses the hidden text to match the confirmation to the original order, which it has stored somewhere on its hard disk.
In the EX35A example, the customer's name is used in the hidden field, although it might be safer to use some combination of the name, date, and time. Here's the HTML code that CEx35aExtension::ProcessPizzaForm sends to the customer as part of the confirmation form:
<input type="hidden" name="name" value="Walter Sullivan">
Here's the code for the CEx35aExtension::ConfirmOrder function:
void CEx35aExtension::ConfirmOrder(CHttpServerContext* pCtxt,
    LPCTSTR pstrName)
{
    StartContent(pCtxt);
    WriteTitle(pCtxt);
    *pCtxt << "<p>Our courteous delivery person will arrive within 30 minutes. ";
    *pCtxt << "<p>Thank you, " << pstrName << ", for using CyberPizza. ";
    // Now retrieve the order from disk by name, and then make the pizza.
    //  Be prepared to delete the order after a while if the customer
    //  doesn't confirm.
    m_cs.Lock(); // gotta be threadsafe
    long int nTotal = ++m_nTotalPizzaOrders;
    m_cs.Unlock();
    *pCtxt << "<p>Total pizza orders = " << nTotal;
    EndContent(pCtxt);
}
The customer's name comes back in the
pstrName parameter, and that's what you use to retrieve the original order from disk. The function also keeps track of the total number of orders, using a critical section
(m_cs) to ensure thread synchronization.
Building and Testing ex35a.dll
If you have copied the code from the companion CD-ROM, your project is located in \vcpp32\ex35a. Building the project adds a DLL to the Debug subdirectory. You must copy this DLL to a directory that the server can find and copy PizzaForm.html also. You can use the scripts and wwwroot subdirec- tories already under \Winnt\System32\inetsrv, or you can set up new virtual directories.
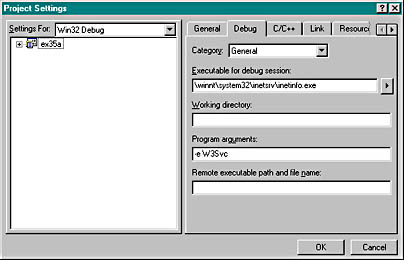
If you make changes to the EX35A DLL in the Visual C++ project, be sure to use Internet Service Manager (Figure 35-1) to turn off the WWW service (because the old DLL stays loaded), copy the new DLL to the scripts directory, and then turn the WWW service on again. The revised DLL will be loaded as soon as the first client requests it.
If everything has been installed correctly, you should be able to
load PizzaForm.html from the browser and then order some pizza. Enjoy!
Debugging the EX35A DLL
The fact that IIS is a Windows NT service complicates debugging ISAPI DLLs. Services normally run as part of the operating system, controlled by the service manager database. They have their own window station, and they run on their own invisible desktop. This involves some of the murkier parts of Windows NT, and not much published information is available.
However, you can use these steps to debug your EX35A DLL (or any ISAPI DLL):