Visual C++ for Windows CE is an add-on to Visual C++. When you install C++ for Windows CE, it extends the Visual C++ environment by adding several Windows CE-specific features:
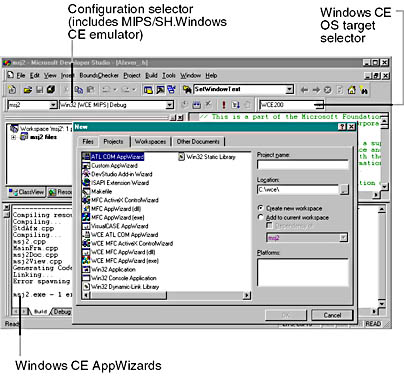
One interesting aspect of Visual C++ for Windows CE is the fact that it also supports the older 1.0 and 1.01 versions of Windows CE. Figure 38-5 shows the Windows CE operating system and processor configuration bars that have been added to Visual C++.
While the environment lets you remotely run and debug your applications on a connected Windows CE device, it also includes a very powerful Windows CE emulation environment. The Windows CE emulator (WCE) is an Intel-based software-only version of Windows CE that runs on your desktop and gives you the convenience of being able to run and test your applications on your development machine. Of course, to ensure that your applications work correctly, you still need to test on real devices, but the emulator takes much of the pain out of the early compile and debug stages of Windows CE development. Figure 38-6 shows the emulation environment in action.
There are four Windows-CE-specific AppWizards that ship with Visual C++ for WCE:
Figure 38-5. Visual C++ for the Windows CE environment.
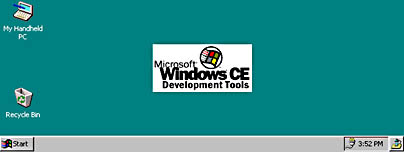
Figure 38-6. The Windows CE emulator.
The WCE AppWizards are basically the same as their big brother Win32 counterparts, except that they have different features that take advantage of the Windows CE operating system, such as the Windows CE help environment. Figure 38-7 shows the first three steps of the Windows CE MFC executable AppWizard. Notice that there are only two project types: SDI and dialog-based. Notice also the variety of Windows-CE-specific options that you can choose from.
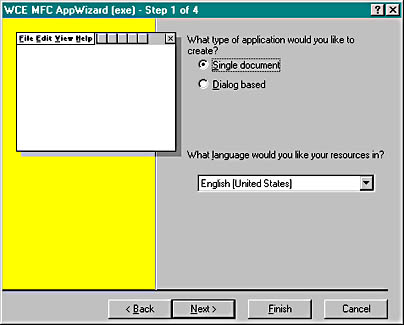


Figure 38-7. The Windows CE MFC AppWizard.
MFC for Windows CE
Visual C++ for Windows CE ships with a smaller version of MFC named Mini MFC. To get a feel for which MFC classes are and are not supported, see Figure 38-8—the MFC for Windows CE hierarchy chart. The grayed out classes are not supported on Windows CE.
Several classes have been added to Mini MFC, including classes for command bars, object store, and socket classes. Windows CE functions provide the command bars in the Mini MFC CFrameWnd class.
Instead of implementing a file metaphor, Windows CE provides an object store. Several new MFC classes were added to give the Windows CE developer access to the object store:
In addition to these data store classes, a new class CCeSocket is provided. CCeSocket implements an asynchronous CSocket derivative.
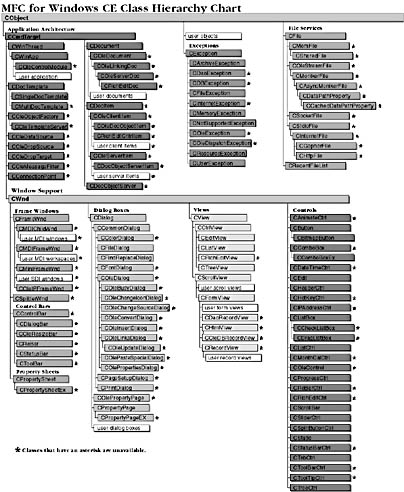
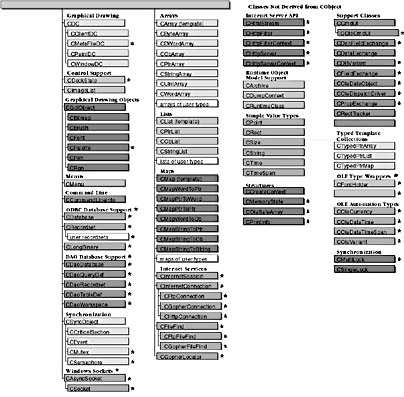
Figure 38-8. MFC for Windows CE hierarchy chart.
Using Mini MFC
Let's look at a couple of examples to get a feel for the Mini version of MFC. In example EX38A, we will create a basic SDI application that draws some text in the view and displays a dialog when the user presses the left mouse button (or taps the screen on a Windows CE machine). EX38A is similar to the EX06A example, so you can compare the steps in creating a similar application for Windows 98, Windows NT, and Windows CE. For this example, you will create a simulated expense-tracking application for Windows CE—a perfect candidate for portable computing. For demonstration purposes, we will focus on creating a dialog that allows the user to enter expense information. Figure 38-9 shows the application running in the emulation environment.
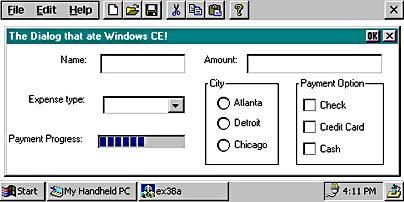
Figure 38-9. The EX38A expense-tracking application.
Here are the steps to create the EX38A example:

(You might also need to set the dialog's Visible property on the More Styles tab.)
If you need a refresher on how to program modal dialogs, please refer to Chapter 6.
Next, add the following code to the CEx38aDialog::OnInitDialog handler to initialize the controls:
BOOL CWindowsCEDlg::OnInitDialog()
{
    CDialog::OnInitDialog();
    m_pComboBox.AddString(_T("Travel"));
    m_pComboBox.AddString(_T("Meal"));
    m_pComboBox.AddString(_T("Cab Fare"));
    m_pComboBox.AddString(_T("Entertainment"));
    m_pComboBox.AddString(_T("Other"));
    m_pProgressCtrl.SetPos(50);

    return TRUE;
}
Notice that you must use the _T macro whenever you have inline strings.
void CEx38aView::OnLButtonDown(UINT nFlags, CPoint point)
{
    CWindowsCEDlg dlg;
    dlg.DoModal();
    CView::OnLButtonDown(nFlags, point);
}
void CEx38aView::OnDraw(CDC* pDC)
{
    CRect rect;
    GetClientRect(rect);

    pDC->SetTextColor(::GetSysColor(COLOR_WINDOWTEXT));
    pDC->SetBkMode(TRANSPARENT);

    pDC->DrawText(_T("Press the left mouse button here."),
        rect, DT_SINGLELINE);
}
#include "ex38aDialog.h"
at the top of the ex38aView.cpp source file, after the statement
#include "ex38aView.h"
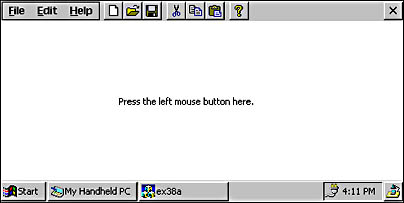
Figure 38-10. The EX 38A application running in the Windows CE emulator.
As you can tell from the EX38A application, programming for Windows CE is very similar to programming for Windows 98 and Windows.
Many Windows CE developers are interested in porting existing
applications to the Windows CE environment. The next section shows you how
to tackle this problem.
Porting an Existing MFC Application to Windows CE
In example EX38B we will port an existing application (EX06B from Chapter 6) from Windows 98 and Windows NT to Windows CE.
We chose the EX06B sample because it is an SDI application. If you are porting an MDI application to Windows CE, we recommend that you first convert it into an SDI application (or a series of SDI applications, if you have several views) and then port it to Windows CE.
Here are the steps for converting EX06B:
TRACE("updating trackbar data members\n");
should be changed to use the _T macro as follows:
TRACE(_T("updating trackbar data members\n"));
    CRect rect;
    GetClientRect(rect);

    pDC->SetTextColor(::GetSysColor(COLOR_WINDOWTEXT));
    pDC->SetBkMode(TRANSPARENT);

    pDC->DrawText(_T("Press the left mouse button here."),
        rect, DT_SINGLELINE);
Also, make sure that ex38b.cpp #includes both the ex06bView.h and ex06bDoc.h header files.
Figure 38-11 shows EX38B running in emulation mode for Window CE.
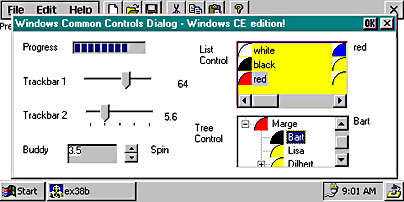
Figure 38-11. The EX38B application running in the Windows CE emulator.
ATL and Windows CE
In addition to Mini MFC, Visual C++ for Windows CE also provides a Windows CE-friendly version of ATL. ATL is already a lightweight framework, so Microsoft didn't need to reduce the feature set for size constraints. However, there are some areas of COM not covered by Windows CE 2.0 that impact the feature set of ATL for Windows CE.
Windows CE doesn't support the apartment-threading model, so ATL for Windows CE doesn't implement the CComApartment, CComAutoThreadModule, CComClassFactoryAutoThread, or CComSimpleThreadAllocator classes.
Windows CE also doesn't support asynchronous monikers, so ATL for Windows CE doesn't implement the IBindStatusCallbackImpl or CBindStatusCallback classes. A variety of other ATL class member functions that behave differently on Windows CE are documented in the Visual C++ for Windows CE documentation.
In addition to ATL, a Windows CE version of the ATL Wizard is provided. Figure 38-12 shows the wizard that has only one option: to use MFC or not.
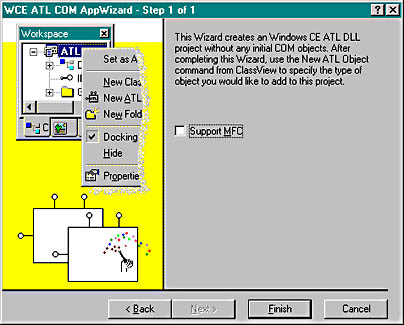
Figure 38-12. The WCE ATL COM AppWizard.
When you write ActiveX controls for Windows CE, remember that they are binary objects and therefore processor-dependent. Depending on the devices you plan to support, you might have to provide several versions of the control (MIPS or SH, for example).