6.1. Using Logical Volume ManagementFedora uses the Linux Logical Volume Management (LVM) system by default for disk storage. LVM combines one or more disk partitions, called Physical Volumes (PVs), into a pool of storage called a Volume Group (VG). From this volume group, one or more Logical Volumes (LVs) are allocated. Each LV is used as a block storage device to contain a filesystem or a swapspace. Here's where the fun begins: LVs can be resized, created, or deleted on the fly, and disks can be added and deletedwhile the system is in use!
6.1.1. How Do I Do That?Fedora Core permits you to manage logical volumes graphically or from the command line.
Although you can increase or decrease the size of any logical volume at any time, an ext3 filesystem within a logical volume can be reduced in size only when it is not in use (unmounted). If the filesystem is the root filesystem, it is in use whenever the system is running; therefore, the only way to shrink the root filesystem is to use another disk as a temporary root filesystem, which is usually done by running the system from the installation CD in rescue mode (see Lab 10.6, "Using Rescue Mode on an Installation Disc"). There is also a limit to how large a filesystem can grow while in use; growing the filesystem past that point must be done when the filesystem is unmounted. 6.1.1.1. Managing LVM graphicallyStart the
LVM administration tool by selecting System Figure 6-1. Logical Volume Management window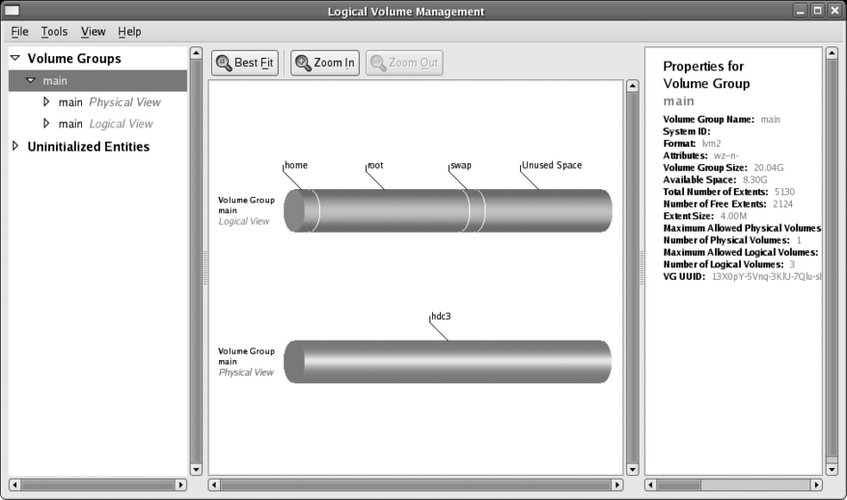
The left pane displays a list of the elements managed by LVM, the middle pane displays the current element in visual form, and the right pane displays a description of the current element. The element list in the left pane is a collapsing outline. To view the elements within a particular category, click on the small arrow to the left of the category name to rotate it to a downward-pointing position; the elements within that category will be listed immediately below it. For example, to see the logical volumes within the main volume group (VolGroup00 if you used the default Fedora configuration), click on the arrow beside "main Logical View" (or "VolGroup00 Logical View"), and a list of volume groups will appear beneath that line. The initial display shows the physical (red) and logical (blue) views of the last volume group listed. If you click on a logical volume in the Logical View, the corresponding areas in the physical view are highlighted, as shown in Figure 6-2. Figure 6-2. Viewing the location of LV data within PVs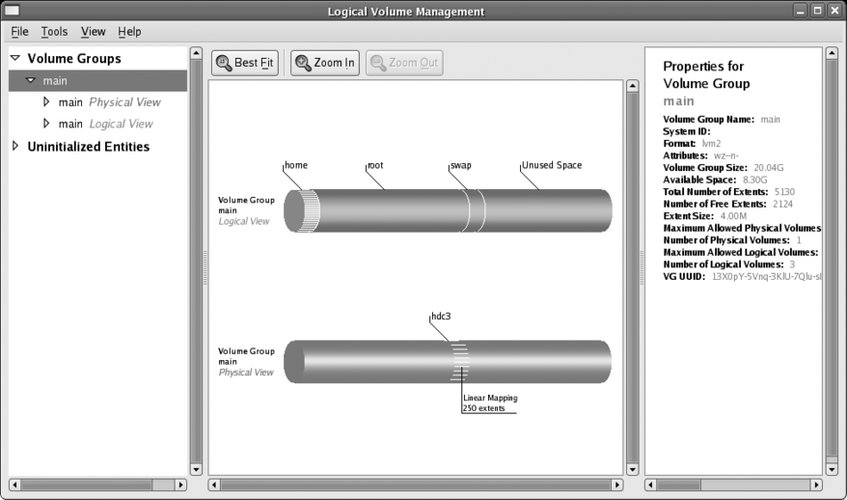
6.1.1.1.1. Growing a logical volumeTo increase the size of a logical volume and the filesystem contained in it, select that LV in the lefthand pane, and then click Edit Properties. A properties dialog like the one in Figure 6-3 will appear. Figure 6-3. LVM properties dialog
Change the unit control from Extents to Gigabytes or Megabytes so that the LV size is displayed in meaningful units; then click on the horizontal slider and drag it to the desired size (or type the size into the "LV size" field or click "Use Remaining"). Click OK. The LV will be resized, then the filesystem will be resized, and then the LVM information will be reloaded to update the display. On most systems, this will take just a few seconds.
6.1.1.2. Shrinking a logical volumeShrinking a logical volume using the graphical tool is done exactly the same way as growing it: select the LV you wish to resize, click Edit Properties, enter the new size, and click OK. The catch is that logical volumes containing ext3 filesystems can be reduced in size only when they are unmounted, so you will be asked if the filesystem may be unmounted during the resize operation. Click Yes. Whenever the system is booted normally, the root (/) and /var filesystems will be in use, so you will not be able to unmount them, and therefore the resize will fail. You'll need to use a special procedure (detailed shortly) to shrink those filesystems. The /home filesystem is a different story; if you log in as root instead of using a normal user account, the /home filesystem will not be in use, and you can successfully shrink /home. If any non-root users have logged in since the system was booted, they may have left processes running, such as the esound daemon (esd). These can be terminated with the fuser command: # fuser -k /home/* /home/chris: 13464c The output shows that the directory /home/chris was in use as the current directory (c) of process 13464. That process is killed, as specified by the -k option. Once this has been done, you can resize the /home directory. 6.1.1.2.1. Creating a new logical volumeYou can create a new logical volume at any time, as long as there is some free space in the volume group you wish to use. Select the volume group's Logical View element in the lefthand panel, then click Create New Logical Volume at the bottom of the center panel. The dialog shown in Figure 6-4 will appear. Figure 6-4. Create New Logical Volume dialog
Enter an LV name consisting of letters, digits, and underscores. Change the LV size unit from Extents to Gigabytes (or Megabytes) and enter the desired LV size directly or by using the slider (click the "Use remaining" button to use all of the free space in the PV). To create a filesystem in this LV, change the Filesystem type control (near the bottom of the dialog) from None to ext3, and select the checkboxes for Mount and "Mount when rebooted." In the "Mount point" field, type the name of the directory where you wish the new filesystem to appear. For example, to create a 10 GB partition for music and video files, you could enter an LV name of multimedia, set the size to 10 GB, and create an ext3 filesystem with a mount point of /media. Click OK. The LV and filesystem will be created and mounted, and you can start using the filesystem immediately. 6.1.1.2.2. Creating a snapshotLVM has the ability to create a snapshot of an LV. The snapshot is an exact copy of the LV as it stood when the snapshot was created, but this is an illusion because the snapshot really stores only a copy of data that was changed since the snapshot was created. You can change the data in the origin LV without affecting the snapshot, and change the data in the snapshot without affecting the original LV. Snapshots enable you to make a self-consistent backup of a filesystem to media such as tape. If you don't use snapshots and you back up an active filesystem containing a database to tape, the database tables would get copied at different times; if the database contained e-commerce data, perhaps the customer table would get copied before the order table. If an order was received from a new customer while the backup was in progress, it is possible that the order table on the tape will include the order but the customer table may not include the new customer. This could lead to severe problems when trying to use the data at a later time. On the other hand, if you take a snapshot and then back that up, the various files will all be in the same state on tape. In addition, snapshots are useful for self-administered document recovery: if you take a snapshot of your users' files each night and make that snapshot available to them, they can recover from their own mistakes if they mess up a spreadsheet or delete an important document. For example, if you take a snapshot of /home and make it available as /yesterday/home, the deleted document /home/jamie/budget.ods can be recovered as /yesterday/home/jamie/budget.ods. Snapshots are also used to test software or procedures without affecting live data. For example, if you take a snapshot of the logical volume containing the /home filesystem, and then unmount the original filesystem and mount the snapshot in its place, you can experiment with procedures that change the contents of home directories. To undo the results of your experiments, simply unmount the snapshot, remount the original directory, and then destroy the snapshot. To create a snapshot of a LV using the graphical tool, select the LV in the left pane, and then click on the Create Snapshot button at the bottom of the middle pane. You will see the dialog box shown in Figure 6-5. Figure 6-5. Creating a snapshot
This dialog looks a lot like the dialog used to create a logical volume (Figure 6-4), and it shouldbecause a snapshot is a special type of LV. Enter a name for the snapshot; I recommend the name of the origin LV, with -snap added to the end. For example, a snapshot of the multimedia LV would be called multimedia-snap. Next, set the size of the snapshot. The snapshot will appear to be the same size as the origin LV; the size setting here is used to reserve disk space to track the differences between the origin LV and the snapshot. Therefore, if you have a 100 GB LV and the data in that LV changes slowly, a 1 GB snapshot might be reasonable; but if the data in that LV changes rapidly, you will need a much larger snapshot size. Select the Mount and "Mount when rebooted" checkboxes, and then enter the "Mount point" that you wish to use (such as /backup/media). You can view the amount of storage used by the snapshot by selecting the snapshot LV in the left pane, then looking at the snapshot usage in the right pane. The usage is reported as a percentage of the total snapshot size and increases as data is changed in the origin or snapshot volumes. If it approaches 100 percent, you can increase the size of the snapshot LV in the same way that you would resize a regular LV. 6.1.1.2.3. Removing a logical volume or a snapshotTo permanently remove a logical volume, select it in the left pane, and then click the Remove Logical Volume button at the bottom of the middle pane. A dialog box will appear, asking you to confirm your choice; when you click Yes, the logical volume will be gone forever. 6.1.1.2.4. Adding a partitionYou can add a partition to a volume group at any time. The first step is to make the partition a physical volume. Select the disk partition you wish to use under Uninitialized Entities in the left pane, and then click the Initialize Entity button at the bottom of the center pane. A dialog box will warn you of possible data loss; double-check the partition information, and then click Yes if you are certain that you will not lose any critical data.
If the Initialize Entity button is deactivated (grayed-out and unclickable), look in the right pane for the reason that the partition is "Not initializable." The most common reason given is Foreign boot partition, which means that the partition is marked as bootable in the drive's partition table. To correct this, use fdisk on the disk containing the partition; for example, run fdisk on the disk /dev/sdb to edit the settings for the partition /dev/sdb1: # fdisk /dev/sdb fdisk accepts single-letter commands. Enter p to print the partition table: Command (m for help): p Disk /dev/sdb: 8 MB, 8192000 bytes 4 heads, 16 sectors/track, 250 cylinders Units = cylinders of 64 * 512 = 32768 bytes Device Boot Start End Blocks Id System /dev/sdb1 * 1 250 7987+ 1 FAT12 There is only one partition on this particular disk, and it is bootable (note the * in the Boot column). Use the a (activate) command to toggle the boot flag: Command (m for help): a
Partition number (1-4):
1Then use w to write the partition table to disk and exit: Command (m for help): w The partition table has been altered! Calling ioctl( ) to re-read partition table. Syncing disks. You can now rerun the graphical LVM administration tool and initialize the partition for use with LVM. This gives you a new physical volume that you can work with. The next step is to add the new physical volume to the volume group. You'll see the newly initialized partition under Unallocated Volumes in the left pane. Click on it, and then click on the button labeled "Add Volume to existing Volume Group." A menu of volume groups will appear; select the one to add it to, and then click Add. Once you've added a PV, you can use the extra space to create new logical volumes or grow an existing volume. 6.1.1.2.5. Removing a partitionTo take a physical volume (partition) out of a volume group, select the PV in the left pane, and then click "Remove Volume from Volume Group." You will be prompted for confirmation (including any move of data to another device), and the PV will be removed (as long as the free space in the VG exceeds the size of the PV; otherwise, removing the PV would destroy data). 6.1.1.3. Managing LVMs from the command lineLogical volumes are almost always used to contain filesystems (the other common use is to hold swapspace). In essence, an LV serves as a container for a filesystem. This has several ramifications:
Fedora's LVM2 system provides the lvm command for administration. Typing lvm by itself starts a specialized shell: # lvm lvm> At the lvm> prompt, you can enter any of the subcommands shown in Table 6-1. You can also enter any of these subcommands as the first argument on the lvm command line: # lvm lvs LV VG Attr LSize Origin Snap% Move Log Copy% home main -wi-ao 1.00G multimedia main -wi-ao 512.00M root main -wi-ao 9.77G swap main -wi-ao 1.00G Symbolic links have been set up from /usr/sbin/<subcommand> to /usr/sbin/lvm, so you can just type the name of the subcommand at the regular bash shell prompt: # ls -l /usr/sbin/lvs lrwxrwxrwx 1 root root 3 Mar 20 14:49 /usr/sbin/lvs -> lvm # lvs LV VG Attr LSize Origin Snap% Move Log Copy% home main -wi-ao 1.00G multimedia main -wi-ao 512.00M root main -wi-ao 9.77G swap main -wi-ao 1.00G
6.1.1.3.1. LVM device namesLogical volumes can be accessed using any of three different device nodes:
In addition to these device node names, some LVM commands allow the volume group and logical volume names to be written as vg / lvfor example, main/multimedia refers to the LV multimedia within the VG main. 6.1.1.3.2. Getting information about LVM elementsTo discover the VGs present on your system, use the vgs command: # vgs VG #PV #LV #SN Attr VSize VFree main 2 4 0 wz--n- 20.04G 7.78G This shows the volume group name, the number of physical volumes, logical volumes, and snapshots; attributes (see the manpage for lvm for details); the volume group size; and the amount of space that is not assigned to a logical volume. vgdisplay shows the same information as vgs but in a more verbose form: # vgdisplay --- Volume group --- VG Name main System ID Format lvm2 Metadata Areas 2 Metadata Sequence No 51 VG Access read/write VG Status resizable MAX LV 0 Cur LV 4 Open LV 4 Max PV 0 Cur PV 2 Act PV 2 VG Size 20.04 GB PE Size 4.00 MB Total PE 5131 Alloc PE / Size 3140 / 12.27 GB Free PE / Size 1991 / 7.78 GB VG UUID 13X0pY-5Vnq-3KlU-7Qlu-sHUc-wrup-zsHipP The VG UUID at the bottom is a unique ID number placed in the disk label of each PV to identify that it is part of this volume group.
To list the PVs present, use pvs or pvdisplay: # pvs PV VG Fmt Attr PSize PFree /dev/hdc3 main lvm2 a- 20.04G 7.77G /dev/sdb1 main lvm2 a- 4.00M 4.00M # pvdisplay --- Physical volume --- PV Name /dev/hdc3 VG Name main PV Size 20.04 GB / not usable 0 Allocatable yes PE Size (KByte) 4096 Total PE 5130 Free PE 1990 Allocated PE 3140 PV UUID RL2wrh-WMgl-pyaR-bHt4-6dCv-23Fd-kX1gvT --- Physical volume --- PV Name /dev/sdb1 VG Name main PV Size 4.00 MB / not usable 0 Allocatable yes PE Size (KByte) 4096 Total PE 1 Free PE 1 Allocated PE 0 PV UUID HvryBh-kGrM-c10y-yw1v-u8W3-r2LN-5LrLrJ In this case, there are two PVs present: /dev/hdc3 (an IDE hard disk partition) and /dev/sdb1 (a USB disk I was playing with). Both are part of the VG main. The display shows the attributes (see man lvm), size, and amount of unallocated space. In a similar way, you can see logical volume information with lvs or lvdisplay: # lvs
LV VG Attr LSize Origin Snap% Move Log Copy%
home main -wi-ao 1.00G
multimedia main owi-ao 512.00M
multimedia-snap main swi-a- 128.00M multimedia 0.02
root main -wi-ao 9.77G
swap main -wi-ao 1.00G
# lvdisplay
--- Logical volume ---
LV Name /dev/main/root
VG Name main
LV UUID LaQgYA-jiBr-G02i-y64m-90fT-viBp-TuZ9sC
LV Write Access read/write
LV Status available
# open 1
LV Size 9.77 GB
Current LE 2500
Segments 1
Allocation inherit
Read ahead sectors 0
Block device 253:0
...(Lines snipped)...
--- Logical volume ---
LV Name /dev/main/multimedia
VG Name main
LV UUID f7zJvh-H21e-fSn7-llq3-Ryu1-p1FQ-PTAoNC
LV Write Access read/write
LV snapshot status source of
/dev/main/multimedia-snap [active]
LV Status available
# open 1
LV Size 512.00 MB
Current LE 128
Segments 1
Allocation inherit
Read ahead sectors 0
Block device 253:3
--- Logical volume ---
LV Name /dev/main/multimedia-snap
VG Name main
LV UUID 7U5wVQ-qIWU-7bcz-J4vT-zAPh-xGVN-CDNfjx
LV Write Access read/write
LV snapshot status active destination for /dev/main/multimedia
LV Status available
# open 0
LV Size 512.00 MB
Current LE 128
COW-table size 128.00 MB
COW-table LE 32
Allocated to snapshot 0.02%
Snapshot chunk size 8.00 KB
Segments 1
Allocation inherit
Read ahead sectors 0
Block device 253:6This display shows the volume group, attributes (again, see man lvm), and logical volume size. Additional information is shown for snapshot volumes and LVs that are being copied or moved between PVs. The Block device shown in the lvdisplay output is the major and minor device number. 6.1.1.3.3. Growing a logical volumeTo increase the size of a logical volume, use the lvextend command: # lvextend /dev/main/multimedia --size 1G Extending logical volume multimedia to 1.00 GB Logical volume multimedia successfully resized Specify the LV device as the first argument, and use the --size option to specify the new size for the volume. Use a numeric size with one of the size suffixes from Table 6-2 as the value for the --size option.
Once you have resized the LV, resize the filesystem contained inside: #
resize2fs /dev/main/multimedia
resize2fs 1.39 (29-May-2006)
Resizing the filesystem on /dev/main/multimedia to 1048576 (1k) blocks.
The filesystem on /dev/main/multimedia is now 1048576 blocks long.Note that you do not need to specify the filesystem size; the entire LV size will be used.
6.1.1.3.4. Shrinking a logical volumeBefore reducing the size of a logical volume, you must first reduce the size of the filesystem inside the LV. This must be done when the filesystem is unmounted: # umount /dev/main/multimedia Next, run a filesystem check to verify the integrity of the filesystem. This is required in order to prevent data loss that may occur if there is data near the end of the filesystem (this is the area that will be freed up by shrinking) and that data is not properly accounted for in the filesystem tables: # fsck -f /dev/main/multimedia e2fsck 1.38 (30-Jun-2005) Pass 1: Checking inodes, blocks, and sizes Pass 2: Checking directory structure Pass 3: Checking directory connectivity Pass 4: Checking reference counts Pass 5: Checking group summary information /dev/main/multimedia: 11/117248 files (9.1% non-contiguous), 8043/262144 blocks Now use resize2fs to reduce the size of the filesystem: # resize2fs /dev/main/multimedia 740M resize2fs 1.38 (30-Jun-2005) Resizing the filesystem on /dev/main/multimedia to 189440 (4k) blocks. The filesystem on /dev/main/multimedia is now 189440 blocks long. Note that resize2fs expects the size to be the second argument (there is no --size option as there is with the LVM commands).
Both the filesystem commands and the LVM commands round off sizes to the closest multiple of their internal allocation units. This means that resize2fs and lvreduce may interpret a size such as 750M slightly differently. In order to avoid the potential disaster of resizing the LV to be smaller than the filesystem, always resize the filesystem so that it is slightly smaller than the planned LV size, resize the LV, and then grow the filesystem to exactly fill the LV. In this case, I'm resizing the filesystem to 740 MB and will resize the LV to 750 MB. Now that the filesystem has been resized, you can shrink the logical volume: # lvreduce /dev/main/multimedia --size 750M Rounding up size to full physical extent 752.00 MB WARNING: Reducing active logical volume to 752.00 MB THIS MAY DESTROY YOUR DATA (filesystem etc.) Do you really want to reduce multimedia? [y/n]: y Reducing logical volume multimedia to 752.00 MB Logical volume multimedia successfully resized Finally, grow the filesystem to completely fill the logical volume: # resize2fs /dev/main/multimedia resize2fs 1.38 (30-Jun-2005) Resizing the filesystem on /dev/main/multimedia to 192512 (4k) blocks. The filesystem on /dev/main/multimedia is now 192512 blocks long. 6.1.1.3.5. Creating a new logical volumeThe lvcreate command will create a new volume: # lvcreate main --name survey --size 5G Logical volume "survey" created #
mkfs -t ext3 -L survey -E resize=20G /dev/main/survey
mke2fs 1.38 (30-Jun-2005)
Filesystem label=survey
OS type: Linux
Block size=4096 (log=2)
Fragment size=4096 (log=2)
655360 inodes, 1310720 blocks
65536 blocks (5.00%) reserved for the super user
First data block=0
Maximum filesystem blocks=8388608
40 block groups
32768 blocks per group, 32768 fragments per group
16384 inodes per group
Superblock backups stored on blocks:
32768, 98304, 163840, 229376, 294912, 819200, 884736
Writing inode tables: done
Creating journal (32768 blocks): done
Writing superblocks and filesystem accounting information: done
This filesystem will be automatically checked every 36 mounts or
180 days, whichever comes first. Use tune2fs -c or -i to override.The -t ext3 option specifies the filesystem type, -L survey specifies a optional filesystem volume label (to identify the contents), and -E resize= 20G (also optional) configures a block group descriptor table large enough that the filesystem can be grown up to 20 GB while mounted. In this case, 20 GB is four times the initial size of the filesystem; use whatever upper limit seems reasonable for your application (the table will take roughly 4 KB of space for each gigabyte in the filesystem maximum size, so the overhead is minimal). You can now mount the filesystem and use it. Here I'll use /usr/lib/survey as the mount point: # mkdir /usr/lib/survey # mount /dev/main/survey /usr/lib/survey To configure the Fedora system to mount this filesystem every time it is booted, add an entry to the file /etc/fstab: /dev/main/root / ext3 defaults 1 1 LABEL=/boot /boot ext3 defaults 1 2 devpts /dev/pts devpts gid=5,mode=620 0 0 tmpfs /dev/shm tmpfs defaults 0 0 proc /proc proc defaults 0 0 sysfs /sys sysfs defaults 0 0 /dev/main/swap swap swap defaults 0 0 /dev/main/home /home ext3 defaults 1 2 /dev/main/multimedia /tmp/media ext3 defaults 1 2 /dev/main/survey /usr/lib/survey ext3 defaults 1 2 The new line (highlighted in bold) contains the filesystem block device, the mount point, the filesystem type, any mount options (defaults specifies the default options, which include mounting the filesystem at boot time), whether the filesystem should be backed up (1 meaning yes), and the fsck sequence number (2 is for filesystems that should be checked but that are not the root filesystem). 6.1.1.3.6. Creating a snapshot logical volumeThe lvcreate command is also used to create snapshot volumes: # lvcreate -s /dev/main/survey --name survey-snap --size 500M Logical volume "survey-snap" created The -s option indicates that this is a snapshot LV. Specify the origin LV as the first positional argument, and use the --name and --size options as you would for a regular lvcreate command. However, the value given for the --size option must be the amount of space allocated for tracking the differences between the origin LV and the snapshot LV. Once the snapshot has been created, it can be mounted and used: # mkdir /usr/lib/survey-snap # mount /dev/main/survey-snap /usr/lib/survey-snap To have the snapshot automatically mounted when the system is booted, edit the file /etc/fstab in the same way that you would for a regular filesystem. To see how much of a snapshot's storage is in use, use lvs or lvdisplay: # lvs LV VG Attr LSize Origin Snap% Move Log Copy% home main -wi-ao 1.00G multimedia main -wi-a- 752.00M root main -wi-ao 9.77G survey main owi-ao 5.00G survey-snap main swi-ao 500.00M survey 8.27 swap main -wi-ao 1.00G # lvdisplay /dev/main/survey-snap--- Logical volume --- LV Name /dev/main/survey-snap VG Name main LV UUID IbG5RS-Tcle-kzrV-Ga9b-Jsgx-3MY6-iEXBGG LV Write Access read/write LV snapshot status active destination for /dev/main/survey LV Status available # open 1 LV Size 5.00 GB Current LE 1280 COW-table size 500.00 MB COW-table LE 125 Allocated to snapshot 8.27% Snapshot chunk size 8.00 KB Segments 1 Allocation inherit Read ahead sectors 0 Block device 253:7 In this case, 8.27% of the snapshot storage has been used, or about 41 MB. If this approaches 100%, you can grow the snapshot LV using lvextend in the same way that a regular LV is grown. 6.1.1.3.7. Removing a logical volumeTo remove a logical volume, unmount it, and then use lvremove: # umount /usr/lib/survey-snap # lvremove /dev/main/survey-snap Do you really want to remove active logical volume "survey-snap"? [y/n]: y Logical volume "survey-snap" successfully removed
6.1.1.3.8. Adding a partitionTo set up a partition for use as a physical volume, use the pvcreate command to write the LVM disk label, making the partition into a physical volume: # pvcreate /dev/sde1 Physical volume "/dev/sde1" successfully created
You can then add that PV to an existing volume group: # vgextend main /dev/sde1 Volume group "main" successfully extended 6.1.1.3.9. Removing a partitionThe vgreduce command is used to reduce the size of a volume group by removing a physical volume. It will fail if any space on the PV is in use: # vgreduce main /dev/sdb1 Physical volume "/dev/sdb1" still in use In this case, an attempt to remove /dev/sdb1 from the volume group main failed. To move the data off a PV (assuming that there is sufficient space available on other PVs in the volume group), use the pvmove command: # pvmove /dev/sde1/dev/sde1: Moved: 100.0% Depending on the amount of date to be moved, this operation can take quite a while to run. When it is complete, you can remove the physical volume: # vgreduce main /dev/sdb1 Removed "/dev/sdb1" from volume group "test" You can then use that partition for other uses. If you want to erase the LVM disk label, use the pvremove command: # pvremove /dev/sde1 Labels on physical volume "/dev/sde1" successfully wiped 6.1.1.4. Managing LVM in single-user modeSome filesystems, such as those containing /var or /etc, may be in use anytime the system is booted normally. This prevents the use of resize2fs to shrink ext2 and ext3 filesystems or to grow them large enough to exceed the block group descriptor table. To use resize2fs on these filesystems, you must use runlevel s, which is single-user mode. Boot your system, and press the spacebar when the GRUB boot screen appears. Press the A key to append text to the boot line; then type s and press Enter. After a few seconds, a root shell prompt will appear (sh-3.1#). At this shell prompt you can unmount the filesystem, then use fsck, resize2fs, and lvreduce (or lvextend). For example, to reduce the size of /home to 925 MB: sh-3.1# umount /home sh-3.1# fsck -f /dev/main/home e2fsck 1.38 (30-Jun-2005) Pass 1: Checking inodes, blocks, and sizes Pass 2: Checking directory structure Pass 3: Checking directory connectivity Pass 4: Checking reference counts Pass 5: Checking group summary information /dev/main/home: 121/256000 files (2.5% non-contiguous), 12704/262144 blocks sh-3.1# resize2fs /dev/main/home 900M resize2fs 1.38 (30-Jun-2005) Resizing the filesystem on /dev/main/home to 230400 (4k) blocks. The filesystem on /dev/main/home is now 229376 blocks long. sh-3.1# lvreduce /dev/main/home --size 950M Rounding up size to full physical extent 952.00 MB WARNING: Reducing active logical volume to 952.00 MB THIS MAY DESTROY YOUR DATA (filesystem etc.) Do you really want to reduce home? [y/n]: y Reducing logical volume home to 952.00 MB Logical volume home successfully resized sh-3.1# resize2fs /dev/main/home resize2fs 1.38 (30-Jun-2005) Resizing the filesystem on /dev/main/home to 243712 (4k) blocks. The filesystem on /dev/main/home is now 243712 blocks long.
Note that, as before, the filesystem was resized to be slightly smaller than the desired size, then expanded to fill the LV after the LV was resized. When you're done, type reboot or press Ctrl-Alt-Delete to restart the system. 6.1.1.5. Managing LVM in rescue modeTo reduce or substantially grow the root filesystem, you'll have to boot from a device other than your normal disk. The most convenient way to do this is to boot from the Fedora Core installation media; when the boot screen appears (Figure 1-1), type linux rescue and press Enter. After prompting you for the language (Figure 1-5) and keyboard type (Figure 1-6) the same way it does for a network installation (use the arrow keys and Enter to select the correct value for each), the system will ask if you wish to start the network interfaces, as shown in Figure 6-6. Select No by pressing Tab and then Enter. Figure 6-6. Rescue mode network interface dialog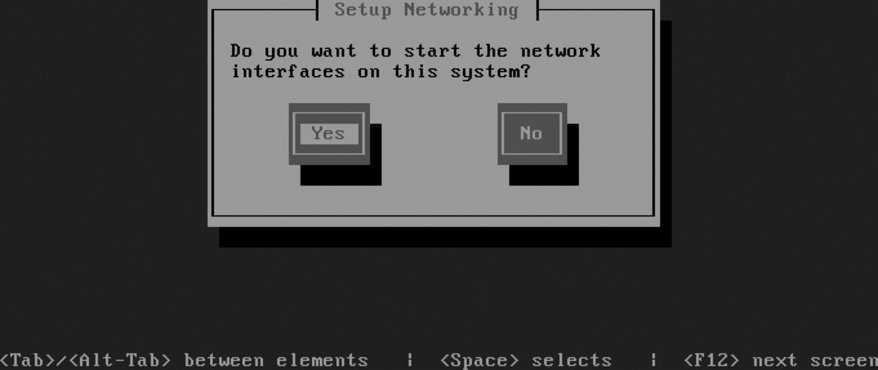
The next screen, shown in Figure 6-7, enables you to select filesystem mounting; select Skip by pressing Tab twice and then pressing Enter. Figure 6-7. Rescue mode filesystem mounting dialog
You will then be presented with a shell prompt (sh-3.1#). The LVM device nodes will not be present until you scan for them and activate them: sh-3.1# lvm vgscan Reading all physical volumes. This may take a while... Found volume group "main" using metadata type lvm2 sh-3.1# lvm vgchange -ay 3 logical volume(s) in volume group "main" now active
You can now resize the root partition: sh-3.1# fsck -f /dev/main/root WARNING: couldn't open /etc/fstab: No such file or directory e2fsck 1.38 (30-Jun-2005) Pass 1: Checking inodes, blocks, and sizes Pass 2: Checking directory structure Pass 3: Checking directory connectivity Pass 4: Checking reference counts Pass 5: Checking group summary information /dev/main/root: 134009/1532576 files (0.5% non-contiguous), 793321/1531904 blocks sh-3.1# resize2fs /dev/main/root 5600M resize2fs 1.38 (30-Jun-2005) Resizing the filesystem on /dev/main/root to 1433600 (4k) blocks. The filesystem on /dev/main/root is now 1433600 blocks long. sh-3.1# lvreduce /dev/main/root --size 5650M Rounding up size to full physical extent 5.53 GB WARNING: Reducing active logical volume to 5.53 GB THIS MAY DESTROY YOUR DATA (filesystem etc.) Do you really want to reduce root? [y/n]: y Reducing logical volume root to 5.53 GB Logical volume root successfully resized sh-3.1# resize2fs /dev/main/root resize2fs 1.38 (30-Jun-2005) Resizing the filesystem on /dev/main/root to 1449984 (4k) blocks. The filesystem on /dev/main/root is now 1449984 blocks long. Type exit or press Ctrl-D to exit from the rescue-mode shell. The system will then reboot; don't forget to remove the installation media. 6.1.2. How Does It Work?LVM works by dividing storage space into same-sized pieces called extents, which may be anywhere from 1 to 128 MB in size. The extents that make up physical storage are called physical extents (PEs); the extents that make up logical volumes are called logical extents (LEs). Obviously, each LE exists as a PE somewhere in the LVM system. A kernel facility called the device mapper converts between LE and PE extent numbers. When the physical extents are changedas the result of a pvmove, for examplethe logical extent numbers remain the same, providing continuity for the filesystem. Extents tend to be fairly largeanywhere from 8 KB to 16 GB in size, but typically in the 1 to 128 MB range (32 MB is the default extent size used during installation). Larger extent sizes cause a reduction in the LVM overhead because the extent tables are smaller and need to be consulted less often. However, LVs and PVs must be a multiple of the extent size, so a large size limits granularity. The extent size can be configured when the VG is created, either at boot time or by using the --physicalextentsize argument to vgcreate. A large, efficient extent size is usually too big for effective copy-on-write operation during snapshots, so a smaller chunk size is used for copy-on-write management. This can be configured using the --chunksize option to lvcreate. 6.1.3. What About...6.1.3.1. ...taking multiple snapshots of a filesystem?It is possible to take multiple snapshots of a filesystem. For example, you could have snapshots of /home for each day in the preceding week, making it even easier for your users to restore their own files in the case of accidental deletion or damage. However, when you have multiple snapshots in place, a single write can trigger a lot of copy-on-write activityso don't go overboard, or your write performance could really suffer. 6.1.3.2. ...improving performance?The LVM system has striping capability, which spreads data over multiple PVs. Data can be read from multiple PVs simultaneously, increasing throughput in some cases. To enable striping, use the -i (stripe-count) and -I (stripe-size) arguments to the lvcreate command: # lvcreate main -i 3 -I 8 --name mysql --size 20G The stripe count must be equal to or less than the number of PVs in the VG, and the stripe size (which is in kilobytes) must be a power of 2 between 4 and 512. You can also select striping in the LV Properties area of the Create New Logical Volume dialog (Figure 6-4). 6.1.3.3. ...LVM mirroring?To protect data integrity, recent versions of LVM provide a mirroring capability, which stores two copies of each physical extent on two different disks. However, this is noted as a technology preview capability in Fedora Core 6, meaning that it's at a beta-test stage. An alternative approach that is stable, proven, and provides a wider range of configuration options is to layer LVM on top of the md RAID system (discussed in Lab 6.2, "Managing RAID"). 6.1.3.4. ...using LVM with RAID?LVM can be layered on top of the Linux md RAID driver, which combines the flexibility of LVM with striping, mirroring, and advanced error-correction capabilities. See Lab 6.2, "Managing RAID," for details on how this is configured. 6.1.3.5. ...using a raw, unpartitioned disk as a PV?Although you can use a raw disk as a PV, it's not recommended. The graphical administration tools don't support it, and the amount of space lost to a partition table is minimal (about 1 KB). 6.1.3.6. ...a failing disk drive?If you suspect that a disk drive is failing, and you want to save the data that is on that drive, you can add a replacement PV to your volume group, migrate the data off the failing (or slow or undersized) disk onto the new PV, and then remove the original disk from the volume group. To migrate data off a specific PV, use the pvmove command: # pvmove /dev/hda3 6.1.3.7. ...creating a flexible disk layout?LVM is all about flexibilitybut for absolute maximum flexibility, divide your disk into multiple partitions and then add each partition to your volume group as a separate PV. For example, if you have a 100 GB disk drive, you can divide the disk into five 20 GB partitions and use those as physical volumes in one volume group. The advantage to this approach is that you can free up one or two of those PVs for use with another operating system at a later date. You can also easily switch to a RAID array by adding one (or more) disks, as long as 20 percent of your VG is free, with the following steps:
You can use this same process to change RAID levels (for example, switching from RAID-1 (mirroring) to RAID-5 (rotating ECC) when going from two disks to three or more disks). 6.1.4. Where Can I Learn More?
|

 Administration