7.1. Configuring Samba to Share Files with Windows SystemsFedora can be configured to use Samba to serve files and printers to a wide range of Windows systems using Microsoft-compatible protocols.
7.1.1. How Do I Do That?To configure Samba, select the menu option System Figure 7-1. Samba configuration window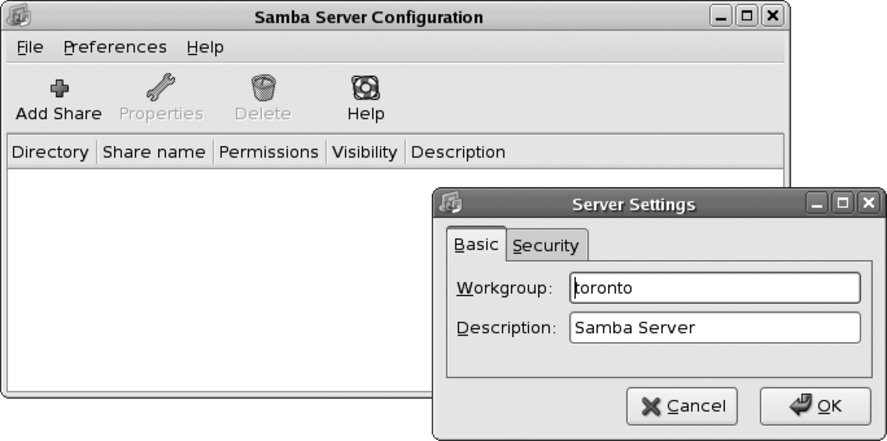
Click Preferences
Next, select Preferences Figure 7-2. Samba user configuration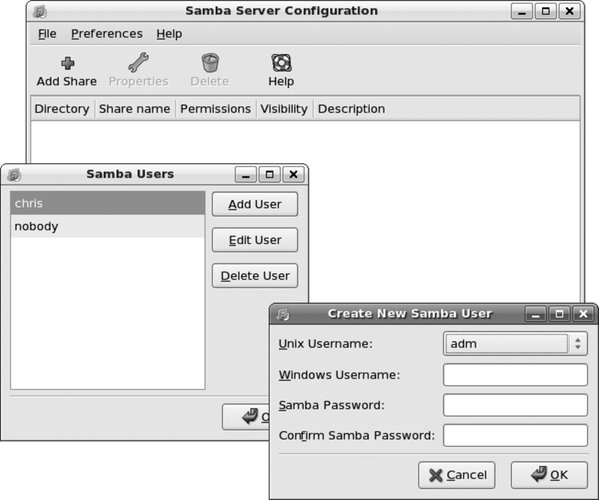
Your system will now be visible to local Windows computers; for example, on an XP system, click My Network Places and then "View workgroup computers," and your Fedora system will appear as an icon with the hostname that you have assigned to it, as shown in Figure 7-3. Click on the computer icon to see the folders being shared by the Fedora system (after you enter your Samba user ID and password to authenticate). Figure 7-3. Windows XP workgroup display showing Samba shares from a Fedora system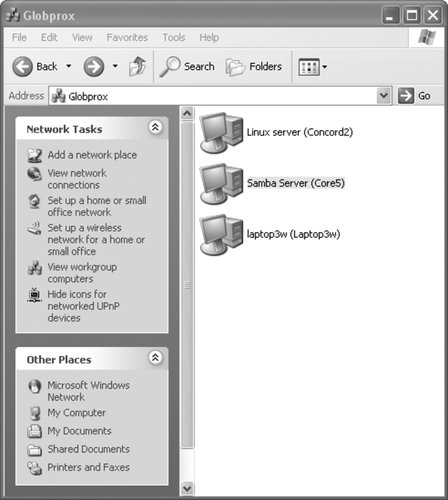
The folder labeled homes contains the home directory of the authenticated Samba user, and the Printers and Faxes folder will contain all of the printers configured on the Fedora system.
7.1.1.1. Adding additional Samba shares
To share an additional directory, start the Samba configuration tool (System Figure 7-4. Adding a Samba share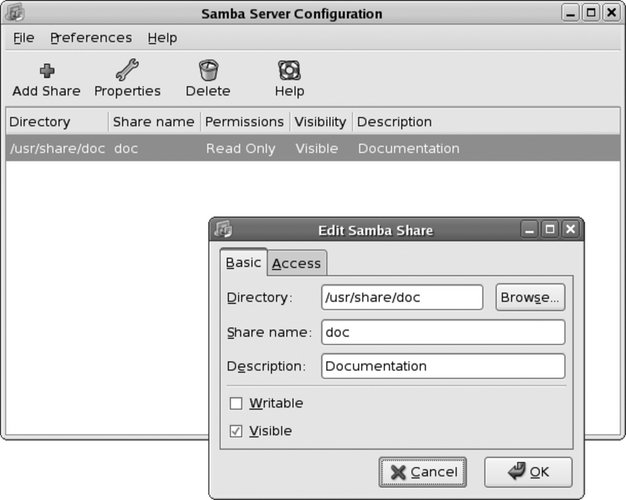
Under the Basic tab, enter the directory name, the name visible to the Windows systems (i.e., the share name), and a description of what is in the shared directory. Use the checkboxes to configure whether the directory is writable by Windows users, and whether it is visible when the Windows users are browsing using a tool such as Windows Explorer. Under the Access tab, you can choose to make the directory available to all users, or you can go through the list of Samba users and select the specific ones you want to grant access to it. Click OK when you are done.
7.1.1.2. Accessing Fedora printers from a Windows systemFedora's default Samba configuration will make all printers available to Windows users. To use a shared Samba printer in Windows XP, follow these instructions.
Figure 7-5. Adding a Samba printer to a Windows XP system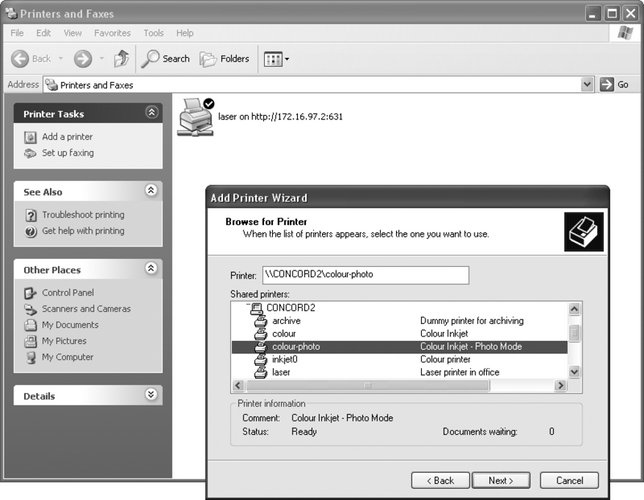
You will now be able to print to the printer from any Windows application. 7.1.1.3. Configuring Samba from the command lineYou can edit Samba's configuration from the command line instead of using the graphical configuration tool. Samba's configuration file is /etc/samba/smb.conf, and it is a regular text file. Like most server programs, Samba has dozens of configuration options, which it calls parameters. This configuration file is divided into sections by lines of section names enclosed in square brackets (so, for example, the global configuration section starts with the line [global]). Lines that start with a pound sign (#) are treated as comments and ignored. The workgroup name and server description are configured at the top of the global section: [global]
# workgroup = NT-Domain-Name or Workgroup-Name
workgroup =
bluesky
# server string is the equivalent of the NT Description field
server string =
Samba ServerSet the workgroup name to the value used by the local Windows workgroup or domain. The server string description can be any descriptive value (change the default if you don't want people to know you're running a Linux system). The system name will be the same as the hostname. By default, only home directories and printers will be shared. To add additional shares, add an additional share section to the end of the configuration file. There are many examples in the configuration file, such as this one: # The following two entries demonstrate how to share a directory so that two
# users can place files there that will be owned by the specific users. In this
# setup, the directory should be writable by both users and should have the
# sticky bit set on it to prevent abuse. Obviously this could be extended to
# as many users as required.
;[myshare]
; comment = Mary's and Fred's stuff
; path = /usr/somewhere/shared
; valid users = mary fred
; public = no
; writable = yes
; printable = no
; create mask = 0765
From this template, you can see the basic format:
To allow read-only access to /usr/share/doc, for example, create this share: [doc]
comment = Documentation
path = /usr/share/doc
writeable = no
browseable = yes
guest ok = yes
After editing the configuration file, restart or reload Samba to activate the changes: # service smb reload Reloading smb.conf file: [ OK ] To add Samba users, you must first create a Linux user account (see Lab 4.7, "Managing Users and Groups"), and then use the smbpasswd command with the add option, -a: # smbpasswd -a frank
New SMB password:
FranklySpeaking
Retype new SMB password:
FranklySpeaking
Added user frank.To change the password, leave out the -a option: # smbpasswd jane
New SMB password:
PrimeUser
Retype new SMB password:
PrimeUserTo delete a user, use the -x option: # smbpasswd -x kim Deleted user kim. 7.1.2. How Does It Work?Samba uses the Server Message Block (SMB) protocol suite and related protocols and programs developed by Microsoftmore recently grouped under the moniker Common Internet File System (CIFS). The name Samba is derived from the acronym SMB. SMB and related protocols have been in use since the 1980s, but have changed significantly through the years. There are many different, incompatible implementations of the protocols present in various versions of Windows, and in particular, there are several ways of authenticating users. Many of Samba's configuration options relate to compatibility and user authentication. Samba is implemented as two server daemons: The graphical configuration tool for Samba is system-config-samba. 7.1.3. What About...7.1.3.1. ...disabling access to printers through Samba?To prevent Samba from sharing your printers with Windows systems, delete (or comment out) this printer share in /etc/samba/smb.conf: [printers]
comment = All Printers
path = /var/spool/samba
browseable = no
# Set public = yes to allow user 'guest account' to print
; guest ok = no
; writeable = no
printable = yesRestart or reload Samba to activate the change. 7.1.3.2. ...accessing a Samba share on another Linux machine?
Use the Places You can also mount Samba or Windows shares at the command line. To mount the share bluesky from the server pictures on the mount point /mnt/pictures: # mount -t smb //bluesky/pictures /mnt/pictures This invokes the smbmount command. 7.1.4. Where Can I Learn More?
|

 Administration