Hack 5. Create Your Own LILO Boot Splash
Create or modify any picture for use as a LILO boot splash background. You can easily start from scratch and create any kind of LILO boot splash background. Just make sure you consider the following:
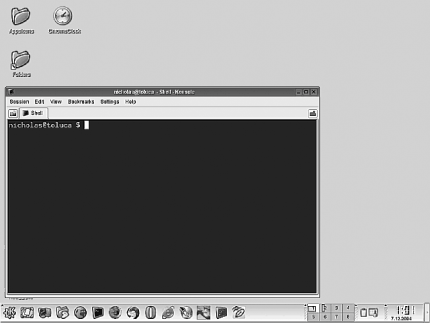
This example bases the LILO boot screen on a KDE screenshot with a Konsole window open (Figure 1-1). The idea is to place the LILO boot menu within the Konsole window, and the countdown timer where the clock appears on the KDE panel. I set up the KDE screen the way I wanted it to look. If you take a similar approach, do not use a complex and colorful background, because it probably will not translate well into 255 colors. I recommend you use the Gimp to take the screenshot and modify it for use as the LILO boot screen. [Hack #12] shows you one method of taking screenshots. Here's how to do it with the Gimp:
This should create a blank area where the clock appears, because that is where the default countdown timer will go. Generally, you would choose a color similar to the panel color, but for this example, you can play it safe by using the color white. Here's how to create that blank area using the Gimp:
See Figure 1-2 for an example of what the result should look like. Figure 1-2. Bitmap ready for LILO Now you need to know the XY coordinates on the picture for those places you plan to place the menu and the timer. Position your mouse cursor approximately in the upper-left corner of the black inner portion of the Konsole (somewhere beneath the prompt). Look at the lower-left corner of the Gimp window, and you should see the coordinates for your mouse position, which will be the upper-left corner of your boot menu. My selection indicates the coordinates 55, 214. Here is the definition of the LILO menu you need to put in the lilo.conf file: bmp-table=<x>,<y>,<columns>,<lines> Let's assume you have up to six entries in your LILO menu. You need only one column to display that many. So, plug in the coordinates, along with these details: bmp-table=55,214,1,6 Now you need to know the coordinates for the timer. Position your mouse cursor in the upper-left area of the white rectangle where the clock used to be. This is where the timer will appear. On my screen, the coordinates I chose were 582, 455. The format of the timer definitions looks like this: bmp-timer=<x>,<y>,<fg color>,<bg color>,<shadow color> You know the coordinates already, so you can fill in that much: bmp-timer=582p,455p,<fg color>,<bg color>,<shadow color> Note that the coordinates are followed by the letter p, which tells LILO that the numbers represent pixel coordinates. Now it's time to pick colors. 1.6.1. Picking ColorsHere's the only really tricky part of creating the boot image specification for lilo.conf. You have to specify the colors to use for the menu and the timer. You specify these colors using an indexed palette. There is no standard palette of colors; the Gimp creates one based on the colors in your particular image. When you converted the image to use 255 indexed colors, the Gimp created a palette for the 255 colors, and you must use one or more of those colors for your menu and timer. Here's how to display the palette for your image:
right-click the image and select Dialogs Here's the trick to defining colors for your menu and timer. Click one of the colored blocks in your palette. You should see the Color Index Number field change to the number of that block. I happened to click a light yellow block, and that was block number 235. Click other colors and you'll see the color index number change accordingly. The color index number is the number you will use to define the colors for your boot menu and timer. Let's make the color of the timer black on white, with no shadow. On the Index Palette Colormap, find a square that is white and click it. Make a note of the color index number (in my case the number is 254). Click a square that is black and note the color index number. In my case, the black square has a color index number of 0. Now that you have these color index numbers, you can finish the bmp-timer definition, which defines the foreground as black (color index 0) and the background as white (color index 254): bmp-timer=582p,455p,0,254, The last comma has nothing after it, because you are not specifying a shadow color. Next, define the colors for the boot menu options, which is the menu you use to select which operating system to boot. The format of that line is as follows: bmp-colors=<fg>,<bg>,<sh>,<sel-fg>,<sel-bg>,<sel-sh> The foreground color of the menu selection is defined by the <fg> option; <bg> is the background and <sh> is the shadow for the text, if you want a shadow. The color of the foreground of the selected menu entry is controlled by the <sel-fg> option; <sel-bg> is the color of the background of the selected entry, and <sel-sh> is the color of the text shadow, if you want one. Assume you want the menu text colors to be white on black, with no shadows. You already have color index numbers for black and white (0 and 254, respectively), and you know to leave the entry blank for no shadow. So, here is what the line should look like at this point: bmp-colors=254,0,,<sel-fg>,<sel-bg>,<sel-sh> Now you need to define the colors for the current highlighted menu selection. Because the menu background is black, I picked something that would create a sharp contrast for the highlighted entry: purple text on a yellow background. Click a purple block in the indexed palette and note the color index number. The index number in my case is 74. Click a light yellow block and make a note of that color index number. In my case, that number is 242. There is no shadow, so leave the shadow entries blank. Now you can fill in the rest of the information for the bmp-colors line: bmp-colors=254,0,,74,242, Logged in as root, save the image as lilo-kde.bmp and copy it to the /boot directory: # cp lilo-kde.bmp /boot Now you need to edit /etc/lilo.conf. Here is the complete entry you want to put in the lilo.conf file for this LILO splash screen. You might have to adjust some of the coordinates and color index numbers depending on how you fashioned your KDE screenshot: install=bmp bitmap=/boot/swirl.bmp bmp-table=55p,214p,1,6 bmp-colors=254,0,,74,242, bmp-timer=582p,455p,0,254, Now run lilo to rebuild the boot record and complete the job: # lilo -v Reboot and you should see the LILO boot menu appear in the Konsole area and the timer appear in the area where the clock was on the panel. Here's a summary of the steps to follow to create a LILO boot splash image:
|
 Acquire