Hack 13. Put Your Command Prompt on a Diet
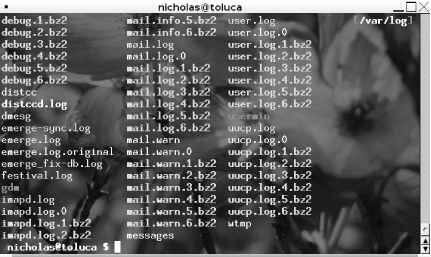
Change your bash prompt to show extra information without cluttering the area around your command prompt. This hack saves command-line prompt space without sacrificing the informational value that prompt hacks often add to command-line prompts. Sure, it's great to see the date, time, uptime, and phase of the moon in your bash prompt, but most schemes for providing this extra information create a crowded mess and push more important text off the terminal screen. This hack uses the tput command to place some of that extra information in the upper-right corner of the terminal or console, leaving your prompt neat, clean, and short. Thanks to Giles Orr whose web site on bash prompts (http://www.tldp.org/HOWTO/Bash-Prompt-HOWTO/) inspired this example hack. I'll keep this particular hack simple. You are going to put the current working directory somewhere on the terminal but not at the prompt itself. This hack creates a directory path that always appears in the upper-right corner. Of course, as explained later, you can modify this location. The tput command is ideal for this type of trick, because tput manipulates the location and color of cursors. Figure 2-1 shows what it might look like when it is configured as the default prompt. Figure 2-1. The current working directory in the upper-right corner This might seem somewhat superfluous when using an X terminal, because it's easy to put the current working directory in the titlebar. However, not every terminal works that way, and there is no titlebar on a virtual console, so it still comes in really handy, especially when you are working without a graphical window manager or desktop. Here is the script, with comments on how it works: #!/bin/bash
function prompt_command {
# save the current position
tput sc
# backwash is where to position the cursor
# to write the whole current working directory
# we back up 2 more for the brackets
let backwash=$(tput cols)-$(echo $(pwd) | wc -m)-2
# position the cursor at Y=0, X=calculated length
tput cup 0 ${backwash}
# set foreground color, bold
tput setaf 4 ; tput bold
# wrap the full path in brackets
echo -n "["
# set the color of the current path
tput setaf 6
# show the path
echo -n "$(pwd)"
# set the color of the closing bracket"
tput setaf 4 ; tput bold
# show the closing bracket
echo -n "]"
# return cursor to the saved position
tput rc
}
PROMPT_COMMAND=prompt_command
GREEN="\[$(tput setaf 2 ; tput bold)\]"
WHITE="\[$(tput setaf 7 ; tput bold)\]"
NO_COLOUR="\[$(tput sgr0)\]"
case $TERM in
xterm*|rxvt*)
TITLEBAR='\[\033]0;\u@\h \007\]'
;;
*)
TITLEBAR=""
;;
esac
PS1="${TITLEBAR}\
$GREEN\u@\h \
$WHITE\$$NO_COLOUR "
PS2='> '
PS4='+ 'Here's how it works. First, the tput sc command saves the current position of the cursor. Now let's pick apart the following, somewhat awkward-looking command from the preceding code: let backwash=$(tput cols)-$(echo $(pwd) | wc -m)-2 The goal here is to find out where to move the cursor on the X axis to start printing out the current working directory surrounded by brackets. The column you want is the width of the terminal minus the width of the current directory, minus two more columns (for the brackets). The tput cols command returns the number of columns in the current terminal or console. The pwd command prints the current working directory, which is echoed and piped through the wc -m command, which returns the number of characters in the current working directory. Then the command subtracts that length plus two more for the brackets. All together, the whole command returns the X axis location of the cursor where the script should start printing the current directory in brackets. The tput cup <row> <column> command moves the cursor to the specified row and column. In this case, we always want row 0 (the top row), and we calculated the starting location for the column in the previous command. Now the script sets up some tput variables to determine how the next bit of text placed on the screen will look. The tput setaf 4 command defines the color as dark blue, and tput bold makes it bold. Then the script echoes the open bracket to the screen. The script resets the color and prints the current path, and then resets the color and prints the close bracket. Then it returns the cursor back to its saved position with tput rc. Finally, it sets the prompt, using variable definitions for tput sequences to set colors. You probably won't find setaf in the manpage for tput. Indeed, Table 2-1 provides some of the rarely documented features of tput.
Table 2-2 shows the ANSI escape sequence commands for foregrounds and backgrounds you can use in place of the colors I've chosen.
|