|
|
< Day Day Up > |
|
13.1 FlashFlash is quickly becoming the standard for Web animation, and with good reason: Macromedia's Flash technology produces high-quality, animated images梜nown as Flash movies梐t a relatively small file size. Its drawings and animations are vector graphics, which means that they use mathematical formulas to describe objects on the screen. By contrast, bitmap technology like GIF and JPEG include data for every pixel of an image, gobbling up precious bytes and adding download time. Flash's vector graphics, on the other hand, save file size with their compact mathematical expressions. Flash can also handle MP3 audio and advanced programming features, providing an added dimension of sound and interactivity that can make a plain HTML page look dull by comparison. For example, advanced Flash gurus can build automatic score tracking into an online game or add a cannon-firing animation each time the player clicks the mouse. While Dynamic HTML (see Chapter 12) can do some of these things, Flash movies are easier to create. An intriguing advantage of Flash movies is that they look and work exactly the same on every browser, whether on Windows or Mac. (Don't try that with HTML.) Of course, all of this power comes at a price. Although Dreamweaver has some limited Flash-creation abilities (such as the new Flash elements feature, discussed in Section 13.2), you need another program, such as Macromedia Flash, Adobe Live Motion, or Swish ( www.swishzone.com ) to produce full-fledged movies. These programs aren't difficult to learn, but they're more programs to buy and more technologies to get under your belt. Furthermore, your visitors can't play Flash movies without the Flash Player plug-in (see Section 5.6). If they don't have it, they'll need to download and install it梐 sure spontaneity-killer. Fortunately, chances are your visitors already have it, since all major browsers (even Opera) now come with the Flash plug-in installed. In fact, Macromedia says that (insert grain of salt here) over 97 percent of Web browsers in use now have some version of Flash Player (a much smaller percentage has the latest version of the player). NOTE
As of this writing, a legal dispute may have a big impact on how you embed external multimedia files into a Web page. A small company named Eolas sued Microsoft for patent infringement and won, forcing the software giant to alter how Microsoft Internet Explorer displays external media files like Flash or Java Applets. Other browser manufacturers may follow Microsoft's lead. Macromedia is working on tools to help Web sites update their pages to conform with these changes. For more information, visit www.macromedia.com/devnet/activecontent/ . 13.1.1 Inserting a Flash MovieTo insert a Flash movie into a Web page, click where you want to insert the movie;
then choose Insert
To preview Flash files directly in Dreamweaver, just select the movie and then click the Play button on the Property inspector (see Figure 13-2). To stop the movie, click the same button, which has now become a Stop button. NOTE
As with other files you include in a Web page, such as graphics or external Cascading Style Sheets, you can store Flash movies anywhere in your site folder. However, if your Flash movie contains links梚f it's an animated navigation bar, for instance梜eep the Flash movie file in the same folder as the Web page itself. Otherwise, links in the movie may not work. (For a workaround to this problem, see the box in Section 13.1.2.4.) If your page has lots of Flash movies梟umerous animated buttons, perhaps梱ou
can play all of them at once by pressing Shift+Ctrl+Alt+P (Shift-Option- 13.1.2 Flash Movie PropertiesYou'll rarely have to change the default properties created by Dreamweaver. But if you ever want to change the margin of space around a movie, restore it to original size after resizing it, or swap in a different movie, the Property inspector is the place to do it. 13.1.2.1 Naming a Flash movieAs with images and navigation buttons, you can use JavaScript to control Flash movies. For example, Dreamweaver's built-in Control Shockwave or Flash behavior lets you start, stop, or jump to a specific frame in a Flash movie (see Section 12.4.4). As noted in Section 12.4.4, however, if you plan to use JavaScript with your Flash movie, you need to give the Flash element a name. To do that, type the name you wish to use in the Name field (the box directly below "Flash" in the Property inspector). JavaScript uses this name to identify the movie in its code. NOTE
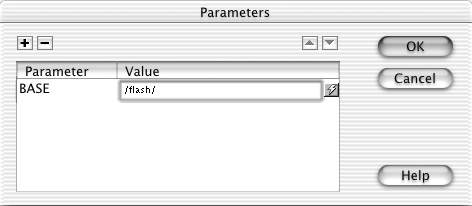
As shown in Figure 13-2, all of the plug-in technologies described in this chapter let you set additional parameters governing the embedded media's behavior. You can find out about additional HTML properties for Flash in the Flash help. See the box in Section 13.1.2.4 for an example.
13.1.2.2 The Movie fileThe File field specifies the path to the Flash movie file on your hard drive. To select a different file, type a new path into the File field, or click the folder icon to access your site folder's contents. When you insert a Flash movie into a page, Dreamweaver tracks the original Flash file. When you click the Edit button here, the file opens in Flash for you to edit.
13.1.2.3 Src propertyAs with Fireworks files (Section 5.3.3), Dreamweaver can keep track of the original Flash file you used when creating a Flash movie. That's fortunate because, once again, Flash movies start off in the program's native format (as .fla files) and then must be exported as .swf (Flash movie) files, which are viewable on the Web. The Src property field indicates where the original Flash file is stored. Clicking the Property inspector's Edit button launches Flash and opens the original Flash file. You can then make any changes you wish to the movie and, in Flash, click Done. Flash exports the updated .swf file into your site, replacing the previous version of the file. 13.1.2.4 Movie sizeAlthough dragging to enlarge a GIF or JPEG image can turn it into a pixellated mess, you can usually resize Flash movies without problems, since their vector-based images are based on mathematical formulas that scale nicely. (The exception is when you've included bitmap images, such as GIFs or JPEGs, in your Flash movie. Then, as when resizing an image in a Web page, you'll see distortion and pixellation in the movie.)
To resize a movie, do one of the following:
If you make a complete mess of your page by resizing the movie beyond recognition, just click Reset Size in the Property inspector. 13.1.2.5 Play optionsThe Loop and Autoplay checkboxes control how the Flash movie plays back. When you turn Loop on, the Flash movie plays over and over again through an endless loop, an approach advertisers often choose for use in animated banner ads. The Autoplay checkbox instructs the Flash movie to start playing when the page loads. Note that neither of these options overrides specific programming instructions in the Flash movie. For instance, if you've added a Stop action to the final frame of a movie梐n action that stops the movie at that frame梩hen the Loop option will have no effect. 13.1.2.6 MarginsFlash-movie margins are especially useful if you've wrapped text around the movie on the page; they determine how much buffer space falls between the movie and the text. To add space above and below a selected movie, type a number of pixels into the V space field in the Property inspector (note you only need to type a number; don't add px to specify pixels). Press Enter to see the results of your change. To add space to the left and right, type a pixel measurement in the H space field. Ten or 20 pixels usually provides an attractive amount of space. Unfortunately, you can't specify independent values for each of the four margins梠nly top/bottom and side/side. (You can, however, accomplish this using Cascading Style Sheets; see Section 6.7.4.) 13.1.2.7 Quality settingsIf your Flash movie's heavy data requirements overwhelm a visitor's computer, it may run slowly and appear choppy, especially if the animation is action-packed and complex. Not every computer on earth already has at least a one-gigahertz processor and two gigabytes of RAM. Until then, you may need to adjust the quality settings of your Flash movies to help them look better on all computers, from the sluggish to the speedy. By default, Dreamweaver sets the quality to High, but you can choose any of the following four settings from the Quality menu in the Property inspector:
13.1.2.8 ScalingWhen you resize a Flash movie (see Section 13.1.2.2), changing its original proportions, your visitors' Web browsers will scale or distort the movie to fit the newly specified dimensions. Scaling becomes an issue particularly when, for example, you give a Flash movie relative dimensions (setting it to, say, 90 percent of the browser window's width), so that it grows or shrinks as your visitor's browser window grows or shrinks. A Flash movie's Scale property specifies how a movie should be scaled when its Width and Height properties are set differently than the original movie. If you've resized a movie, press F12 to see how it looks in a Web browser, then, if necessary, choose a different setting from the Scale pop-up menu in the Property inspector.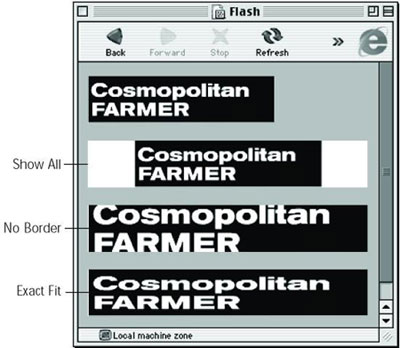
The Scale property lets you determine how the Flash Player plug-in scales your movie. For example, in Figure 13-3, the top movie's original size is 200 x 50 pixels. But if you resize the movie so that it's 300 x 50 pixels, one of three things may happen, depending on your choice of Scale setting:
13.1.2.9 AlignmentYou can align Flash movies relative to the paragraphs around them, just as you do with images. In fact, the alignment options in the Property inspector work exactly the same as image-alignment properties discussed in Section 5.2.4. For example, choosing Right from the Align menu positions the movie at the right of the screen and wraps text around its left side. (If the movie is inside a cell, Align Right moves it all the way to the right of the cell.) 13.1.2.10 Background colorTo set a background color for a Flash movie, use the Bg color box in the Property inspector. This color overrides any background color set in the movie itself; it fills the space where the movie appears when the page first loads (and the movie hasn't). |
|
|
< Day Day Up > |
|
 Media
Media