Previous Section  < Day Day Up >  Next Section

18.4 Adding Optional Regions

Templates provide consistent design. While that's generally a good thing, it can also get boring. Furthermore, there may be times when you'd like the flexibility to include information on some template-based pages but not on others.

Dreamweaver provides a fairly foolproof way to vary page design: optional regions. An optional region is simply part of a template page that can be hidden or displayed on each template-based page (see Figure 18-9). When creating a new page based on the template, a page author can turn the region on or off.

Creating an optional region is a snap. Just select the HTML code you wish to make optional, and then do one of the following:

  • On the Common tab of the Insert bar (Figure 18-2), select the Optional Region option from the Templates menu.

  • Choose InsertTemplate ObjectsOptional Region.

  • Right-click (Control-click) the selection and choose TemplatesNew Optional Region from the contextual menu.

In the New Optional Region window, type a name (see Figure 18-10). Make sure not to use the same name as any other region on the page, and梐lthough Dreamweaver allows it梔on't use spaces or other punctuation marks. (Following the rules for naming files as described in Section 14.1 is the best method, and ensures that the optional region will work properly.) Click OK to close the window and create the new Optional region. Dreamweaver adds a light blue tab with the word "If " followed by the name you gave the region (Figure 18-9).

Now you see it, now you don't. Optional regions let you show or hide content on a pageby- page basis. In these examples, the template page has an optional region containing a "Sign of the Month" button indicated by the blue tab with the label If signOfMonth (top). When creating a template-based page from this template, you can either display the optional region (bottom right) or hide it (bottom left).
figs/18_09.jpg
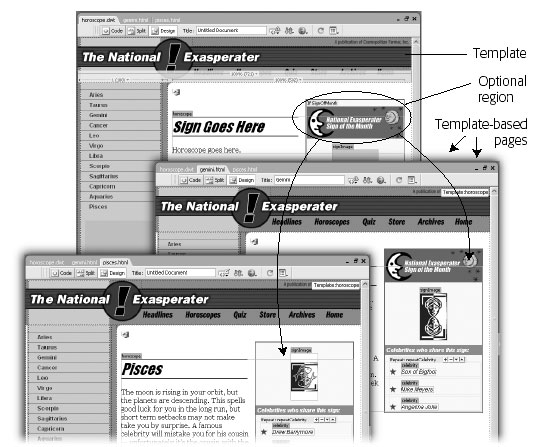
The Optional Regions feature lets you show or hide specific content on template-based pages. Turning on "Show by default" tells Dreamweaver to display the region when a page author first creates a template-based page. Turn this box on if the optional region needs to show on most pages. You'll save someone the effort of turning the region on each time she creates a new templatebased page.
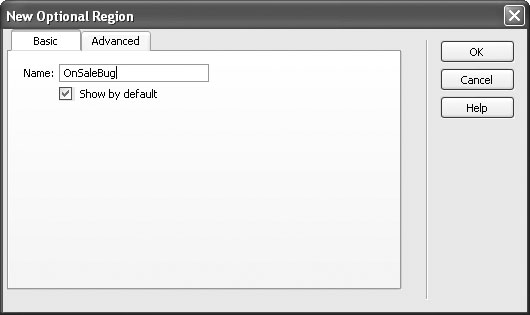
figs/18_10.jpg

18.4.1 Locking optional regions

An optional region can include editable and repeating regions and locked regions. For example, if you simply want to allow a page author to turn on or off a graphic ("This item on sale!!!!"), insert the graphic into a locked area of the page (Section 18.1), and make it an optional region as described above. In this way, a page author won't be able to change the graphic or ruin its formatting梠nly make it visible or hidden.

18.4.2 Repeating optional regions

An optional region can also include repeating regions. For example, suppose you create a repeating region (Section 18.3.2) that lets a page author add row after row of links to a list of related articles. You could then turn this repeating region into an optional region, as described above, so that if a particular page had no related articles, the author could simply hide the entire "related articles" section of the page.

18.4.3 Optional editable regions

Dreamweaver's Optional Editable Region command inserts an optional region with an editable region inside it. To use it, click in the template at the spot where you'd like to add it, and choose InsertTemplate ObjectsOptional Editable Region (alternatively, you can choose this option from the Templates menu on the Common tab of the Insert bar). The New Optional Region window appears; give it a name and follow the same steps outlined above for an optional region.

This technique doesn't offer a lot of control; it's hard to insert HTML outside the editable region, for example. So if you want to have an image or table that is optional but not editable, it's usually better to just create the editable region as described in Section 18.3 and turn it (and any other HTML you wish to include) into an optional region.

The Optional Editable Region command doesn't let you name the editable region; instead you'll get a generic name like EditRegion7. You can select the editable region and change its name in the Property inspector, but do so before you build any pages based on this template (see the Warning in Section 18.3.2).


18.4.4 Advanced Optional Regions

Optional regions are rather simple affairs: They either appear or they don't. But Dreamweaver offers more complex logic for controlling optional regions. For example, maybe you want several different areas of a page to be either hidden or visible at the same time梡erhaps an "On Sale Now!" icon at the top of the page and a "Call 1-800-SHIZZLE to order" message at the bottom of the page. When one appears, so does the other.

Because these objects are in different areas of the page, you have to create two separate optional regions. Fortunately, using Dreamweaver's advanced settings for optional regions, you can easily have a single region control the display of one or more additional areas of a page. Here's how to do it:
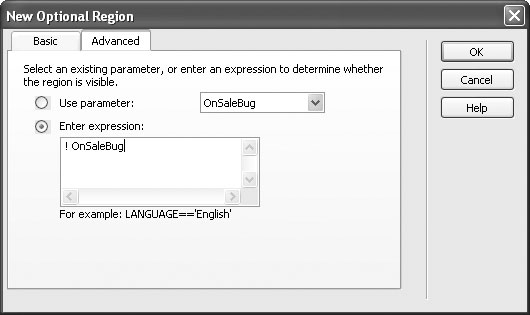
  1. Create the first optional region using the steps in Section 18.4.

    Give the region a name using the Basic tab of the New Optional Region window (Figure 18-10).

  2. Select the part of the page梐n image, paragraph, or table梩hat you wish to turn into a second optional region.

    In this case, you'll make the display of this region dependent on the optional region added in step 1. If the first region is visible on the page, this region will also show.

  3. On the Common tab of the Insert bar (Figure 18-2 ), choose the Optional Region item from the Templates menu.

    The New Optional Region window appears.

  4. Click the Advanced tab.

    The optional region's advanced options appear (see Figure 18-11 ). In this case, you want the first optional region you created to control the display of this new region. So instead of giving this region a name, simply select the name of the first optional region.

    The New Optional Region box lets you more precisely control the display of an optional region. You can make the region appear only when another region is visible, or use Dreamweaver's template expression language to create a more complex behavior. In this case, the selected region will appear only when another region梟amed OnSaleBug梚s not visible (the ! is a programming equivalent to "is not").
    figs/18_11.jpg
  5. Click the Use Parameter button and select the name of the first optional region from the menu.

    This step is what makes the first optional region control this region. If a page author displays the first region, this second region will also appear.

  6. Click OK to close the window and create the new optional region.

    You can continue adding optional regions in this way, using the Advanced tab and selecting the name of the first optional region from the menu. This way, a single region can control the display of many other areas of the page.

18.4.4.1 Even fancier tricks

You can use these advanced controls for even more elaborate Web page stunts. For example, say your site is composed of several sections. When a visitor is in one section of the site, its navigation button is attractively highlighted and a secondary navigation bar miraculously appears, offering links to other pages in that section.

Using a template, you can add an optional region containing the highlighted section button. When you add the secondary navigation bar to the page, you'd make it an optional region controlled by the highlighted navigation button. Then, when you add a page to that section of the site, you'd simply show the optional region containing the highlighted button (Figure 18-12 ), causing the secondary navigation bar to appear as well.

18.4.4.2 Controlling regions with expressions

You can program even more complex behaviors using a basic expression language, loosely based on JavaScript, that Dreamweaver understands. For example, instead of having an optional region appear when another optional region is visible (as in the above example), suppose you want to have a region appear when another region is invisible. This arrangement can come in handy when you're creating a navigation bar. When a page is in a particular section, for instance, the navigation button for that section is highlighted, but the button isn't highlighted if the page is in another section.

In other words, you can build a single template for all the sections of the site, but control the appearance of the navigation bar separately for pages in each individual section (see Figure 18-12).

Here's how you'd do that:

  1. Click in the page where you wish to insert the navigation buttons.

    An optional region on the page at left controls highlighting of the top navigation button. By turning on a different optional region (right), the navigation system can highlight the site's current section?What is Electricity?"
    figs/18_12.jpg
  2. Insert the highlighted ("You are in this section") navigation button.

    This button could be a rollover image (see Section 5.5) or just a single graphic. If you have multiple pages in the section, you'll probably also want to link this graphic to the main page for that section.

  3. Click next to the highlighted button and insert the plain ("You can go here") navigation button.

    The button could also be a rollover image with a link to the main page for this section (for example, the main Products page).

  4. In the Property inspector, select the highlighted navigation button and link (if it has one).

    This button will appear on any template-based page for this section.

  5. On the Common tab of the Insert bar (Figure 18-2 ), choose Optional Region from the Template menu.

    The New Optional Region window appears. Make sure the Basic tab is selected.

  6. Type the name of the section into the Name field. Click OK.

    For example, if this section of your site advertises your company's products, you might call it products. Don't use any spaces or punctuation other than hyphens (-) or underscores (_) for the name. Also make sure the "Show by default" box is not turned on. Since you'll be building template-based pages for all the sections of your site, most pages you build will be in other sections of the site. Your work will go faster if this highlighted button starts out hidden. In the next steps, you'll make the plain nav button appear by default.

  7. Use the Property inspector to select the plain button and link, and then click the Optional Region button on the Insert bar.

    The New Optional Region window appears again, but this time you'll use the advanced options.

  8. Click the Advanced tab; select Enter Expression ( Figure 18-11).

    You're going to type an expression in the Expression field. An expression is a programming statement that is either true or false. (For an obvious example, the statement 2=2 is true, but the statement 2=4 is false.) The important thing to remember here is that when an expression is true, the optional region is visible; when it's false, it's hidden.

  9. Type an exclamation point (!) followed by the name you entered in step 6?span class="docEmphasis">!products , for example.

    Dreamweaver's template expression language is based on the JavaScript programming language. An exclamation mark means "not," so this code means "not products." A translation into non-caveman language: When the products region(remember, that's the highlighted button) is not displayed, this region (button) will appear on the page.

    The logic gets a little complicated, but have faith. When you add a new page based on this template, the optional region you added in step 6 is not visible (because you turned off the Show by Default box). In other words, because the region?span class="docEmphasis">products in this example梚s not showing, this region, the one with the plain nav button, will by default appear on the page. Turning the products region on (as described in Section 18.6.3), will therefore hide the plain nav button. In other words, the first optional region works like a light switch, alternately turning on one or the other navigation button.

  10. Click OK to close the window and add the additional optional region.

    Repeat this process for each button in the navigation bar. When you're finished, your template will be perfectly suited for displaying customized navigation bars for each section of your site. When you create a new template-based page, simply turn on the region for the particular section in which the page is located. (Hiding and showing optional regions is described in Section 18.6.3.)

    POWER USERS' CLINIC
    Understanding Template Parameters

    When you insert an optional region, Dreamweaver adds special code to the head of the Web page. Called a template parameter, this code is responsible for showing or hiding an optional region.

    In fact, Dreamweaver uses parameters when you make a tag attribute editable, too. A typical parameter for an optional region might look like this:

    <!-- TemplateParam name="SaleBug" type="boolean" value="true" -->


    The <!-- and -->are HTML comments that hide this code from a Web browser. TemplateParam tells Dreamweaver that the comment is actually part of the program's Template features梥pecifically, a template parameter.

    A parameter is composed of three parts: name, type, and value. The name is the name you gave the editable region. The type桞oolean梚ndicates that the value of this parameter can be only one of two options: true or false. In this example, the value is "true," which simply means that the optional region called SaleBug will be visible. (Don't worry; you don't have to actually edit this code by hand to turn optional regions on and off, as you'll see in Section 18.6.3.)

    In programming jargon, a template parameter is known as a variable. In simpler terms, it's just a way to store information that can vary. Dreamweaver will react differently depending on this value: show the region if the parameter is true, or hide it if the parameter is false.

    Editable tag attributes also use parameters to store the values you enter for the tag attribute. For example:

    <!-- TemplateParam name="PageColor" type="color" value="#FFFFFF" -->

    On template-based pages, you can change the value of a parameter used for an editable tag attribute to change that tag's property (Section 18.6.2).

    Unfortunately, when you delete an optional region from a template, or remove the ability to edit a tag attribute, Dreamweaver always leaves these parameter tags hanging around in the head of the template document. Keeping in mind that Dreamweaver adds these parameter tags directly before the closing </head> tag, you can find and remove unused parameter tags in Code view (see Chapter 10).

    For an excellent discussion of Template Parameters, in particular, and Dreamweaver Templates, in general, check out the book Dreamweaver MX Templates by Murray Summers and Brad Halstead.


As you can see, optional regions are very powerful梐nd potentially confusing. But using even basic optional regions, you can exert a great deal of control over your template-based pages. For more information on template expressions and optional regions, take a look in Dreamweaver's built-in Help system. (Press F1; then, in the window that appears, click the Search tab. Type template expressions in the box, and click the List Topic buttons. The Dreamweaver Help system then lists several articles related to templates and template expressions.)

18.4.5 Editing and Removing Optional Regions

After inserting an optional region, you can always return to the New Optional Region dialog box to change the region's name, alter its default settings, and use advanced options. To edit an optional region, first select it using one of these techniques:

  • Click the region's blue tab in the document window (Figure 18-9).

  • Click anywhere inside the optional region in the document window; click the <mmtemplate:if> tag in the tag selector (see Section 1.2.2 for details).

When you select an optional region, an Edit button appears in the Property inspector. Click it to reopen the New Optional Region window. You can then change the region's properties.

To remove an optional region, select it using one of the techniques listed above and choose ModifyTemplatesRemove Template Markup. Dreamweaver removes most of the code associated with the optional region (but see the box below).

    Previous Section  < Day Day Up >  Next Section