Previous Page
Next Page

Making Multiple Links Change a Single Rollover

Up to now, you've seen how mousing over a single image (or actually, the link associated with that image) can trigger a rollover effect. But you can also have several different images that trigger a rollover. This can be very useful when you have several images that you want to annotate. Rolling over each of the images makes the description of that image appear. In this example, we've done just this with images of three of Leonardo da Vinci's inventions. As you roll over each image, the description of that image appears in a text box. The description itself is another image. Actually, it's three images, one for each of the three inventions. Figure 4.8 shows Script 4.8 (HTML) and Script 4.9 (JavaScript) in action. As with most of the scripts in this book, it builds on previous examples, so we'll just explain the new concepts. There are just a few lines that are different between Script 4.8 and Script 4.9.

Figure 4.8. This page has three interactive images, a flying machine, a tank, and a helicopter. When you roll over an image, its description appears under Leonardo's face.


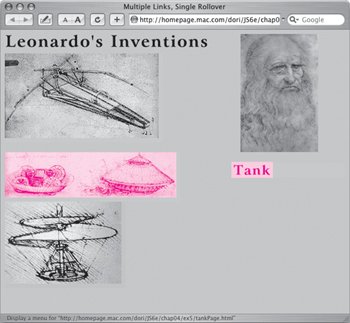
Script 4.8. Note that the links and images on this page all have unique ids.

<!DOCTYPE html PUBLIC "-//W3C//DTD XHTML 1.0 Transitional//EN">
<html xmlns="http://www.w3.org/1999/xhtml">
<head>
     <title>Multiple Links, Single Rollover</title>
     <script src="script05.js"
language="javascript" type="text/javascript"> </script>
</head>
<body bgcolor="#EECC99">
     <img src="images/DaVinci.jpg" width="144" height="219" alt="DaVinci" align="right"
 hspace="50" />
     <img src="images/leoText.gif" width="375" height="26" alt="Leonardo's Inventions" />
     <a href="flyPage.html" class="textField" id="flyer"><img src="images/flyer.gif" 
width="293" height="165" border="0" alt="Flying Machine" vspace="10" id="flyerImg" /></
a><br clear="right" />
     <img src="images/bg.gif" width="208" height="27" id="textField" alt="Text Field"
 align="right" vspace="20" />
     <a href="tankPage.html" class="textField" id="tank"><img src="images/tank.gif" 
width="325" height="92" border="0" alt="Tank" id="tankImg" /></a><br />
     <a href="heliPage.html" class="textField" id="helicopter"><img src="images/helicopter
.gif" width="224" height="160" border="0" alt="Helicopter" id="helicopterImg"/></a>
</body>
</html>

Script 4.9. This script shows you how to use multiple links to trigger a single rollover.

window.onload = rolloverInit;

function rolloverInit() {
     for (var i=0; i<document.links.length; i++) {
        var linkObj = document.links[i];
        if (linkObj.className) {
           var imgObj = document.getElementById(linkObj.className);
           if (imgObj) {
              setupRollover(linkObj,imgObj);
           }
        }
     }
}

function setupRollover(thisLink,textImage) {
     thisLink.imgToChange = textImage;
     thisLink.onmouseout = rollOut;
     thisLink.onmouseover = rollOver;

     thisLink.outImage = new Image();
     thisLink.outImage.src = textImage.src;

     thisLink.overImage = new Image();
     thisLink.overImage.src = "images/" + thisLink.id + "Text.gif";
}

function rollOver() {
     this.imgToChange.src = this.overImage.src;
}

function rollOut() {
     this.imgToChange.src = this.outImage.src;
}

To make multiple links change a single rollover:

1.
if (linkObj.className) {
  var imgObj = document.getElementById(linkObj. className);


We can't use the id of the rolled-over images to calculate the id of the changed imagethat's because an id has to be unique, and all of the rolled-over images have to come up with the same value for the changed image destination. Instead, we're using the class attribute (because you can have multiple page elements sharing the same class). In this line, we're looking for the className of the link object.

2.
function setupRollover(thisLink, textImage) {
  thisLink.imgToChange = textImage;


The setupRollover() function is passed the current link object (thisLink) and the image object, which we're calling textImage. Note that when we passed these objects (which can also be referred to as variables) in, we called them linkObj and imgObj, respectively.

The rest of the script works the same way as the previous examples in this chapter.


Previous Page
Next Page