A lookup form is similar to a parameter query with a custom front end; the form simply collects input that drives a query. When you use forms and VBA, you can be flexible about gathering input as well as the type of information you can return to users.
The easiest way to implement a form that looks up information is to have the user type the lookup information in a text box and click a button to start the search. The text box should be unbound because it doesn't enter information into the database; it simply gathers search information from the user. A query uses the value specified in the text box to find the matching information.
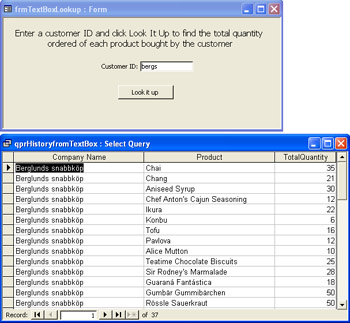
Figure 5-17 shows a form that opens the qprHistoryfromTextBox query when the user types a customer ID in the text box and clicks Look It Up. The query finds the total quantity ordered of each product bought by that customer.
The SQL statement for the qprHistoryfromTextBox query follows. Notice that the syntax specifies a parameter query. The parameter value is provided by the text box, txtCustomerID, on the frmTextBoxLookup form. This form appears at the top of Figure 5-17. If the frmTextBoxLookup form is closed when a user attempts to open the query, Access automatically prompts for a parameter to denote the value that the text box normally supplies. The query joins three tables to compute the quantity of each product ordered by the customer whose customer ID is in the txtCustomerID text box.
SELECT Customers.CompanyName, [Order Details].ProductID,
Sum([Order Details].Quantity) AS TotalQuantity
FROM (Customers INNER JOIN Orders
ON Customers.CustomerID = Orders.CustomerID)
INNER JOIN [Order Details]
ON Orders.OrderID = [Order Details].OrderID
WHERE Customers.CustomerID=Forms.frmTextBoxLookup.txtCustomerID
GROUP BY Customers.CompanyName, [Order Details].ProductID
The final element is a short VBA event procedure that fires when the user clicks the form's command button. The procedure has a single line that opens the query qprHistoryfromTextBox:
Private Sub cmdLookup_Click()
    DoCmd.OpenQuery "qprHistoryfromTextBox"
End Sub
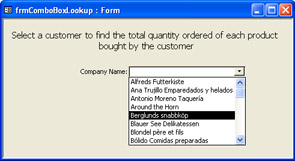
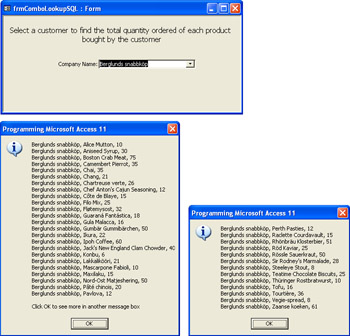
The form, frmComboLookupSQL, shown in Figure 5-18 has a better design than the one in Figure 5-17, provided that your list of customers isn't too long. Instead of forcing the user to enter a correct CustomerID field value, this form lets the user select the customer's name from a combo box. A procedure for the combo box's AfterUpdate event opens the qprHistoryfromComboBox query that uses the customer selected by the user, so the command button is unnecessary.
| Note |
Combo Box lookup forms can become prohibitively slow as the number of lookup items becomes large. In this situation, you have at least two choices. First, you can revert to the text box lookup form (see Figure 5-17). Second, you can create a tiered system in which users make choices that restrict the range of items a combo box will make available. Essentially, you can split the list for one combo box across two or more other combo boxes. See "Programming Conditional Combo Boxes" in Chapter 12 for a sample implementing this approach. |
To populate the combo box with the values for the application, follow these simple steps:
Set the control's RowSourceType property to Table/Query (the default).
Set the control's RowSource property to a SQL string that returns the fields you want. (The SQL string for the sample is "SELECT CustomerID, CompanyName FROM Customers".)
Set the control's ColumnCount property to 2.
Specify the column widths, separated by a semicolon. (The first value should always be 0.)
If you prefer, the Combo Box Wizard can create the control for you. Simply click the Control Wizards button on the Toolbox, and then add the combo box to the form.
Your goal is to populate the combo box with two columns. The first column contains the customer IDs, and its width is 0. The second column contains customer names, and its width is appropriate for displaying these names. When the user opens the combo box, he or she sees the customer names. However, when the user makes a selection, the combo box assumes the value of the CustomerID corresponding to the selected customer. You need to understand this distinction because the query must use the CustomerID value and not the customer name as a criterion value. The following SQL statement for the qprHistoryFromComboBox query reinforces this point. Notice that the WHERE clause sets the cboLookup control on the frmComboBoxLookup form to CustomerID—not CompanyName.
SELECT Customers.CompanyName, [Order Details].ProductID,
Sum([Order Details].Quantity) AS TotalQuantity
FROM (Customers INNER JOIN Orders
ON Customers.CustomerID = Orders.CustomerID)
INNER JOIN [Order Details]
ON Orders.OrderID = [Order Details].OrderID
WHERE Customers.CustomerID=Forms.frmComboBoxLookup.cboLookup
GROUP BY Customers.CompanyName, [Order Details].ProductID
The preceding samples in this section suffer from two weaknesses. First, they pass values to and expose values from queries in Datasheet view. This means that users can inadvertently damage the query's design. Second, a user can modify the data underlying a query.
The sample lookup form at the top of Figure 5-19 remedies both of these deficiencies by using VBA and ADO. The input form has the same look and feel as the form in Figure 5-18. While the result sets of the queries opened by both forms are identical, they are displayed in different ways. The sample in Figure 5-19 displays its result set in message boxes rather than in a query window in Datasheet view. (The sample uses as many message boxes as necessary to display its result set.) This protects the underlying data from inadvertent damage by a user.
The following procedure fires on the AfterUpdate event of the combo box in Figure 5-19. It executes a command based on a query to develop a result set. It then assigns the result set from the command to a recordset and displays the recordset using one or more message boxes.
Private Sub cboLookup_AfterUpdate()
Dim ctl1 As Control
Dim cmd1 As Command
Dim rst1 As Recordset
Dim str1 As String

'Set reference to combo box control
Set ctl1 = Me.Controls("cboLookup")
'Create and define command.
'Use combo box value in SQL string for command.
    Set cmd1 = New ADODB.Command
    With cmd1
        .ActiveConnection = CurrentProject.Connection
        .CommandText = "SELECT Customers.CompanyName, " & _
            "Products.ProductName, " & _
            "SUM([Order Details].Quantity) AS TotalQuantity " & _
            "FROM Products INNER JOIN ((Customers INNER JOIN Orders " & _
            "ON Customers.CustomerID = Orders.CustomerID) " & _
            "INNER JOIN [Order Details] ON " & _
            "Orders.OrderID = [Order Details].OrderID) " & _
            "ON Products.ProductID = [Order Details].ProductID " & _
            "WHERE Customers.CustomerID = '" & ctl1.Value & "'" & _
            "GROUP BY Customers.CompanyName, Products.ProductName;"
        .CommandType = adCmdText
        .Execute
    End With

'Create recordset based on result set from SQL string
    Set rst1 = New ADODB.Recordset
    rst1.Open cmd1, , adOpenKeyset, adLockOptimistic

'Loop through result set to display in message box(es)
'in blocks of 925 characters or less
    Do Until rst1.EOF
        str1 = str1 & rst1.Fields(0) & ", " & _
            rst1.Fields(1) & ", " & rst1.Fields(2)
        str1 = str1 & vbCrLf
        If Len(str1) > 925 Then
            str1 = str1 & vbCrLf & "Click OK to see more " & _
                "in another message box"
            MsgBox str1, vbInformation, _
                "Programming Microsoft Access 2003"
            str1 = ""
        End If
        rst1.MoveNext
    Loop
    MsgBox str1, vbInformation, _
        "Programming Microsoft Access 2003"

End Sub
I could not use the SQL code from a query window in Design view in this procedure because the SQL string for a Command object does not support lookup fields. Therefore, I added the Products table to the query design so that I could report each product's name in the result set instead of just a product ID from the Order Details table. Adding this extra table further complicated the join logic for the query. (See Chapter 4 for an introduction to the SQL statement syntax.)
A Do loop steps through the recordset sequentially and writes its contents to a string. At the end of each record, the loop inserts a carriage return and a linefeed. If the string length exceeds 925 characters, the procedure inserts a blank line and an instruction to view the continuation of the sales history for the customer in the next message box. A message box can hold just over 1000 characters. (The testmsgbox procedure in this chapter's sample database helps you determine the maximum number of characters that a message box can hold; note that each of the top 19 lines in this test routine's output contains two nonprinting characters.) Limiting additions to the current message box to 925 characters allows the message box to be filled without truncating any characters.
You can display data, such as a record, in a form, and you can even design a form so that users can view the record but not edit it. Figure 5-20 shows a pair of forms that work together to let the user view a customer's record. The user selects a customer in the frmCustomerLookup form and clicks the Show Customer In Form button to open the Customers form, which displays the customer's record. (The Allow Edits, Allow Deletions, and Allow Additions properties of the Customers form are set to No, which prevents the user from changing the data.) The user can then click the Return To Customer Lookup Form button to transfer control back to the initial lookup form. The user can also launch another lookup or exit the application from this form.
The following elegant and simple event procedure is the code behind the command button with the Show Customer In Form caption:
Private Sub cmdShowCustomer_Click()
On Error GoTo ShowCustomerTrap
Dim str1 As String
Dim str2 As String

str1 = Me.cboCompanyName.Value
DoCmd.OpenForm "frmCustomers", acNormal, , _
    "CustomerID = '" & str1 & "'"

ShowCustomerTrapExit:
Exit Sub

ShowCustomerTrap:
If Err.Number = 94 Then
    MsgBox "Select a customer in the combo box " & _
        "before attempting to open the Customer form.", _
        vbExclamation, "Programming Microsoft 2003"
Else
    str2 = "Error number: " & Err.Number & "caused " & _
        "failure.  Its description is:" & vbCrLf & _
        Err.Description
    MsgBox str2, vbExclamation, _
        "Programming Microsoft Access 2003"
End If
Resume ShowCustomerTrapExit

End Sub
The dynamic output generated to this point relies on SQL string expressions with variables. The variable values change the value returned by the SQL string. However, parameter queries are another common and powerful approach to obtaining dynamic output from Access. This section illustrates a couple of approaches to processing Access parameter queries with ADO.
Both approaches use the same parameter query, which is not a stored query in Access. By leaving the parameter query unstored, the sample demonstrates how to secure a query from anyone who can list or view the queries in a database file. A function procedure, LookupOrders, in a standard module evaluates the parameter query and returns an ADO recordset with rows based on the parameter value passed to the function procedure. The sample has the procedure in the sole standard module within the Chapter05.mdb file. By using a procedure in a standard module, multiple forms can re-use the same code.
The following listing shows the logic behind the function procedure that takes a parameter value and returns an ADO Recordset object. The procedure's parameter is a CustomerID value, such as one from the Customers table in the Northwind database. The result set from the parameter query is a set of rows listing order information for the customer specified by the parameter value. The columns in the rowset include CustomerID, OrderID, and OrderDate. The SQL string for the parameter is the CommandText property value for an ADO Command object. The procedure applies the CreateParameter method, initially discussed in Chapter 2, to instantiate a parameter for the Command object that will allow a specification of the parameter by the CommandText property.
Function LookupOrders(str1 As String) _
    As ADODB.Recordset

Dim cmd1 As New ADODB.Command
Dim prm1 As ADODB.Parameter

'Specify a parameter query cut and paste from the
'SQL view window
cmd1.ActiveConnection = CurrentProject.Connection
cmd1.CommandText = "PARAMETERS [Which customer?] Text(5); " & _
    "SELECT Customers.CustomerID, " & _
    "Orders.OrderDate, Orders.OrderID " & _
    "FROM Customers INNER JOIN Orders " & _
    "ON Customers.CustomerID = Orders.CustomerID " & _
    "WHERE (((Customers.CustomerID) = [Which customer?]))"

'Assign the value in the Text0 control to the
'parameter for cmd1
Set prm1 = cmd1.CreateParameter("[Which customer?]", _
    adVarWChar, adParamInput, 5)
cmd1.Parameters.Append prm1
prm1.Value = str1

'Execute cmd1 and return the result set
Set LookupOrders = cmd1.Execute

End Function
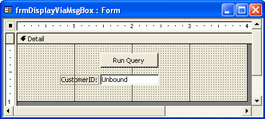
The form that displays the result set from the parameter query in a message box has three controls—text box, its matching label, and a command button (see Figure 5-21). A user inputs a CustomerID code into the text box and clicks the command button. The click starts the presentation of one or more message boxes that display the orders for the customer corresponding to the CustomerID in the message box.
The code behind the form consists of two event procedures. The Form_Load event procedure formats the form by adding a caption and removing the record selector, dividing lines, and navigation buttons. The text specifying the Caption property appears in the form's border when the form is open in Form view (Figure 5-21 shows the form in Design view). The Click event procedure for the command button, cmdRunQuery, starts by invoking the LookupOrders function procedure described previously. The return from the function procedure is a recordset that the procedure displays in one or more text boxes. Within a Do loop, the procedure displays orders in blocks of 10 each. The procedure presents any orders not displayed within the loop immediately after exiting the loop. This can occur when the last block of orders contains fewer than 10 orders.
Private Sub Form_Load()

    Me.Caption = "Show orders for CustomerID in a message box"
    Me.RecordSelectors = False
    Me.DividingLines = False
    Me.NavigationButtons = False

End Sub

Private Sub cmdRunQuery_Click()

Dim rst1 As ADODB.Recordset
Dim str1 As String
Dim int1 As Integer

'Invoke parameter query through function
'procedure
Set rst1 = LookupOrders(Text0.Value)

'Loop through the result set from the parameter
'query and form a string for display; display
'ten rows at a time
int1 = 0
Do Until rst1.EOF

    str1 = str1 & rst1("CustomerID") & ", " & _
        rst1("OrderDate") & ", " & rst1("OrderID") & _
        vbCr
    rst1.MoveNext

    int1 = int1 + 1
    If int1 = 10 Then
        MsgBox str1, vbInformation, _
            " Programming Microsoft Access 2003"
        int1 = 0
        str1 = ""
    End If

Loop

'Display any odd lot of rows in the result set
If int1 > 1 Then
    MsgBox str1, vbInformation, _
        "Programming Microsoft Access 2003"
End If

End Sub
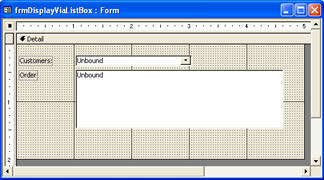
The form to display orders in a list box appears in Figure 5-22. The Combo Box control has the name cboCustomers. This control displays a list of customer names and stores the CustomerID of any customer a user selects. After the user makes a selection, the List Box control, lstOrders, displays the orders for the customer selected in the combo box. The default vertical scrollbar for the list box permits users to navigate to an order not showing in the control's window.
Two event procedures behind the form in Figure 5-22 enable the functionality described for the form, as well as format the layout of the form. The Form_Load event procedure populates cboCustomers with CustomerID and CustomerName column values from the Customers table. The load event procedure also specifies a Value List as the RowSourceType property for lstOrders. This setting enables the code to populate the lstOrders control with the values from the recordset returned by the LookupOrders procedure, instead of relying on an Access object such as a stored query. The Form_Load procedure closes by formatting the form. For example, it assigns a Caption property to the form declaring that the procedure displays orders in a list box.
The cboCustomers_AfterUpdate event procedure populates lstOrders with the orders for the customer selected in cboCustomers. The event procedure performs three tasks. First, it invokes the LookupOrders procedure to return a recordset with the orders for the customer selected in cboCustomers. Next, the procedure clears any prior contents for the RowSource property of the lstOrders List Box control. This prepares lstOrders to show just orders for the last selected customer from cboCustomers. Finally, the procedure iterates through the rows of the rst1 recordset and adds them one at a time to lstOrders. The AddItem method for List Box controls facilitates this objective. In order for this process to work, it is also necessary for the control's RowSourceType property to equal Value List. Here's the listing for the code behind the form in Figure 5-22.
Private Sub Form_Load()

'Initialize cboCustomers control
With cboCustomers
    .RowSource = "SELECT CustomerID, " & _
        "CompanyName FROM Customers"
    .BoundColumn = 1
    .ColumnCount = 2
    .ColumnWidths = "0 in; 1.75 in"
    .Width = 2880
End With

'Assign Value List as RowSourceType property
'for lstOrders
lstOrders.RowSourceType = "Value List"

'Format form
Me.Caption = "Show orders for customer in a list box"
Me.RecordSelectors = False
Me.DividingLines = False
Me.NavigationButtons = False

End Sub

Private Sub cboCustomers_AfterUpdate()
Dim rst1 As ADODB.Recordset

'Open recordset based on selection for
'cboCustomers
Set rst1 = LookupOrders(cboCustomers.Value)

'Clear prior RowSource property setting
'for lstOrders
lstOrders.RowSource = ""

'Loop through the result set from the parameter
'query and form a string for display in listbox
'control
Do Until rst1.EOF
    str1 = rst1("CustomerID") & ";" & _
        rst1("OrderDate") & ";" & rst1("OrderID")
    lstOrders.AddItem str1
    rst1.MoveNext
Loop

End Sub
The Microsoft Graph 2000 Chart object makes it easy to create professional-looking charts. (The Chart object is a mature Access development feature available since the first version of Access.) The object, which sits in an OLE Unbound Object Frame control on a form, can be bound to Access tables and queries, and you can choose from a wide selection of graph types and formatting options. (Double-click the object on a form in Design view to expose the custom menu for the object. When you finish using the Chart object's custom menu, click on the form outside the object to restore the normal Access form Design menu.)
You can add a Chart object manually, but using the Chart Wizard is easier. Simply follow these steps:
Click the Forms object in the Database window and then click New.
In the New Form dialog box, select Chart Wizard and the table or query on which your chart will be based, and then click OK.
On the first page of the Chart Wizard, select the fields that will be on your chart datasheet and then click Next.
Select the chart type and click Next.
Drag and drop the desired field buttons to the chart and click Next.
Select the Modify The Design Of The Form Or The Chart option and click Finish.
You can add aggregation and formatting functions by modifying the SQL statement in the RowSource property for the unbound object control containing the Chart object. (The wizard creates a SQL statement for you.)
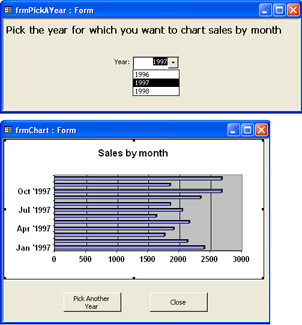
Figure 5-23 shows two forms that let the user chart sales for a selected month. The top form lets the user select any year in the Orders table. The combo box's AfterUpdate event opens the bottom form, which uses the Microsoft Graph 2000 Chart object to display total sales quantity by month for the specified year. In Figure 5-23, the chart is based on a query that retrieves all orders from the specified year. The query translates each order date to the first of its month. (The underlying data remains unchanged.) This makes it simple to aggregate sales quantity by month, which in turn makes it easy to chart sales quantity by month. (The Chart Wizard automatically sums sales quantity by month for a record source such as this.)
The following three event procedures control the interaction between the two forms. The cboPickAYear_AfterUpdate procedure loads the charting form and minimizes the form in which the user selects a year. (You must minimize instead of close this form because the query for the chart determines what year the user selected using the combo box on the first form.)