Creating an unbound combo box on a form is a very popular technique for controlling the flow of an application. Users make a selection from a combo box to launch a second form. When the list of values for a combo box is very large, your application can use multiple combo boxes so that users pick from two or more combo boxes to control the flow of an application. Replacing a single combo box with two combo boxes can speed the operation of an application by avoiding a long wait for a single combo box to display a list.
This section illustrates several different approaches to working with unbound combo boxes. An unbound combo box shows the values from a field in a record source, but it doesn't enter values into that field when users make selections from the control. The section initially revisits using the Combo Box Wizard with SQL Server. Being able to use such a lowly tool with a database as advanced as SQL Server is a major breakthrough. This capability minimizes the complexity of building solutions based on an advanced database manager such as SQL Server. This section also illustrates multiple ways to build combo box solutions with code, including writing a procedure that actually creates an event procedure.
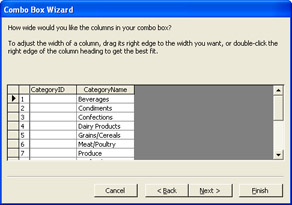
You can invoke the Combo Box Wizard from a blank form in Design view. Open the Toolbox, and select the Control Wizards button. Recall that you can show the name for a control in the Toolbox, on toolbars, and elsewhere by holding the cursor over the control. Next click the Combo Box control in the Toolbox, and then click on a central area on the blank form. The Combo Box Wizard dialog box opens. The features of this dialog box are mostly identical to those in the dialog box for Access database files. Make the selections for a combo box that shows the CategoryName but saves the CategoryID column values from the Categories table. Instead of having a check box to hide the first column with CategoryID, you must drag the column width to an extent of zero to hide the column. See Figure 12-7 for an illustration of this process. By dragging the CategoryID column border to the left margin, you hide this column even while Access saves the CategoryID value after a selection from the combo box.
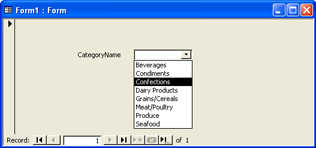
After using the Combo Box Wizard as just described, you'll have a form that resembles Form1, contained in the Access project for this chapter. Figure 12-8 shows the sample combo box created by this process. Although the combo box allows you to select items from a list, nothing happens after you do so. To enable some action based on a selection from the combo box, you need an AfterUpdate event procedure. In this section, I'll describe a couple of approaches to building this type of event procedure, and I'll show the event procedure performing a couple of different tasks.
Programming a combo box with an event procedure on a form involves three steps. First, you create the form. Second, you add the combo box control to the form. Third, you program the addition of an event procedure for the combo box.
The next VBA sample contains three procedures for programmatically creating a blank form with a designated name. The main routine, CreatefrmForCbo, calls the other two procedures. The first called procedure drops a prior version of the form, if it exists. The second called procedure creates the new form and assigns it a specific name. Before calling either of the other procedures, the main routine assigns the string variable frmName, the name of the new form.
The Drop_a_form procedure loops through the AllForms collection. If the procedure finds a form that has the name created by the sample, it attempts to delete the form from the Access Database window by using the DeleteObject method for the DoCmd object. Before invoking the method, the procedure closes the form. This step is necessary because Access cannot delete an open form. If the form is already closed, Access ignores the request to close it.
The Create_a_form procedure adds a form to the application based on the default template. The CreateForm method accomplishes this task but doesn't offer a way to assign a name to the form. Therefore, the procedure saves the default name and closes the form to save it. Next the procedure selects the form with the default name in the Database window and renames the form with the value of the string saved in frmName. In this instance, the new form assumes the name frmForCbo.
Sub CreatefrmForCbo()
Dim frmName As String

'Create a form for programmatically specified
'combo box
frmName = "frmForCbo"
Drop_a_form frmName
Create_a_form frmName

End Sub

Sub Drop_a_form(frmName As String)
Dim obj1 As AccessObject

'If form exists, close it and delete it
For Each obj1 In CurrentProject.AllForms
    If obj1.Name = frmName Then
        DoCmd.Close acForm, obj1.Name
        DoCmd.DeleteObject acForm, obj1.Name
    End If
Next obj1

End Sub

Sub Create_a_form(frmName As String)
Dim frm1 As Form
Dim str1 As String

'Create form and close it with a default name
Set frm1 = CreateForm
str1 = frm1.Name
DoCmd.Close acForm, str1, acSaveYes

'Change from default (str1) to custom name (frmName)
DoCmd.SelectObject acForm, str1, True
DoCmd.Rename frmName, acForm, str1

End Sub
The next step is to add a combo box to the programmatically created form. The two procedures in the next sample illustrate this. The first procedure simply passes a name to the second procedure. Then the second procedure uses the name to open a form to which it will add a combo box. If the code is passed the name of a form with controls that already exist, the procedure removes each control on the form by invoking the DeleteControl method. When the procedure finishes looping through any existing controls on the form, it invokes the CreateControl method to add a new combo box to the form named by the value frmName. After adding the combo box control, the procedure makes two types of settings for the combo box. The first pair of settings positions the combo box on the form. The settings for the control's Left and Top properties are offsets in twips from the form's left and top borders. The next five settings for the combo box control specify a combo box that shows CategoryName but saves CategoryID from the Categories table. Once the combo box settings are complete, the procedure saves the changes to the form. Just before closing, the procedure asks whether the user wants to show the form. Because the procedure can add a control to a form in Design view only, this final prompt gives Access an opportunity to reopen the form in Normal view if the user wants to preview the form with its new combo box control.
Sub CallAddUnboundCboToForm()
Dim frmName As String

'Call a procedure to add a combo box to form
frmName = "frmForCbo"
AddUnboundCboToForm frmName

End Sub

Sub AddUnboundCboToForm(frmName As String)
Dim frm1 As Form
Dim ctl1 As Control
Dim cbo1 As ComboBox

'Open the form in Design view
DoCmd.OpenForm frmName, acDesign
Set frm1 = Forms(frmName)

'Remove all controls from the form
For Each ctl1 In Forms(frmName).Controls
    DeleteControl frmName, ctl1.Name
Next ctl1

'Add a new combo box
Set cbo1 = CreateControl(frmName, acComboBox)
cbo1.Left = 2880
cbo1.Top = 720

'Assign combo box settings
cbo1.RowSourceType = "Table/View/StoredProc"
cbo1.RowSource = _
    "SELECT CategoryID, CategoryName FROM Categories"
cbo1.ColumnCount = 2
cbo1.ColumnWidths = "0,2"
cbo1.BoundColumn = 1

'Save settings
DoCmd.Close acForm, frm1.Name, acSaveYes

If MsgBox("Do you want to show form?", _
    vbYesNo, _
    "Programming Microsoft Access 2003") = vbYes Then
    DoCmd.OpenForm frmName
End If

End Sub
The last step is to add an event procedure to the combo box programmatically. The next sample illustrates one direct way to accomplish this. Again, the first procedure just passes a form name to the second procedure, which programs the event procedure for a combo box on the form.
The second procedure in this sample starts by opening the form with the name passed to it. Next the procedure clears any lines of code in the module behind the form. Then it searches through the controls on the form for a combo box. Actually, it searches for all the combo boxes on the form, but because the form has just one combo box, the set of all combo boxes contains just that one combo box. When the procedure finds the combo box, it invokes the CreateEventProc method to add an AfterUpdate event procedure to the combo box. This method takes two arguments. One is a string that names the type of event procedure. The second argument is another string that represents the name of the control to which you'll add the event procedure. The InsertLines method for a module object writes the code to the module behind the control's form. The procedure's first line creates a string that denotes a filter for opening a form based on the selected item in the combo box. The procedure's second line specifies the opening of the frmProducts form and references the filter from the first line. This event procedure programs the frmProducts form to display only products from the category selected in the combo box.
The second procedure concludes by opening the form with the combo box so that you can try out the application. Switch from the Code window to the Access application environment so that you can use the combo box to open the frmProducts table for a single category of products. Here's the syntax for the procedures just described.
Sub CallAddAfterUpdateEvent()
Dim frmName As String

'Call a procedure to add an AfterUpdate event procedure
'to a combo box
frmName = "frmForCbo"
AddAfterUpdateEventToCbo frmName

End Sub

Sub AddAfterUpdateEventToCbo(frmName As String)
Dim frm1 As Form
Dim cbo1 As ComboBox
Dim ctl1 As Control
Dim mdl1 As Module
Dim str1 As String

'Open the form in Design view
DoCmd.OpenForm frmName, acDesign
Set frm1 = Forms(frmName)

'Set reference to module for form, and delete
'all previously existing procedures
Set mdl1 = frm1.Module
mdl1.DeleteLines 1, mdl1.CountOfLines

'Add event procedure to open frmProducts for the
'category selected in the combo box; loop through form
'controls to find combo box
For Each ctl1 In frm1.Controls
    If TypeOf ctl1 Is ComboBox Then
        lngReturn = mdl1.CreateEventProc("AfterUpdate", ctl1.Name)
        mdl1.InsertLines lngReturn + 2, _
        "str1 = " & _
        """CategoryID = """ & " & Cstr(" & ctl1.Name & ".Value)"
        mdl1.InsertLines lngReturn + 3, _
         "DoCmd.OpenForm ""frmProducts"", , , str1" & vbCr
    End If
Next ctl1

'Save settings and reopen form in Normal view
DoCmd.Close acForm, frm1.Name, acSaveYes
DoCmd.OpenForm frmName

End Sub
This sample writes the AfterUpdate event procedure listed next for the combo box named Combo3. The procedure that writes the event procedure never actually searches for a control with this specific name. It merely searches for combo boxes. If you want to update a specific combo box, you can reference its name as well as the type of the control inside the loop within the procedure that writes the event procedure. Notice that the completed event procedure has two lines. Compare their construction with that of the sample that writes them, to see the string syntax rules for constructing event procedures programmatically.
Private Sub Combo3_AfterUpdate()

str1 = "CategoryID = " & CStr(Combo3.Value)
DoCmd.OpenForm "frmProducts", , , str1

End Sub
Instead of opening a form based directly on a combo box selection, you sometimes will want to base a form (either directly or indirectly) on two or more combo box selections. The sample in this section shows how to generate the list for a second combo box depending upon the selection made in an initial combo box. Only the selection from the second combo box is directly used to open the form.
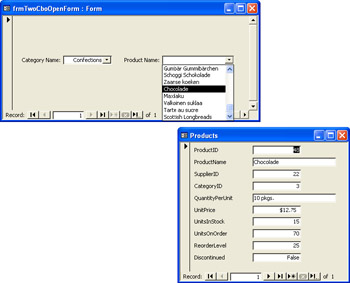
The frmTwoCboOpenForm form in the sample Access project for this chapter contains a couple of combo boxes. The first combo box lets a user pick from a list of category names. The list for the second combo box shows products just for the category selected in the first combo box. After a user selects a product from the second combo box, frmTwoCboOpenForm opens frmProducts for the specific product selected. Figure 12-9 shows how the combo boxes and forms work together. In the figure, the user initially picks the Confections category from the first combo box. This sets the source for the second combo box to show only products in the Confections category. If a user chooses Chocolade in the second combo box on frmTwoCboOpenForm, frmProducts will open and display detailed product data for Chocolade. The caption for frmProducts is Products.
To make the frmProducts form show another product, close the form by clicking its top right Close control. Then make new selections from first and second combo boxes on frmTwoCboOpenForm. Making a selection from the first combo box is optional. If you do make a new selection in the first combo box, it will alter the selection list for the second combo box. After making a selection from the second combo box, frmProducts will reopen to the new product selection for the second box.
I created this sample by adding two combo boxes to a form (without using the Combo Box Wizard). In fact, the second combo box is just a duplicate of the first one. You can create such a copy with the Edit, Duplicate command from the form Design view menu bar. Figure 12-10 shows the combo boxes in Design view. Because you're just creating one combo box and then duplicating it, this design is quick to set up manually. The code behind the form does all the formatting and makes all the data assignments for the combo boxes.
Aside from adding the combo boxes and positioning them in the style of those shown in Figure 12-10, the sample depicted in Figure 12-9 requires one more manual setup step—assigning names to the combo boxes and their labels. Use the Name property setting on a control's Properties dialog box to assign the control a name. The names for the first label and combo box are lblCategoryName and cboCategoryName, respectively. The names for the second label and its combo box are lblProductName and cboProductName.
The following three event procedures drive the application. The Form_Open event procedure formats the two combo boxes and makes the data assignments for the first combo box, which displays the list of categories. Recall that this combo box displays values from the CategoryName column in the Categories table but saves values from the CategoryID column. The code for this in the Form_Open event procedure relieves a developer from having to use the Combo Box Wizard to add the control. It also eliminates the need to manually make assignments in the combo box's Properties dialog box to control its selection list.
Formatting the combo boxes might be the most novel feature of the Form_Open event procedure. This is because of the way the code positions controls in relation to one another. In addition, this event procedure uses an assortment of combo box and label control properties. The procedure positions the label control for the first combo box 60 twips from the form's left border. It also assigns a width and caption for the label and right aligns the caption in the control. Next the procedure arranges the first combo box so that its left border begins 60 twips beyond where its label ends. After setting the selection for the first combo box, the procedure positions the label for the second combo box. This label starts 40 twips to the right of where the first combo box ends. The label control width for the second combo box matches the width of the label control for the first combo box. The code right aligns the caption for the second label—just like the first one. The second combo box itself is wider than any of the other three controls, but the second combo box begins 60 twips beyond the right edge of its label control—just like the first combo box. After setting the position of the second combo box, the procedure concludes by clearing the combo box Value property, which reveals its display.
Private Sub Form_Open(Cancel As Integer)
Dim ctl1 As Control
Dim cbo1 As ComboBox
Const conAlignRight = 3

'Position CategoryName label 60 twips from form's
'left border and 1 inch (1440 twips) wide
Set ctl1 = Me.lblCategoryName
ctl1.Left = 60
ctl1.Width = 1440
ctl1.Caption = "Category Name:"
ctl1.TextAlign = conAlignRight

'Set CategoryName combo box to start where text box ends,
'and set combo box's width to 1 inch (1440 twips)
Set ctl1 = Me.cboCategoryName
ctl1.Left = 60 + Me.lblCategoryName.Left + _
    Me.lblCategoryName.Width

'Assign data/display settings for CategoryName combo box
ctl1.RowSourceType = "Table/View/StoredProc"
ctl1.RowSource = _
    "SELECT CategoryID, CategoryName FROM Categories"
ctl1.ColumnCount = 2
ctl1.ColumnWidths = "0,2"
ctl1.BoundColumn = 1

'Position ProductName label 40 twips from right edge of
'cboCategoryName and 1 inch (1440 twips) wide
Set ctl1 = Me.lblProductName
ctl1.Left = Me.cboCategoryName.Left + _
    Me.cboCategoryName.Width + 40
ctl1.Width = Me.lblCategoryName.Width
ctl1.Caption = "Product Name:"
ctl1.TextAlign = conAlignRight

'Set ProductName combo box to start where text box ends,
'and lengthen combo box to 1.5 inches (2160 twips)
Set ctl1 = Me.cboProductName
ctl1.Width = 2160
ctl1.Left = 60 + Me.lblProductName.Left + Me.lblProductName.Width
ctl1.Value = ""

End Sub
Whereas the Form_Open event procedure configures the layout of controls and the contents of the selection list for the first combo box, the two AfterUpdate event procedures make the form responsive to user input. Making a selection from the cboCategoryName combo box assigns an SQL string as the RowSource property to the cboProductName combo box. The cboCategoryName_AfterUpdate event procedure enables this as well as other actions. The SQL string for the cboProductName RowSource property relies on the value in the cboCategoryName combo box to filter the product names that appear in the cboProductName combo box. Other assignments in the cboCategoryName_AfterUpdate event procedure enable the cboProductName control to show ProductName column values but save ProductID column values.
Private Sub cboCategoryName_AfterUpdate()
Dim ctl1 As Control

'Assign data/display settings for ProductName combo box
'based on CategoryName combo box selection
Set ctl1 = Me.cboProductName
ctl1.RowSourceType = "Table/View/StoredProc"
ctl1.RowSource = _
    "SELECT ProductID, ProductName FROM Products " & _
    "WHERE CategoryID = " & Me.cboCategoryName
ctl1.ColumnCount = 2
ctl1.ColumnWidths = "0,2"
ctl1.BoundColumn = 1

End Sub
The cboProductName_AfterUpdate event procedure is very simple. It creates a string for identifying a single product that appears in the frmProducts form. This string depends on the value a user selects from the cboProductName list. The event procedure uses that string as an argument for the OpenForm method to show the frmProducts form with the selected item from the cboProductName list.